Scratch USS Moebius Original Design / Scratch Built
Scratch - USS Moebius {Scratch}
Contributed by Todd Mullin
| Manufacturer: | Scratch |
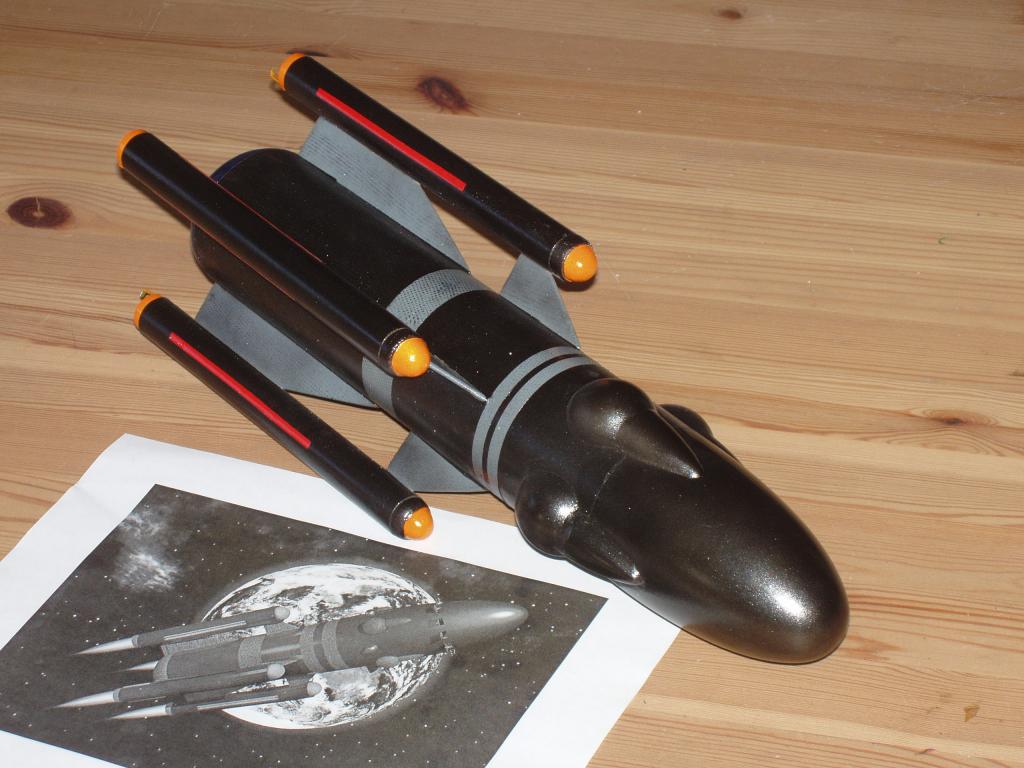
Click on Pics to Enlarge I loved EMRR's new "Spaceship Design Contest", but in the beginning, I wasn't excited by any of the designs. But, over the weeks that followed, I rotated the pictures on my desktop wallpaper and studied each for a few days and finally settled on this design. I thought that the outboard motors would be an interesting challenge that I had not tried before. This design reminds me of the look of the ships of Star Trek, though somewhat "lower tech" looking. Probably around the time of the "Enterprise" series and an early Star Fleet tug or supply ship from its looks. Working with that line of thought, as many of the ships in the Star Trek universe are named after famous scientists and scholars, I decided to name this rocket the USS Moebius. I started out the design process by firing up my handy-dandy copy of Rocksim. I got the basic model built and looking pretty good, I thought. However, there was one little problem... Rocksim said it was totally unstable even with several ounces of nose weight! At this point, I decided to go ahead and build the rocket that, with my many years of experience, I was pretty sure would be stable. I decided that I would use an old Estes Fat Boy nose cone that I had kicking around after my last Fat Boy lost it's match with gravity. This provided the scale for the design and the rest was scaled to look proportional to the picture. I decided to keep the design as simple as possible and pop the nose cone on each nacelle instead of trying to passport the ejection charge to push out the main nose cone. Due to the nagging feeling in the back of my head created by Rocksim, I decided to go with 13mm motors instead of the larger 18mm to cut back the weight on the tail end as much as possible. This rocket provided me with an interesting new challenge as well. To get the nose cones for the nacelles to look right, I would either need to use a BT-5 stuffer tube inside of the BT-20 nacelles to get the correct look, or try to turn the cones. I up until this point had been highly intimidated by the though of trying to turn cones for myself. For some reason, the process seemed much more daunting than it actually (if you'll pardon the pun) "turned" out to be! I cut a chunk of balsa to 1"x1"x1" and CA'd a piece of hard wood dowel into one end. I chucked this into my drill after it cured and locked the drill in the "on" position. I let the drill rest on the ground and held the dowel as it turned (I'd recommend gloves for this...friction burns are nasty...) and used some 80 grit paper to slowly round the balsa into shape. The first one came out amazingly perfect! I was floored! The came the harder part.... Making three more that were identical.... Heady with my initial success, it took a couple extras to get four that were suitably close enough for use. If you have not tried this because it seems to "scary", give it a shot. The process is reasonalby simple to grasp, but it is definitely an artform. Give it a little practice and it is really rewarding! I also had to turn the tailcone for the Moebius as well. This was somewhat easier as I was able to trim the diameter of the balsa to match the tube before I started turning. After turning, I glued the cone flush without it having a shoulder. It seems to be sturdy enough to survive without the extra weight that the shoulder would have added. The rest of the build was fairly straight forward. I tacked the fins to the nacelles with CA and Tite-bond, filleting after the root bond had cured. I eyeballed the alignment of the fins onto the main airframe since my fin alignment guide wouldn't fit under the outboard pods, using the same gluing technique. I finished up where I normally start, building and inserting the mini-motor mounts into the pods. At this point, I decided it would be a good time for a swing test to make sure that I was going to have a rocket the flew in straight lines instead of loops! With a couple of ounces of sand glued into the front of the Fat Boy cone, the rocket seemed stable enough for flight! Nice to see that I haven't lost my eye for stability, even though the software said otherwise.... I took a page from the Master of the Dark Art of Rocketry, Shrox, to add the details to the nose...Ping pong balls! I cut the ends off a couple of balls, as a full half of a ball was much too large for the look of the design. I had a couple of old Alpha III cones in my parts box, so I halved them and trimmed them down to about a third of the length so that they would match up nicely with the ping pong balls. Gluing these to the airframe helped disguise the seam between the body and the nose somewhat. I filled the seams with Elmer's Fill-n-finish, sanded and primed with Kilz and sanded again. The tailcone got a coat of Rust-o-leum Metallic Blue and the airframe got a coat of gloss grey. After masking the grey stripes, I sprayed the whole model with Rust-o-leum Metallic Black. The design for the contest had a bit of a pixelated pattern to the lighter grey areas, so I laid a piece of loose weave fiberglass over the grey areas and sprayed them with the metallic black to give them a little bit of the texture from the image. The day of the launch, I had decided to not tempt the wrath of the Rocket Gods and didn't want to fly the rocket in it's finished paint. It flew in primer only... Pretty rockets make ugly flights! My initial flight was on 4 A10-3T's. I loaded the motors up and installed the igniters with and borrowed a whipclip from a buddy. All four motors lid and it jumped into the sky perfectly thanks to the high initial thrust spike of the A10's. All four nosecones popped in series, much to the delight of several children who were looking on. I had installed two streamers and a parachute, leaving one of the cones to just pop. This brought the model down reasonably quickly, but with no damage as the flight was not very high and our launch field here in San Diego is sand. I enjoyed the experience of building this rocket because of the challenge of it's outboard cluster and having to learn the new skill of turning cones. Overall a very satisfying experience. I am going to continue flying the Meobius after the contest, but in a modified configuration. I am going to glue in the nacelle nose cones. Lighting all 4 motors is more of a challenge than I would rather deal with every time I want to fly it. Since the tail cone is only surface glued to the end of the main airframe, it should be easy to remove. I'm going to install a central 24mm motor mount that will rear eject, as the nose details are glued securly over the seam at the front, making a standard ejection impossible.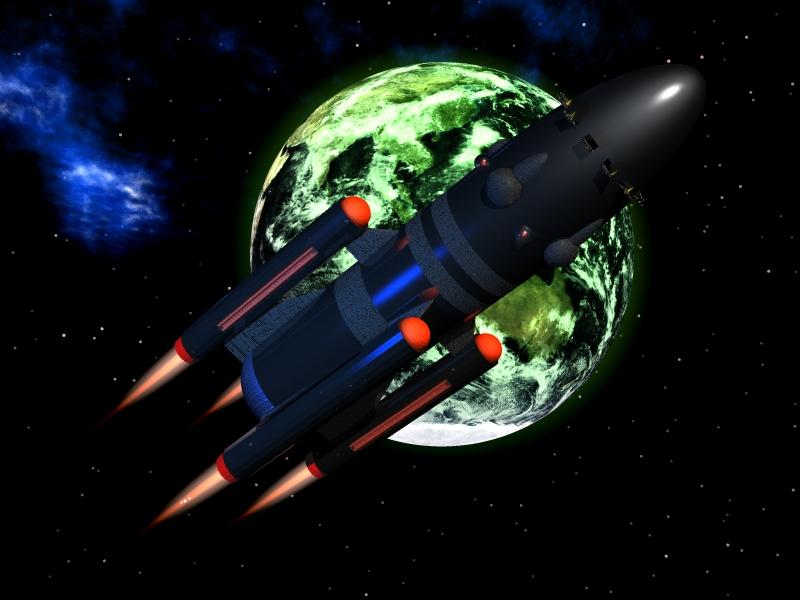


 I waited until another day to get my additional flight in. Both my second and third flights were near disasters. Only 2 or 3 of the 4 motor lit on these flights. With the reduction in thrust, the model was terribly underpowered, barely clearing the rod on the 2 motor burn. At this point, I had burned through most of my supply of A10-3t's, so I loaded only two on the next flight as well as 2 A-10PT's! This one lit perfectly, but seemed to not fly quite as high as the first flight had. After another failled flight, with this motor combination, I switched to my final flight configuration, 2 A10-3T's and 2 A3-4T's. Luckily, as these were the last mini-motors that were left in my flight box, all the motors lit. This combination was again underpowered. My thought had been that it would get more altitude because of the longer burn of the A3's, but without the initial thrust spike from 4 A10's, the flight barely ejected before impact.
Sponsored Ads


 | Intermediate Rocket Kit | Step-by-Step Instructions | Science Education Kits | Great for Teachers, Youth Group Leaders and Birthdays,Blue")

, Launch Pad/ Controller, Glue, Four AA Batteries, and Two Engines")
 |
 |