| Construction Rating: | starstarstarstarstar |
| Flight Rating: | starstarstarstarstar |
| Overall Rating: | starstarstarstarstar |

 Brief:
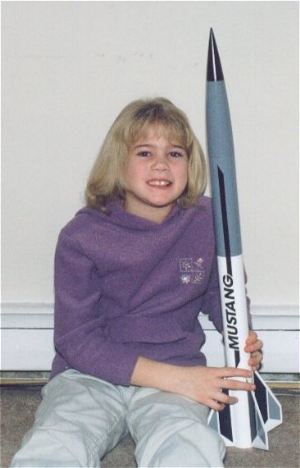
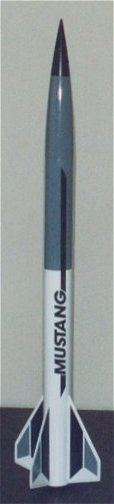
The Aerotech Mustang is a Sport model using a 1.9" body tube and is 32" in length. It has a four fin configuration and has been designed to handle motors from the E thru G range.
Construction:
Aerotech kits are like the Cadillac of model rockets and this one is no different. High quality components and rugged yet simple design are what you expect to see when purchasing one of these kits. Thick walled tube and through-the wall fin mounting are good indicators of a quality design. The model came in a colorful box which doubles as a rocket stand. Components included a 1.9" thick walled pre-slotted body tube, 29mm Motor mount with a 24mm adapter, Pre molded and tapered heavy duty plastic fins, fin inter-lok system, 16" nylon parachute, ogive nosecone, shock cord, motor retainer, buffer system and instructions. Component Rating: 5 of 5
The entire kit is assembled using medium CyA glue and construction began with building the motor mount. Fiber centering rings are placed over the motor mount ends and sandwich a fin-lok frame. The frame is really slick because it allows you to snap in the fins without having to worry about alignment. Also during this build, you install a VERY heavy duty motor retainer which resembles an Estes retainer on steroids! Once this system is assembled, you build the 24mm motor adapter as this model can fly on small 24mm RMS motors. Before inserting the mount in the tube, the buffer system is installed. They give you a chunk of wire mesh, similar to the copper coiled scotch-brite pads you can buy at the store for doing dishes. This is stretched out and inserted in the upper section of the motor mount, then a plastic cap with air slots is glued to the top of the motor tube. The purpose of the coiled material is that it buffers and absorbs the heat from the ejection charge, so no wadding is needed. Simply load the parachute and go; very nice touch! An "eye" hook is then screwed into this cap and the shock cord is tied to the hook. Once all this is prepared, the entire assembly is glued into the body tube. Make sure that your Fin-loks are aligned with the through-the-wall fin slots on the body tube.
Some CyA is added to the bottom of each fin and in the fin-lok slots, then each fin is "snapped" in place. The parachute is attached to the 6 foot long shock cord and then tied to the nosecone. This kit, like all Aerotech kits, builds fast and can be assembled in no more than a few hours at the most. No modifications or fixes to poor design are necessary as the manufacturer has taken the guess work out of building. Instructions are top notch; just follow them and you will be fine.
The nosecone was sanded next to remove molding flash, which was minimal. 220 Grit paper was used on the nosecone during this process. Construction Rating: 5 of 5
 Finishing:
Here is a hint with this model; fill the small spirals and primer the body tube BEFORE assembly and you will not have to deal with trying to sand around the fins. Make sure you sand the body tube down as it does have a glassine coat over it. I used 400 grit wet/dry sandpaper to take the "shiny" coat off so paint could adhere. Also, my spirals were so shallow that I simply used primer and sanding to fill them. Several coats of primer were applied to the tube and fins, then sanded with 400-600 wet/dry sandpaper.
Once assembled, White Testors Glossy paint was applied to the lower body tube, as I planned to follow the stock paint scheme. Something that worked well though was that I taped the upper tube so it could be painted later with the medium gray. Once the lower tube was painted with three coats of white, I removed the tape from the upper part of the tube and there was a definite "ridge" where the white paint stopped, which is what I wanted. The Testors paint does work well, as it is a bit thicker and flows together nicely.
The model was left to dry for a few days and then it was time to paint the upper body tube. I used some automobile 3M trim tape, excellent stuff to use for our hobby, and taped over the white paint even with the edge that had just been painted a dew days ago. The rest of the model was masked using masking tape and a garbage bag to cover the lower section from over-spray of the gray paint that was about to be applied. Testors medium gray glossy paint was then applied to the top portion of the body tube in three separate coats, then left to dry. When the masking was removed, the was NO RIDGE between the White and Gray paint where they met!!! This is what I was trying for and it worked out well. Once the paint has dried, the model looks like it's been plastic coated! I was pleased with the Testors paint as It was my first time using it for an entire model.
The nosecone was finished in Testors medium gray glossy and black satin Krylon was added to the tip. Decals are applied next and a large bowl of warm water with a few drops of detergent was used to dip the decals before application. This allows you to slide each decal around until it is positioned where you want it, then you can squeegee the remaining water out from underneath the decal when positioned. The final product turned out well and looks exactly like as advertised. Finish: 5 of 5
Construction Rating: 5 out of 5
Flight:
My rocket weighed in at 10.5 oz, which is right on the money for this model according to the manufacturer. Now here is the kicker. I have attended many launches and the Mustang always comes with me. Believe it or not though, I get so busy at the launches with HPR that I don't have time to prep this little beauty. I even planned at my last launch to drag race a friend of mine, Ken Parker with his Aerotech Cheetah, but we wound up never getting to it.
I did finally get to launch it; first load was a 24mm E18W-4. The motor lit instantly for a White Lightning and the Mustang soared to an altitude of around 1500 feet. It was a great launch; straight and true with the added bonus of the smoke and fire trail.
Recovery:
Parachute deployed at apogee and recovery was on. It settled down about 100 yards away without a mark. The heat buffer system for this rocket really worked well as the parachute did not have a mark on it. Three more flights occurred that day, one on another E18W, then two on 29mm RMS, an E16W and E23T. All four flights went well. This is one awesome kit!
Flight Rating: 5 out of 5
Summary:
The Aerotech Mustang is a great kit and would make a nice entry level kit into mid-power rocketry. Yes, there are a few parts, but construction is very simple. Also, this was the first kit I ever assembled using CyA glue and the only bad part was it built too fast! If you want a top notch kit though, with quality components, all I can say is buy Aerotech & Their reputation is true to form!
Overall Rating: 5 out of 5
Other Reviews
- Aerotech Mustang By Mark Fisher
Aerotech has long been known to high power rocketeers for their fine motors and sturdy kits, but not too many model rocketeers have used their products. They're a lot more expensive than the average entry level stuff; the Initiator start set isn't cheap (Discount Rocketry has it for a reasonable $115.95), nor is their Interlock Launch Controller if purchased separately (I paid $39.95 for mine, ...
- Aerotech Mustang By Kris Henderson
Brief: This is a basic 4FNC kit that flies on 29mm and 24mm motors. Construction: The kit contains one thick body tube with pre-cut fin slots and pre-cut slots for launch lugs, 4 trapezoidal plastic fins with modified double wedge airfoil, 29mm motor mount, 24mm motor adapter, plastic nose cone, long shock cord, and 16" chute. THe kit des not include a payload section. ...
- Aerotech Mustang By Darwin May
The Mustang is a single stage mid power rocket. The Mustang was my first mid power and first Aerotech kit. I opened the box to find one tube, a 5:1 ogive nosecone, 4 trapezoidal fins, and a beefy motor mount. The centering rings were made of black fiber material, very stiff. The shock cord was about 6' long. The nose was made out of plastic and was tethered to the end of the MMT by the ...
- Aerotech Mustang By Jack Caynon
Brief: Modified to incorporate anti-zipper design. Modifications: This modification doesn't require any special tools, however, it does require an Aerotech 1.9" coupler. First, I used a hacksaw to gently cut the airframe into two parts, the lower part of the airframe with the fin slots should be 10.5" long. Then I tossed aside the engine retaining hook and used a 29mm Slimline motor retainer ...
- Aerotech Mustang By Andy Tate
( Contributed - by Andy Tate - 04/10/02) Brief: Single stage mid power parachute recovery kit. Construction: Kit includes 4 "Trapezoidal with modified double wedge airfoil" fins, 1.9" body tube, Aero-Fibre" centering rings, 5:1 ogive nose cone, 6' elastic shock cord, and nylon parachute. This is extremely easy to put together. The instructions are clear ...
- Aerotech Mustang By David Kneble
( Contributed - by David Andrew Kneble - 07/20/01) Brief: The Mustang is a rugged single stage mid-power rocket. It is easy to construct and flies on a wide range of motors from D-G. it is a perfect rocket for someone trying to get into the world of mid-power rocketry. Construction: The Mustang consists of a 24mm motor adapter tude, adapter rings, an E spacer tube, a thrust ring, ...
- Aerotech Mustang By David Urbanek
Brief: Good entry level rocket for Mid-Power. There's one on every shelf on every hobby shop in America. Construction: Solid stuff through out. Thick body tube, plastic fins, plastic motor mount cage. It has a baffle and a motor clip. Initially I thought about deleting the motor clip so I could use H motors in it. Typical lack of perspective thought. I'm glad I ...
 |
 |
Flights
|
|
K.D. (January 1, 2001)
N.A. (May 1, 2001)
N.P. (November 16, 2001)
K.P. (April 12, 2002)
E.M.Z. (July 6, 2002)
P.V. (July 28, 2002)
W.L. (March 9, 2003)
D.B. (August 15, 2003)
P.T. (September 5, 2005)
Excellent kit, but it really helps to have read all these reviews first. This is my first medium power rocket and this kit is very impressive in it's quality and very rugged result. Due to limited space and gusty winds, flight has been limited to Estes E engines, but it flies great and should last a long time - however - the elastic shock card is showing some fraying and will need to be replaced which will prove very tricky. Definitely consider using a heavier (Kevlar or steel) leader from the mounting screw to the end of the body tube if you are building this kit.
G.W. (April 28, 2006)
Great kit - the reviews are right on! I started assembling mine with CA per the directions, and I managed to permanently glue the adapter in the motor tube while installing the thrust ring assembly. I should've been more careful with my CA placement in this phase. I ended up buying a replacement motor mount kit which I then assembled with epoxy. I also made a double loop Kevlar leader which was attached to the screw eye on the baffle. The Kevlar leader stopped just inside the top of the body tube, and I attached the kit shock cord to it. I've only flown it once so far on an E15-7W, but both the flight and recovery were flawless!
Sponsored Ads


|
|
C.J. (November 1, 1999)