Art Applewhite Rockets Delta Flying Saucer 38mm (18")
Art Applewhite Rockets - Delta Flying Saucer 38mm (18") {Kit}
Contributed by Dick Stafford
| Construction Rating: | starstarstarstarstar_border |
| Flight Rating: | starstarstarstarstar |
| Overall Rating: | starstarstarstarstar_border |
| Manufacturer: | Art Applewhite Rockets  |
Brief:
This was a pre-production version of the kit and its construction varied somewhat from the production model. Nonetheless, it is representative of the performance you should expect from the production model. I have tried to indicate where the production model varies, however, these notes may not be all-inclusive.
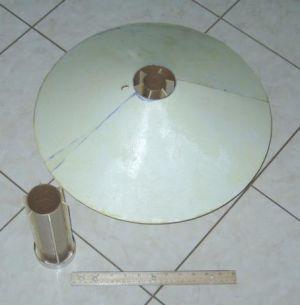
This rocket is a huge, 18" diameter, Level 2 capable version of Art's Delta saucer. It is built primarily from Gatorboard and includes both 38mm and 54mm motor adapters.
Construction:
Main saucer parts list:
- 3/16" Gatorflex, however, the production version will use standard foamboard
- 1/2" Gatorboard
- 3" paper tube
- Fiberboard
- Fiberglass cloth
- 1/4" launch lug

54mm and 38mm Motor Adaptors parts list:
- Mount tubes
- 3" thrust ring
- 3/32" Basswood fins
Materials and tools required: utility knife, X-Acto knife with new blade, spatula or other spreading tool, Elmer's Glue-All, Easy release masking tape (the blue kind), sandpaper, slow setting epoxy, and Devcon 5 minute Epoxy.
 This build is very similar to the smaller delta saucers, only bigger. The top and bottom shrouds were made from pre-marked Gatorflex and the center plate was made from the thicker and more dense Gatorboard piece. These materials are both multi-layer laminates of dense polystyrene foam, laminated with plastic and paper. The Gatorboard is laminated on both sides while the Gatorflex is laminated on only one side, allowing it to be flexible. Cutting these components was much harder than standard foamboard, so new blades, patience, and good work surface are musts. Unfortunately, the Gatorflex is no longer available, so in the production model, the top and bottom shrouds are made from standard foamboard. To make it flexible, you make numerous cuts using a provided tool, which holds a hobby-knife blade. Minus this cutting, the rest of the construction should be almost identical.
You first prepare the top shroud by wrapping it around and connecting the seams with 5-minute epoxy and the supplied fiberboard strip. Once dry, you sand the hole to fit the 3" host body tube. The bottom is prepared similarly.
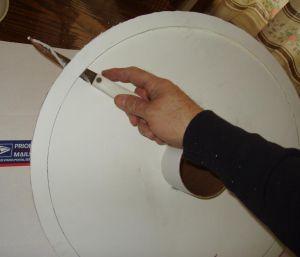 The center plate really takes some effort and should be cut in short sections. As with the smaller deltas, the edge is beveled. I didn't have the recommended knife so I used a very sharp kitchen knife, which seemed to work quite well.
In short, you glue the mount to the top, coat the inside of the top with slow setting epoxy, attach the center to the top, and finally the bottom to the center. In this beta version, the main trick was to align the holes for the launch rod. In the production model, a ¼" launch lug is glued to the inside of the 3" host tube, thus avoiding having to cut additional holes in any of the components. The removable adapters slide past this lug. After the first flight, I retrofitted a 1/2" lug.
The last step is to glass the top with the provided fiberglass sheet. This too is pre-marked. I won't go into the details here, but make sure you use slow setting epoxy as there is a lot of surface area to cover.
 For both size motor mounts, you cut the thin fins from the basswood using the provided pattern, glue them to the tube, and install the thrust ring. On the 38mm mount, I used wood glue and added epoxy fillets. On the 54mm mount, I used only epoxy.
Finishing:
I chose not to paint my saucer.
Construction Rating: 4
Flight:
This will make for a great sport flight and/or a relatively easy certification attempt. You lightly friction fit your choice of adapters and motor. The recommended motors include a wide variety of I and J motors as well as the Aerotech K185W and Ellis L330P. In the beta testing, a wide variety of motors were flown. Note that although the saucer will fly on H motors, these motors are so short that they may not allow the saucer to aerobrake properly and the saucer may be damaged if it lands on the edge of the shroud.
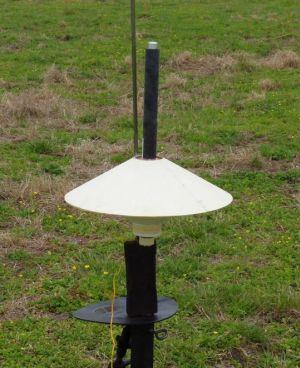

I first flew the big Delta Saucer on an Ellis J228 at the 3rd Annual TRF Reunion at the Whitakers field in NC. The saucer tore off the pad with lots of smoke and noise. It was a fantastic flight. The second flight was at a NOVAAR launch. This was a very interesting flight. The J110 had a nice long 7 second burn. Because of the low average thrust and regressive thrust profile, the saucer arched over and was still under power after apogee.

Recovery:
Big? No problem! In both cases, aerobraking brought it down softly without damage. With the longer J228, the motor and adapter unseated from the main tube upon impact. This is a feature, not a bug and may help to absorb some of the shock from the landing.
On the J110 flight, the saucer aerobraked down and continued to spew large amounts of smoke, causing some concern with the LCO. It landed in an outcrop of brush but that part of the field was damp and there was no risk of fire. The ensuing smoke cloud was described as a "mushroom cloud on the horizon". Cool! Still, I'd recommend the J228 over this motor.
Flight Rating: 5
Summary:
This is another fun rocket from The Saucerman and it will make an economical certification rocket for Level 2. The beta version was an easy build yet was still enough work that you would feel proud of your accomplishment. The production model will take a bit more time. What do you expect from a Level 2 capable rocket anyway?!
Overall Rating: 4
Other Reviews
- Art Applewhite Rockets Delta Flying Saucer 38mm (18") By Matthew McFarland
Brief: This is a beautiful HPR saucer that wows the crowd with great boosts and long aerobrake recoveries. Construction: This kit comes essentially as three kits. There are the saucer itself and two motor mount kits: one for 54mm motors and one for 38mm motors. The saucer is a single central body tube, a launch lug that mounts inside the body tube, three foam sheets, and some ...
Sponsored Ads

 |
 |