| Published: | 2010-11-13 |
| Manufacturer: | BlackSky  |

Using the blacksky rail system!
 Getting a nice, straight boost of your
high power rocket has generally meant one thing in the past -- use a rail
launcher. Unfortunately, it also meant that you were going to be building your
own, since there were no commercial units available. Consider that past
history, because blacksky has
released what is sure to be a definite hit for many clubs and individuals
looking to utilize the accuracy of rail launching -- their blacksky Standard
Rail and High Power Rail.
Getting a nice, straight boost of your
high power rocket has generally meant one thing in the past -- use a rail
launcher. Unfortunately, it also meant that you were going to be building your
own, since there were no commercial units available. Consider that past
history, because blacksky has
released what is sure to be a definite hit for many clubs and individuals
looking to utilize the accuracy of rail launching -- their blacksky Standard
Rail and High Power Rail. blacksky had offered their ProRail in the past, but the new version of the High Power Rail is completely redesigned and the newer Standard Rail an offshoot of that research -- an affordable rail for the individual flyer.
The blacksky Rail system is a "C" type rail custom extruded from 6063 aluminum alloy. A machined acetal plastic or Teflon-coated aluminum rail guide shaped like a pulley is attached to your rocket with screws. The rail guides slide along the "C" section of the rail and provides initial guidance to the airframe until a safe velocity is reached for flight.
The 6063 aluminum alloy used for the blacksky Rail System is based on a formulation of aluminum, silicon and manganese along with small amounts of iron, copper, magnesium, chromium, zinc and titanium. This alloy is designed specifically for production of precision extrusions and produces a good surface finish with excellent corrosion resistance and anodizing qualities. After extrusion, the rails are heat-treated to a T6 condition that maximizes its mechanical characteristics. Each section of rail is treated with a military spec A-8625, Type II, Black anodize. The anodize serves to seal the surface of the aluminum from the corrosive effects of rocket motor exhaust and it provides a hard, smooth surface for the Rail Guide to slide along.
 The rail guides are machined from acetal plastic rod or teflon coated
aluminum. Acetal plastic is used because of the ease of machining, its physical
strength, wear resistance and its lubricating qualities. Teflon coated aluminum
is used for its high mechanical strength and lightness. The rail guides are
drilled to accept a #8 screw which is used to mount the rail guide to the
rocket. You would use the Acetal rail guides to mount rockets ranging from
1.5" in diameter weighing half a pound to rockets over 10 inches in
diameter weighing over 50 pounds while the aluminum rail guides are suitable
for rockets weighing up to 250 pounds. A pair of rail guides is all that is
necessary for practically any rocket.
The rail guides are machined from acetal plastic rod or teflon coated
aluminum. Acetal plastic is used because of the ease of machining, its physical
strength, wear resistance and its lubricating qualities. Teflon coated aluminum
is used for its high mechanical strength and lightness. The rail guides are
drilled to accept a #8 screw which is used to mount the rail guide to the
rocket. You would use the Acetal rail guides to mount rockets ranging from
1.5" in diameter weighing half a pound to rockets over 10 inches in
diameter weighing over 50 pounds while the aluminum rail guides are suitable
for rockets weighing up to 250 pounds. A pair of rail guides is all that is
necessary for practically any rocket.
 The Standard Rail which I reviewed is a new product
from blacksky and is
manufactured in standard 24 inch lengths. These lengths can be coupled together
end-to-end by using a formed stainless steel channel and #10-24 screws and nuts
that are captured using a unique rectangular section on the back of the
Standard Rail. Two 24 inch lengths make up the Standard Rail Assembly that
includes a ¼"x 20 stainless steel pin used to couple to your
launcher. Up to four 24 inch lengths can be coupled together to create an eight
foot rail. The Standard Rail is suitable for use with practically any model
rocket and most high power rockets weighing up to 25 pounds.
The Standard Rail which I reviewed is a new product
from blacksky and is
manufactured in standard 24 inch lengths. These lengths can be coupled together
end-to-end by using a formed stainless steel channel and #10-24 screws and nuts
that are captured using a unique rectangular section on the back of the
Standard Rail. Two 24 inch lengths make up the Standard Rail Assembly that
includes a ¼"x 20 stainless steel pin used to couple to your
launcher. Up to four 24 inch lengths can be coupled together to create an eight
foot rail. The Standard Rail is suitable for use with practically any model
rocket and most high power rockets weighing up to 25 pounds.
The High Power Rail is used for those really big projects that require the "big stuff". Rockets over 20 inches in diameter and weighing over 100 pounds have been successfully launched off of the blacksky High Power Rail. blacksky states their Standard Rail is stiffer in equivalent lengths than 1/2" steel rod and their High Power Rail is stiffer than a 1" steel rod. When used as recommended, launch deflection is only a few degrees with even the heaviest projects. blacksky goes on to state, "the blacksky Rail leaves the flier no excuse - if the rocket does not fly straight ... 'rod whip' is not the reason."
 For the purposes of my review, I was headed to the site
of LDRS2000, Orangeburg, SC for their Fourth of July launch, so I decided this
would be a good time to check out the new blacksky Standard
Rail. My launch vehicle is a verteran of high impulse flight, a 2.1"
scratch-built rocket made from fiberglassed LOC tubing. It had originally seen
life as a minimum diameter rocket until I gave its previous owner, Greg Muri, a
Silver Streak to fly in it. Obviously from that batch of 54mm Silver Streaks
which like to come unglued, this one blew the forward bulkhead and proceeded to
gut the interior. When Greg discarded the remains, I quietly extracted them
from the trash and rebuilt it with a 38mm motor mount and fresh paint. On its
maiden flight (re-flight?) at LDRS17, it hit 9100 feet on an AeroTech
J570!
For the purposes of my review, I was headed to the site
of LDRS2000, Orangeburg, SC for their Fourth of July launch, so I decided this
would be a good time to check out the new blacksky Standard
Rail. My launch vehicle is a verteran of high impulse flight, a 2.1"
scratch-built rocket made from fiberglassed LOC tubing. It had originally seen
life as a minimum diameter rocket until I gave its previous owner, Greg Muri, a
Silver Streak to fly in it. Obviously from that batch of 54mm Silver Streaks
which like to come unglued, this one blew the forward bulkhead and proceeded to
gut the interior. When Greg discarded the remains, I quietly extracted them
from the trash and rebuilt it with a 38mm motor mount and fresh paint. On its
maiden flight (re-flight?) at LDRS17, it hit 9100 feet on an AeroTech
J570!
 For this particular flight, I loaded it
with an Aerotech I-161 White Lightning reload, a combination which would easily
send it to around 4,000 feet. I assembled the two piece Standard Rail easily by
slipping the rail connector into the machined slot in the back or each section
of the rail and then tightening the three #10-24 screws securely. All that was
left to be done was to install the rail in the launcher.
For this particular flight, I loaded it
with an Aerotech I-161 White Lightning reload, a combination which would easily
send it to around 4,000 feet. I assembled the two piece Standard Rail easily by
slipping the rail connector into the machined slot in the back or each section
of the rail and then tightening the three #10-24 screws securely. All that was
left to be done was to install the rail in the launcher.
I found that the stainless pin in the lower section was a little short to reach the clamp of the launch pad and ended up shimming it with a stainless steel screw to keep it perpendicular with the ground. In reading comments from others, it appears this mounting pin has been found to be a little too short for most people, something that Dean Roth apparently remedied simply by installing a longer 3/8" bolt and then cutting off the head. The stainless pin should easily unscrew if you wanted to make that change in yours.
Once the rail was mounted and the pad tilted over, the rocket was gently lowered down the rail on the guides until it rested at the bottom. I might recommend that you place your rocket gently onto the rail until both guides are within the rail grooves, as it would be very easy to gouge the finish of your airframe if you get too excited before the second rail guide is seated. When the rocket was uprighted into launch position, the firm accuracy of the rail was immediately apparent -- the rocket wasn't free to whip around the rod at the whim of the wind, something that is very important to precise placement before launch. Once the launcher was secured, the igniter leads were installed and armed.
Back at the rangehead, a quick five count led to a launch button being depressed, and the rocket soared off the rail as straight and true as if it were on a ... rail ... because it was. The blacksky rail system appeared to be everything it was claimed to be.
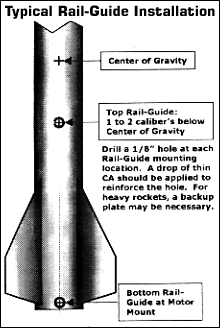 Retrofitting your existing rockets or installing rail guides on new
ones couldn't be any easier -- simply mark the location of the two guide
mounting holes, drill and install. The graphic at the left shows how to
determine where to mount your rail guides and a drop or two of CA into the
mounting holes should stiffen them enough to give the mounting screws some
teeth.
Retrofitting your existing rockets or installing rail guides on new
ones couldn't be any easier -- simply mark the location of the two guide
mounting holes, drill and install. The graphic at the left shows how to
determine where to mount your rail guides and a drop or two of CA into the
mounting holes should stiffen them enough to give the mounting screws some
teeth.
It would appear the Standard Rail is quite a bargain at $40 for the two piece kit and additional sections with securing clamp are just $20 each. For this price, a nice 8 foot rail could cost a mere $80, a small price for the accuracy and precision of launching on a rail.
The High Power Rail is even beefier and is something that you'll be stretched to overpower. It should easily handle any project you anticipate undertaking in hobby rocketry. It lists at $100 for a six foot section, so a 12 foot rail with coupler is just $215.
Additional rail guides are available -- $5 for two pair of the acetal plastic or $10 for the Teflon-coated aluminum ones.
So, if you are looking for a great, inexpensive rail system, give the blacksky Rail System a try. I think you will as impressed with it as I was, and you certainly won't miss filleting launch lugs at all!
Written and submitted by
Darrell D. Mobley for Rocketry Online -- Copyright 1996-1999
 |
 |


|
|
D.S. (October 1, 2000)