Welcome
Welcome to RocketReviews.com (formerly EMRR).
RocketReviews.com is the home of almost 5000 reviews of rocketry kits and products. Written by visitors to RocketReviews.com like you, the reviews cover everything from low-power model rocket kits to high-power rocket motors.
The site's Flight Log allows you to record and share your rockets and their flights. The Builds feature helps you document your rocketry projects.
At RocketReviews.com, you'll also find a large collection of rocketry resources such as a list of rocketry clubs, and large libraries of OpenRocket design files and Rocksim design files. A number of rocketry tools and calculators are available to help you design, build, and fly your rockets.
As you explore RocketReviews.com, you'll also find a number of fun things such as a huge library of rocketry videos and a collection of photo albums.
 |
 |
Featured Review
Scratch Little Red Max
Manufacturer: Scratch

Contributed by Brian Ray
(Contributed - by Brian Ray - 11/03/09)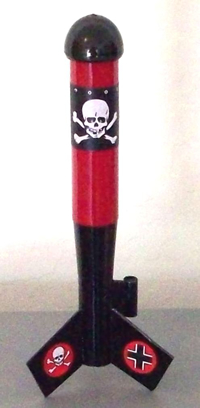
Brief:
This rocket was a leftover from a build I did for a family reunion launch. I threw together a pile of scratch rockets
and let each of the kids pick one. This one wasn’t chosen by any of the kids so I worked into a variant of the Der
Red Max. I call it the Little Red Max.
Construction:
My primary components were:
- BT-50 about 4"
- BT-20 about 4"
- Cardstock transition
- 3 downscaled Red Max fins, drawn and cut by hand.
- NC – half of an Easter egg
- Elastic shock cord.
- Hartle Engineering streamer
This was a fun build. The one thing that I sometimes struggle to remember is to mark the lower BT for fins prior to attaching the transition. It’s a pain to mark it post-transition.
The rocket is painted in a Red Max-esque theme; not exact, but an homage. The paint I used was given to me by a family member prior to their moving out of state. It’s designed for plastics – specifically for remote control cars. I was curious to see how it did on wood and paper and was pleased with the results. For me it’s prohibitively expensive to ever buy for this application.
The decals were printed on Avery label paper and sealed with Wal-Mart clear coat.
Flight:
This rocket flew just once on a C6-7. It flew high and straight. Too high, as a matter of fact. We thought we had a
bead on it as it came down but apparently not so much. Its maiden voyage was its last.
Summary:
This was a fun little rocket, especially since it became its final incarnation pretty much as an accident. And
I’ll try to remember next time that a rocket this small has a good chance of disappearing with that much motor.
Browse our database of about 4,300 reviews of rocketry kits and other products.
Sponsored Ads


")

")
|
|