| Manufacturer: | Scratch |
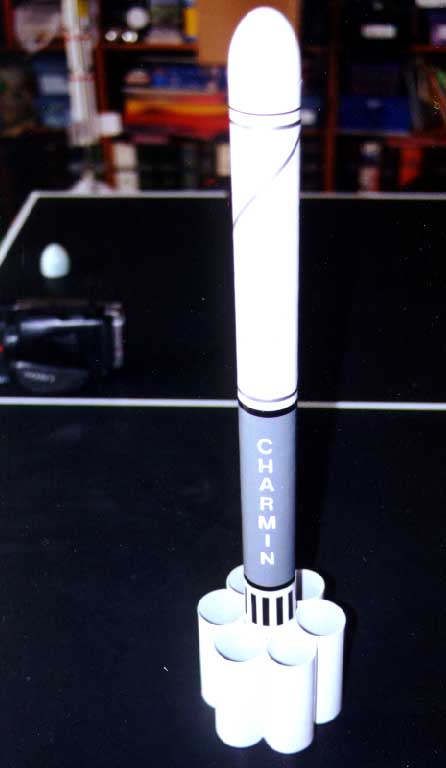
SIMPLY CHARMIN
| This is my first entry in any Descon. In keeping with the theme, I designed "Simply Charmin" with the primary goal of making its components and construction as simple as possible. "Simply" refers to its simple construction and "Charmin" relates to its origin from toilet tissue rolls.
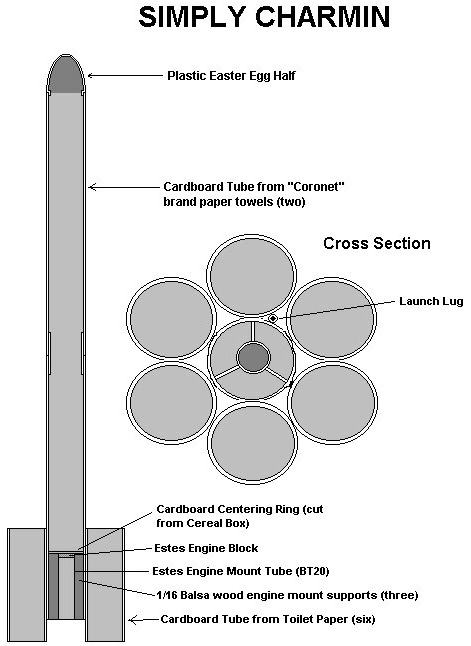
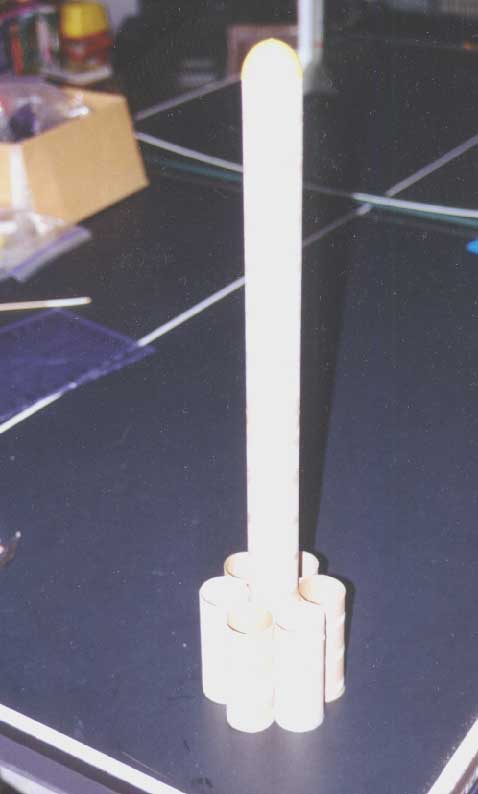
For materials, you will need several cardboard tubes from toilet tissue and paper towels and one medium sized generic plastic easter egg (I got a dozen at ToysRUs for 18 cents). You will also need some scrap balsa wood, a short length of BT-20 tubing, parachute and shock cord material. The body tube is constructed from two paper towel tubes coupled together. The nosecone is constructed from the easter egg. You can use just the half with the inner lip or construct a more streamlined and heavier version by cementing the two halves together (explained in the assembly instructions). The tube fins are toilet tissue rolls. The most complicated aspect of this project is assembling the engine mount. Not all cardboard tubes are suitable however. I have found some that are just the perfect diameter for mating with the easter egg ("Coronet" brand paper towels and "Quilted Northern" brand toilet tissue). These have a diameter of approximately 1.75 inches. Some tubes are just a bit smaller at 1.70 inches but these are good for use as couplers ("Charmin" brand). I'm sure there are other brands that are suitable. There is also a difference in quality. The "Coronet" and "Northern Quilted" tubes are constructed quite well and are much thicker and more substantial than those from say "Charmin", this rocket's namesake. |
 click to enlarge |
VITAL STATISTICS:
Height: 24.75 inches
Diameter: 1.75 inches
Weight: 4.9 ounces
Engine: C5-3 only
Altitude: 250 feet
 Components and Aft View of Assembled Rocket |
COMPONENTS:
2 - cardboard tubes from "Coronet" brand paper towels (or other 1.75" dm tube).
7 - cardboard tubes from "Quilted Northern" brand toilet tissue (or other 1.75" tube).
1 - medium sized generic plastic easter egg (mine was purchased from TRU).
1 - 2.75" BT-20 engine mount tube (I had a spare from a kitbashed Estes kit).
1 - Engine thrust ring (Estes BT-5 to BT-20 heavy duty centering ring).
1 - 3.50" small diameter plastic straw (for the launch lug).
1 - Estes plastic 18" parachute (with optional snap swivel).
some cereal box cardboard (for centering rings)
some scrap 1/16" balsa sheet (to mount the engine tube)
some scrap styrene plastic sprue (to construct an eyelet for the shock
cord/parachute)
some ? inch elastic (for the shock cord)
some modeling putty.
ASSEMBLY:
1) Construct the body tube by coupling two paper towel tubes together end-to-end using a portion of one of the toilet paper rolls as a coupler. You can smear a thin coat of white glue over the interior and exterior of the tube ends to add strength and to remove rough and fraying edges (same for the toilet paper rolls).
2) Glue six toilet paper rolls around the base of the body tube for tube fins (make sure they project one inch below the base of the body tube).
3) Glue the engine thrust ring inside one end of the engine mount tube.
4) Precisely measure and cut out three 2.75" x 0.45" pieces of 1/16" balsa sheetwood and glue them longitudinally onto the sides of the engine mount
tube at one third intervals.
5) Trace and cut out a centering ring utilizing cereal box cardboard and glue it to the end of the engine mount tube facing the interior of the rocket
(optional - trace and cut out a second centering ring to be glued to the aft end of the engine mount). This purpose of this centering ring is to seal off the aft end of the body compartment and not to support the engine mount.
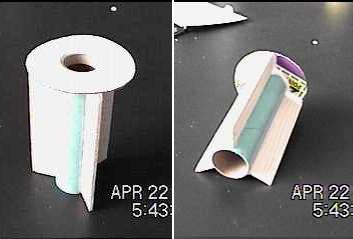
Motor Mount
6) Glue the finished engine mount assembly into the base of the body tube.
7) Glue the plastic straw between two of the toilet paper tolls and the body tube to serve as a launch lug.
8) Construct the nose cone by cementing the more convex half of the plastic easter egg to the less convex half.
9) Apply putty (I used Squadron Green Putty) around the gap between the two egg halves, sand smooth when dried.
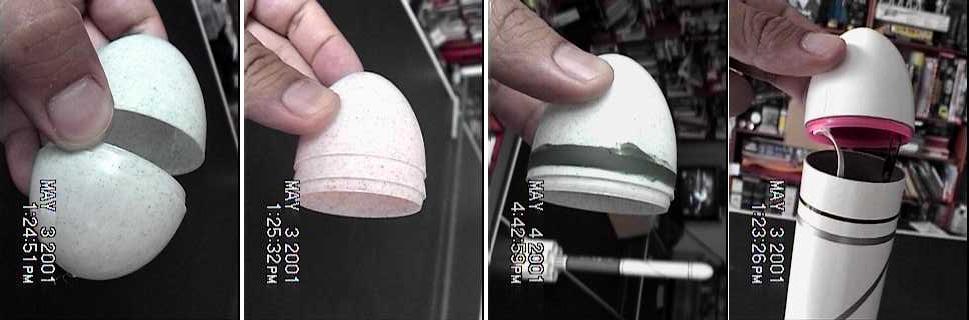
Nosecone Fabrication (click image to enlarge)
10) Bend plastic sprue into a U-shape, cut and cement inside the easter egg nosecone (optional - use scrap plastic Estes E2X launch lugs).
11) Cut a 3 foot length of ? " elastic (optional - use ? " elastic or kevlar) for the shock cord; mount inside body tube using method of your own choice. Tie the other end to the easter egg nosecone.
12) Tie parachute (or use a snap swivel) to the easter egg nosecone.
13) Optional step: prime and paint the rocket.
14) Optional step: to reduce the "Krushnic" effect on the engine thrust, use scissors to cut away the interior sections of the tube fins protruding beneath the base of the body tube.
Charmin' before painting
FLIGHT REPORT:
"Simply Charmin" weighs a hefty 4.9 ounces without the engine (this is largely due to the numerous coats of primer and paint that I applied) so the only engine that can be used safely is a C5-3. If you left this rocket unpainted and used a simpler easter egg nosecone, a ounce or more could be shaved off its weight and it might then be eligible for a C6-3. I preferred to give it a smooth and glossy finish and the appearance of a commercial satellite launch vehicle. The additional primer and paint also significantly strengthened the tubes. There is no need to add nose weight as the CG falls more than one body tube diameter ahead of the CP (calculated using VCP and confirmed by the flight test).
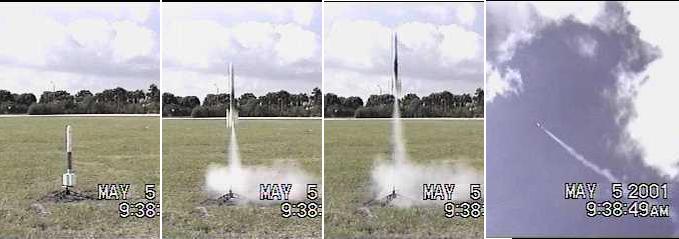
"Simply Charmin" flew for the first time on May 5, 2001 on a breezy day with wind gusts up to 25 mph. Not ideal flying weather but I had to test its flightworthiness before the current Descon deadline. Between gusts of wind and despite it, "Simply Charmin" flew straight up with no weathercocking at all. By eye, it looked like it reached about 250 feet, maybe a bit higher. The ejection charge went off right at apogee and because of the wind, she drifted about 300ft down range on its 18 inch parachute. She was recovered in perfect condition and sent up a second time because I failed to capture a good picture of the first launch with my video camera. Again, there was a straight flight and perfect recovery. There is something inherently superior to tube fins over straight fins and I am going to start experimenting with them in my future rocket designs.
Sponsored Ads


")

")
 |
 |