| Diameter: | 1.33 inches |
| Length: | 30.50 inches |
| Manufacturer: | FlisKits  |
| Skill Level: | 4 |
| Style: | Futuristic/Exotic |
 Brief:
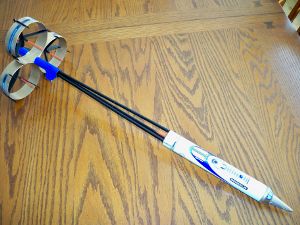
The Borealis is not only a unique looking rocket, it also provides a unique construction challenge. A quick look at the rocket suggests fragility, but don't be fooled. If properly assembled (the instructions provided are excellent), this is in fact an extremely durable kit. Appearances are also deceiving in terms of flight characteristics. This rocket gets off the pad quickly, flies great, and does well with both recommended engine types, making it a crowd pleaser on both large and small fields.
Construction:
The parts list:
- 3 Cardboard ring fins
- 1 Cardboard upper body tube
- 1 Cardboard lower body ring
- 2 Cardboard lower body tubes
- 1 Cardboard connecting tube (connects lower body tubes/mount location for ring fins)
- 3 Fiber ejection baffles/body tubes
- 1 Balsa nose cone
- 6 Fiber support jigs(provides additional support for ring fins)
- 1 Customizable parachute (Flis recommends cutting to 16" diameter)
- 1 Kevlar/elastic shock cord combo
- 4 Decorative toothpicks
- 4 Fiber Structural Rings (used to connect body tubes)
- 2 Cardboard motor mount rings
- 1 Fiber launch lug platform
- 2 Launch lugs
- 1 Decal sheet
- 3 Fiber body tube alignment supports (used for construction purposes only)
Building the Borealis is not exceptionally difficult, in my opinion somewhat easier than the 3.5 difficulty rating suggests. The key to success is careful attention to the excellent FlisKits assembly documentation, proper use of the provided tube alignment supports, and the patience to allow glue to dry completely where recommended by the instructions.
You will want to fill tube grooves before assembly. Doing so after construction will be far more difficult. Even if you don't normally worry about tube grooves (guilty!), you will want to fill the grooves on the inside of the ring fins--they are wide and deep. Priming/painting will not minimize them.
Before beginning the build, you should give careful consideration to the idea of painting the lower body tubes, ring fins, support jigs, and lower body ring prior to assembly (being careful not to paint bonding points). If you don't do this, be prepared for a fairly lengthy and painstaking finishing process, including a significant amount of hand painting. Because I like to build solid rockets, with generous glue fillets, I chose not to paint in advance--instead, I hand painted the entire rocket after construction was complete. It was not easy, but like the build, a willingness not to rush the painting process (painting the rocket in stages, allowing the paint to dry after painting each section) was the key to success.
Highlights of the construction process (35 well-documented steps in the instructions provided):
- Steps 1-4 / Assembly and marking of lower body tubes: Straightforward assembly process, but make sure you get the recommended gap between the two lower body tubes correct, as the ring fins will be mounted in this gap.
- Steps 5-6 / Marking ring fins: The ring fins won't be perfectly round out of the package. It is important to shape the rings to fit perfectly on the Tube Marking Guide before marking bonding lines.
- Steps 7-9 / Support jig assembly: Straightforward process, but you will want to make sure that you are careful with the application of glue. Too little glue will compromise strength, too much will make the finishing process more difficult.
- Steps 10-17 / Mid-ship assembly (ejection baffles/body tubes/support rings): Make sure to read all of the instructions for these steps prior to beginning. Take your time, utilize the alignment support provided, and allow the glue to dry completely where recommended by the instructions. The key in the construction process is to ensure that the three ejection baffles/body tubes are in perfect alignment.
- Steps 18-22 / Attach upper body tube to mid ship assembly: Again, patience is very important here. For the Borealis to fly properly, you must align the upper body tube to the mid-ship assembly perfectly. This is easily done by properly utilizing the provided alignment support, and allowing the glue to dry completely once the parts are glued together.
- Steps 23-27 / Attach ring tube/jig assemblies to lower body tubes: This is an easy sequence provided you have properly marked the ring tubes and lower body tubes in prior steps. Use a liberal amount of glue when connecting the ring tubes to the lower body tubes and be prepared to press each part together for several minutes after gluing to ensure the strength of each bond.
- Steps 28-29 / Launch lugs: This step, very simple with most rockets, is more difficult with the Borealis. You will want to cut the first launch lug to the same length as the launch lug platform before gluing them together (unlike the illustration in the instructions, the launch lug is longer than the platform). The second launch lug is then glued directly onto the rocket (to the lower body ring and support jig--not to the lower body tube). Then you must attach the launch lug platform you prepared earlier to the lower body tube. Care must be taken here, as it is a bit tricky to properly line up the two launch lugs.
- Steps 30-35 / Attach decorative toothpicks, shock cord, and parachute: These final steps are easy and straightforward.
Finishing:
This is a beautiful, unique rocket. It deserves no less than your best painting effort! I sprayed the entire model with white primer and decided on a 5 color painting scheme (all gloss): Gold for the ring fins and nose cone, black for the ejection baffles and support jigs, white for the upper body tube, blue for the lower body tubes, and red for the toothpicks and lower body ring. As mentioned earlier, painting the Borealis will be much easier if you paint the lower 1/3 of the rocket prior to assembly. Otherwise, be prepared for a test of your painting prowess! There are only a few decals, but they add a lot to the finished product. Make sure to paint the upper body tube a light color, ensuring the decals will stand out.
Flight and Recovery:
I launched the Borealis for the first time on a fairly windy day (gusts to 20 mph). Despite the length of the ejection baffles, I followed the advice of EMRR members and used 2-3 sheets of recovery wadding to avoid parachute damage (FlisKits claims no wadding is needed). I used a B6-2 on the first flight. Despite the wind, the rocket got off the launch pad in a hurry and had a beautiful straight flight with a perfect recovery. For the second flight, I used a C6-3. The Borealis really performed well with this engine. Out of 13 rockets launched in gusty conditions, this was the best flight of the day. The 16" parachute brought it down softly with no damage on either flight.
Summary:
I love the Borealis! It is fun to build, cool looking, performs well in windy conditions, and is not prone to damage despite its fragile appearance. If there is a con, it is that extra care must be taken not to damage the ring fins when transporting to the field.
Other Reviews
- FlisKits Borealis By Chan Stevens (June 9, 2007)
Another absolutely wild futuristic design by the mad scientist/evil genius Jim Flis, featuring primarily ring fin stability and ducted ejection plus a nose cone sure to draw a strong like/hate opinion... While you might be a little scared off by the $28.95 retail price on this, when you open up the kit and start to look over the amount and quality of parts, you'll find it's really a decent ...
 |
 |
Flights
|
|