| Construction Rating: | starstarstarstarstar_border |
| Flight Rating: | starstarstarstarstar_border |
| Overall Rating: | starstarstarstarstar_border |
| Diameter: | 1.64 inches |
| Length: | 23.90 inches |
| Manufacturer: | FlisKits  |
| Skill Level: | 2 |
| Style: | MicroMaxx |
Why does Summer, and even Fall, always run out of time? I guess so we'll have the opportunity to sled, build snowmen and throw snowballs! But, here in Vermont it simply halts all rocket finishing activity! Still, I was interested in getting my 2nd kit built from the the newest kit manufacturer, FlisKits (opened in September 2002). As with my FlisKits Tumble Weed I was impressed with the packaging. The kits look just like they were mass-produced in some factory somewhere.
The packaging includes a "hanger" section with a nice FlisKits logo and age recommendation on the front and, on the back, the saying "FlisKits are the Best kits"™, address and a warning about plastic bags being dangerous. Inside the bag you will find a Full One-Year Warranty with a Limited Liability Statement and the NAR flying code all neatly placed in a separate quarter-folded insert. The Praetor™ kit even has a plastic parachute with FlisKits' name and logo on it. Very professional.
 The Praetor™ kit (SP001) seems to have a history according to FlisKits' website: "The Praetor also has a very important and unique history. The Praetor was the anniversary kit, designed by Jim Flis and presented to attendees of the 1990 Pearl River Model Rocketry Convention in Pearl River, NY, founded and hosted by teacher Dick Nelson. "
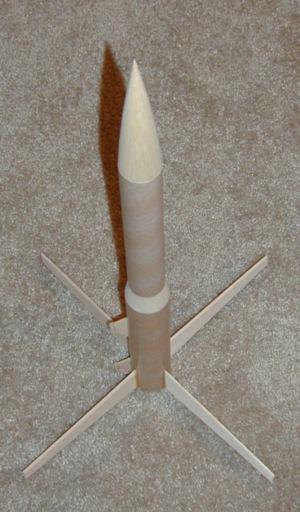
The Praetor's™ most distinctive feature is the length of the 4 fins. The rocket stands about 23 1/2" tall but has 4-fin span of 14". Very, long fins! It also transitions from a BT-60 (1.6") to a BT-55 (1.3") and has an upper payload section.
The kit includes body tubes that are each 8 1/2" long, a 1" balsa transition, and a 5 3/8" long balsa nose cone. The motor mount included fiber centering rings, an 18mm motor tube, a thrust ring and motor hook. The recovery system is made up of a 18" length of 1/8" elastic (white) shockcord, an eye-hook and a 3-fold paper template, and a 16" plastic parachute with shroud lines. There are two launch lugs to complete the kit components. There are also instructions, a fin template and fin marking guide.
CONSTRUCTION:
The instructions are printed on both sides of a single sheet of paper. They include 14 steps of assembly instruction with an illustration for nearly every step. On the back of the packaging card you will find the parts list and pre-flight checklist. You will need a sharp hobby knife, white glue, fine and medium grit sand paper, a pencil and scissors.
FlisKits rates this a skill level 2 kit and I would agree. It is not a difficult kit to build. I did use two techniques that are not described in the instructions that I will describe below.
The build is typical, starting with the motor mount. I did find one minor issue here. The lower centering ring is described as have a cutout for the engine hook in it, however, it did not. I used my hobby knife and quickly remedied that.
The motor hook is secured in place with masking tape. The instructions indicate to use "a length of masking tape around the engine tube, securing the engine hook in place." I used enough tape to wrap 3 times around the motor (engine) tube.
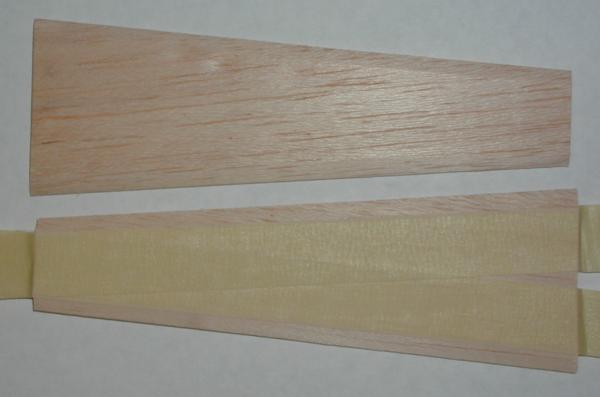
Next comes body tube marking and fin cutting. The templates were correct and there was clear instructions on the placement of the templates on the 1/8" balsa sheets (2) provided. The instructions outline the shaping of the fins. Here is where I used a technique that I have yet to use. I took masking tape and ran it the length of the fin to form the shaping edge. I then sanded the fin with a block and paper. With the masking tape in place, it provided a clean, straight edge that looks very nice (hard to tell from the picture).
The motor mount is installed in the body tube and is recessed so that even the motor hook is flush with the bottom of the main body tube.
The balsa transition is glued in place on the bottom of the upper tube. The instructions then say to glue the nose cone in place. I did this, however, there probably should be a note that indicates not to use glue if you want that section to be a payload area. I didn't and potentially someone that did would realize this.
The next step is attaching the fins to the body tube. Here is where I went outside of the instructions and used a T-Pin to poke holes every 1/8" on the line that the fin would be glued on. The glue is then placed over these holes and the fin is pressed on. The idea is that the glue seeps into the pin holes to increase the strength of the attachment . . . mini-rivets if you will. Another technique that could be used here is the double-glue technique. With this technique you would glue the parts, press them together and immediately separate them. Let that glue dry. Reglue the parts and attach them together. It, too, is said to be a stronger joint. Once the fins are attached, FlisKits recommends fillets.
There is one thing I didn't understand: why the two launch lugs are on stand-offs. It doesn't appear to be by necessity, however, it does add and interesting look as they are angled to match the stand-offs. FlisKits confirmed that reason . . . "they looked cool".
The parachute. An interesting item indeed. The parachute is printed in such a way that 3 different sizes can be cut out of it. The problem I had was which size to cut. Step 12 tells us to assemble the parachute per the instructions included with the parachute (they are actually printed on the unused sections of the plastic sheet). Which of the 3 sizes do I use? The instructions do not say, however, there is a clue. In the parts list is says, Parachute, 16". So, then I measured the 3 patterns on the sheet. If measured from the points of the hexagons, the patterns measure 17", 12 3/4", and an 8 1/2". If measured from the edges of the hexagons, the patterns measure 14 3/4", 11" and 7 1/4". What to do, what to do?
I weighed my kit and found it to be 2.3 ounces (unfinished and exactly what FlisKits said it should weigh). I used the parachute calculator and came up with the following range: 28.1 cm (11.1 in) to 36.2 cm (14.3 in) diameter parachute. I grabbed an extra Estes 12" chute and used it for now.
The parachute assembly (if used) is typical. You use the provided shroud lines and tape disks to secure them.
As you can see, I didn't beat the cold of winter for getting the Praetor™ painted, so when I do finish it, I will update the review. Sadly, the kit does not come with any decals.
Overall, for CONSTRUCTION I would rate this kit 4 points. The instructions are well done and the kit is not complicated. The parts are from good quality material. I like the fiber centering rings and like having a transition to add to the looks of the rocket. The centering ring finding and the parachute size will no doubt be corrected in future kits (my kit number was #49). Having to cut out the balsa fins was not a problem with such a simple fin design. With all the other professional features, this kit deserved decals and there were none.
FLIGHT/RECOVERY:
 FlisKits recommends the A8-3, B6-4 or C6-5 for flying the Praetor™. I flew it for the first time on a B6-4. (Yes, I'm sorry, it was flown naked).
Flight preparation included using wadding in the lower body tube, the placing the parachute in place and then sliding the transition in place (the transition has an eye-screw that the elastic shock cord is attached to and the other end of the elastic is attached by the 3-fold paper method to the inside of the lower body tube).
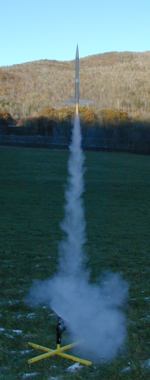
The first flight was nice. These large fins make it really easy to see in the air. Ejection was perfectly at apogee and descent on the 12" 'chute was fine. It might be a little fast, but not for my field since it is smaller and has soft ground. Upon inspection, I found an "Estes-dent". Yes, the short shock cord caused the upper section to kick back and hit the top of the lower body tube. No real damage but a slice pattern in the transition balsa.
 The second flight was on a C6-5. Again, a very nice match. This combination would be fine on a small (football sized) field. It was straight and stable and easy to see due to those large fins. Ejection was again at apogee. This time the snap-back of the elastic sliced off a small piece of the balsa transition when it hit the lower body tube. Enough of that.
I decided to lengthen the shockcord and added an additional 16" of elastic. I flew it again on a B6-4. This time I caught it on camera. Good flight and no damage caused by the shock cord.
I figured I'd have some burning around the bottom of the rocket's body since the motor mount is pushed in so that the motor hook is flush with the bottom. After 3 flights there is no sign of burning. If you catch a picture it puts the flame coming right out from the bottom of the rocket. Just noteworthy to me.
 For FLIGHT/RECOVERY, I would rate this kit 4 ½ points. The Praetor™ is an interesting looking rocket with the large fins and these same fins make it extremely easy to see in flight. Are you tired of loosing sight of your model rockets on C motors? Consider the Praetor. I looking forward to painting this rocket with some bright colored fins to even improve the visibility. FlisKits needs to ensure that they do not skimp on the shockcord which was the only detractor from this kit's Flight/Recovery rating. Good news, FlisKits wrote me this, we're "...including with our already-packaged-kits longer cords. For the Praetor we're going with 30". This is to correct just the problem you've mentioned."
I give the kit an OVERALL rating of 4 ½ points. FlisKits appears to be working through their initial kit "bugs", like very minor instruction issues and the short shockcord on this kit. They are responsive to the input and that can only help produce even better kits. The build and flight characteristics of the Praetor™ make it a solid kit. I'd recommend it for those that don't have a very large field flying. Also for those that may fly alone since it is very trackable. The transition and large fin allows you to have some interesting finishes (see my RockSim 3D Model to the right), so I look forward to finishing mine in spring.

Other Reviews
- FlisKits Praetor By Greg Deeter
The new Fliskits Praetor is a single stage, dual diameter "Sport" design, with a very unique and bizarre looking set of four fins. The kit says that this was first introduced at the "Pearl River Model Rocket Convention (MODROC)". This comes in the same type of package as my previous rockets from FlisKits. Estes type retail package, which is a plastic bag with hole punched hang tab. ...
 |
 |
Flights
|
|
Z.C. (July 19, 2008)
Sponsored Ads


|
|
J.B. (February 11, 2008)