Madcow Rocketry Little John (4.0)
Madcow Rocketry - Little John (4") {Kit}
Contributed by William Carpenter
| Construction Rating: | starstarstarstarstar |
| Flight Rating: | starstarstarstarstar |
| Overall Rating: | starstarstarstarstar |
| Published: | 2010-03-30 |
| Manufacturer: | Madcow Rocketry  |
Brief:
The 4" Little John by Madcow rocketry is a high-power rocket available with either a 38mm or a 54mm MMT. I chose a 38mm motor mount and used this rocket to achieve my Junior Level One Certification. It's a great first high-power rocket, both because of its ease of assembly, and good performance on a variety of motors.
Construction:
The kit included...
- One 4" Nose Cone
- A Pre-Slotted 4" Airframe Tube
- Two Laser Cut 1/4" Plywood Centering Rings
- Four Laser Cut 1/4" Plywood Fins
- A Length of 38mm MMT Tube
- A Length of Tubular Nylon Shock cord
- Small bag of hardware including an eye-bolt, nut and rail buttons.
To augment the kit, I also ordered a 38mm Aero Pack retainer and an AeroPack 29mm/38mm adapter.
I also chose to get my Little John without a recovery system in favor of using a 'chute of my choosing, and so that I could set it up for use with a Chute Tamer later.
I had heard about the great fit of Madcow's parts from other EMRR reviews, and was eager to see it myself. Sure enough, I was able to dry fit the entire kit together right out of the bag. It doesn't get much better than that.
The first thing I did was attach the Aero Pack retainer. I did this as per Aero Pack's instructions with JB Weld. I love how easy to use the Aero Pack retainers are. No more messing with threaded inserts and easy-to-lose machine screws.
Next was MMT assembly. First, the aft centering ring was epoxied above the retainer. The distance to the forward centering ring was then measured out using one of the TTW tabs on the fins, and the forward centering ring was epoxied at this mark. The included eye-bolt was then inserted into the pre-drilled hole in the forward centering ring and secured with its nut and some epoxy. After tying the shock cord to the eye bolt (you can't access it after the MMT is in the rocket) the MMT assembly was epoxied into the rocket.
For rail button attachment, the instructions tell you to drill the holes for them directly into the centering rings. This arrangement placed the forward rail button a little too far aft for my comfort. I figured that 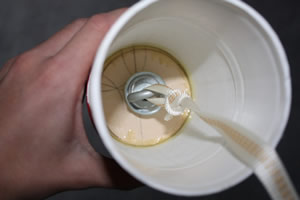 simply epoxying it into a hole in the tube would be enough, and moved it up four or five inches.
The fins were then attached with epoxy. The fillets were made with West System's epoxy mixed with their colloidal silica filler.
To facilitate the attachment of nose weight, I deviated from Madcow's instructions. To allow me to add and remove weight to optimize it for any given motor, I first cut off the thin piece of plastic on the hole in the bottom of the NC. I then used JB Weld to attach a 1/4" nut to the hole. Nose weight is added and removed by adding or removing washers from a 1/4" bolt. This worked... for a while.
It turned out that the RockSIM file I was using was more than a little optimistic about the location of the CG (I may have overbuilt the fin can just a little). To remedy this problem, I cut the base off of the NC and attached a bulkhead about seven inches into the NC. An eyebolt was used as a shock cord anchor as well as a method of adding and removing nose weight. This got the rocket stable enough for me to be willing to fly it.
Overall, my rocket came out to 45oz without nose weight.
Finishing:
The spirals on the body tube were of the shallow-and-wide variety, so wood filler wouldn't have stayed in if I had tried. Some automotive primer filled them mostly up along with what little grain the plywood had.
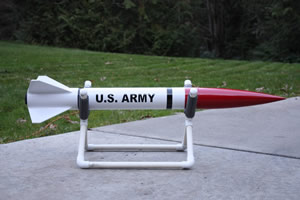
Instead of the usual olive drab paint scheme, I chose to do something resembling the picture on Madcow's web site.
First, the NC was sanded and washed to promote adhesion. Next, it was hit with three or four coats of Rustoleum Automotive Primer. A good sanding and a coat or two of Rustoleum red finished it off.
The body was primed like the NC and sanded. The rocket was then masked and the forward section was painted red. Next the masking was reversed and the rest of the rocket was painted Rustoleum gloss white. The masking was then changed and the black stripes painted on to finish the rocket off.
Construction Rating: 5 out of 5
Flight:
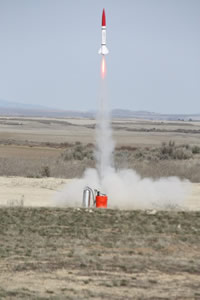
The first flight of my Little John came at the Washington Aerospace Club's Spring Festivus 2010. The flight was on an AeroTech H148 Redline and also served as my Jr. Level One certification flight.
 My rocket came out more than a little tail-heavy, so care had to
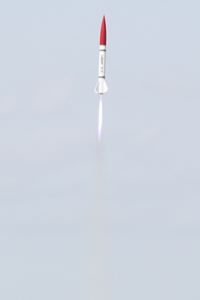 be taken with respect to motor size vs. nose weight. With my H148 loaded up, field testing showed that 4oz. of nose weight attached to the bulkhead in the NC brought rocket up to a stability margin of exactly one caliber.
My cert flight was perfect. Despite some wind, the Little John flew arrow straight to what easily looked like the RockSIM estimated 1700'. The 'chute popped just after apogee and the rocket slowly drifted down to a soft landing about a half-mile downwind.
After my cert, I flew the Little John again with a Cesaroni H200 Blue Streak. This flight was noticeably faster, and the bright blue flame was nearly as long as the rocket. The rocket again flew perfectly straight, this time to about 2200'. Just after apogee, the ejection charge fired and pushed out the 'chute, but it remained wrapped in its Nomex® shield. After 400' or so of tumbling the 'chute finally opened and the rocket recovered perfectly from there.
Recovery:
The 36" parachute included in the kit (if you decide to buy it with the recovery package, that is) 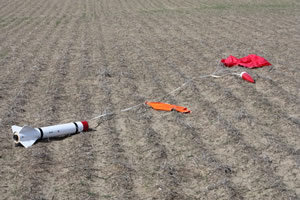 simmed out as way to small for this rocket. For the two flights mentioned above, I used a 50" Top Flight 'chute, but for future flights I'll be using a 36" hemisphere made by Fruity Chutes.
On both flights the rocket came down slowly (almost too slowly) and landed with barely a scratch on the paint.
Flight Rating: 5 out of 5
Summary:
Madcow Rocketry's 4" Little John is a great L1 kit. It goes together easily (barring a few stability-related modifications) and flies great with proper application of nose weight. After seeing two perfect H flights, I can't wait to throw a Chute Tamer in it and see what it does on an I. While it presents some challenges, the Little John is a rewarding rocket once complete, and is a great addition to any high-power fleet.
Overall Rating: 5 out of 5
 |
 |
Flights
|
|
Sponsored Ads

|
|
T.G.P. (June 16, 2010)