| Construction Rating: | starstarstarstarstar_border |
| Flight Rating: | starstarstarstarstar |
| Overall Rating: | starstarstarstarstar |
| Diameter: | 4.00 inches |
| Manufacturer: | Mountainside Hobbies  |
 Brief:
This is an excellent mid and high power (only high power for me, it weighs too
much because I used too much epoxy. DOH!) kit. It is extraordinarily hard to
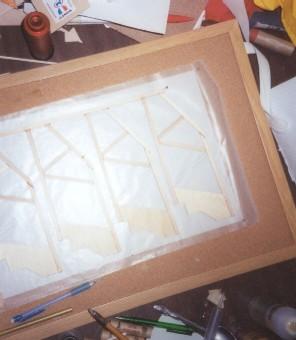
build, as I had to assemble the fins from sticks of wood and then put a frame
over them. I then had to do a trillion inside and outside fillets all while
keeping epoxy out of two little screw holes. A very challenging build. It has a
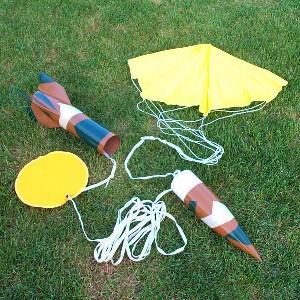
super huge parachute.
Construction:
It has one body tube made of the same stuff as LOC tubing, no payload section
(too small for that), 2 centering rings, a big fat nose cone, a little piece
that goes on the end of the nose cone, a super long shockcord made of nylon and
a lot of other little wooden pieces.
The kit comes with great instructions and illustrations--not a single gotcha, a semi-logical assembly order, and fin templates on a sheet of very nice paper. The kit requires a lot of glue. Alignment was a challenge but it helped that everything fit well. I found it to be a little complicated and frustrating at times, but otherwise a fun build.
 Finishing:
I painted using the White Sands Missile Park paint scheme (black on part of the
fins and white everywhere else). No decals came with the kit, but there are so
many V2 paint schemes that Mountainside Hobbies would be wasting their time to
include them.
Construction Rating: 4 out of 5
Flight:
I flew this for my first HPR, an H165R in a borrowed case (Thank you Ryan!). I
thought it would be low and slow, doing a huge arc and almost hitting the
ground before deploying, with an easy recovery. However, it was none of that.
She screamed off the pad, shot straight as an arrow to goodness knows what
altitude, popped at apogee, and drifted across two barbed wire fences, a huge
swamp, and into a tree. At least my dad and I came prepared. My dad got the
huge pole that we always bring just in case something like this happens,
scurried under the fences hunter-style, and walked very slowly through the
half-dry swamp. My dad finally saw it hung up in a small tree, about 5 feet
above how high we could reach. We eventually got it down by just tugging on the
shock cord, which was hanging down with the nose cone. We wanted to get it down
at all costs, even though we thought we would kill the chute but everything was
in perfect condition. There are a few scratches on the nose cone but I can get
rid of them with a can of spray paint. That was a flight which everything we
thought it was gonna do did not happen. At least we got it back with the
borrowed case still in it. Simply amazing!
Recovery:
The rocket just seemed to sit there in the sky despite the huge amount of nose
weight I added. The shock cord was tied to an eyebolt on the top centering
ring. The only thing I would change is to reef the chute on windy days. I
overestimated the effect the extra nose weight would have on the recovery.
Flight Rating: 5 out of 5
Summary:
All good, no bad. A big challenge in the build process but that is why I chose
this one instead of some other easy kit.
Overall Rating: 5 out of 5
![[NAR]](/images/archive/images/link_nartitle.gif)
The following excerpt is from "Sport Rocketry". The intention is to allow guests to get a basic feeling about a kit. We strongly suggest that you get a copy of the referenced Sport Rocketry and read the entire article. Inside you will find many helpful hints in construction as well as other useful information. For more information, use the two links above.
(Sport Rocketry - May/Jun 2004 - by David Grumbine, Jr.)
 "This kit pays close attention to the
scale profile and incorporates careful engineering for strength with less
weight."
"This kit pays close attention to the
scale profile and incorporates careful engineering for strength with less
weight."
"The instructions, have been carefully written...even a novice...should
have no problem..."
"The first scale profile detail is the tip of the nose cone. The plastic
nose cone...has the tip of the nose already removed. ...a replacement turned
wood nose piece is supplied."
"...the second scale profile detail. Unlike many other V-2 kits, this
version has scale-size fins."
"The fins are constructed of two thin sheets of plywood laminated to a
basswood frame."
"The rest of the kit is fairly standard in construction."
"The plastic tail cone is pre-slotted..."
"...a piece of Nomex® cloth is included along with 25 feet of 3/8-inch
tubular nylon stock cord and a 36-inch nylon parachute..."
"For the first flight, I decided to fly the model on the recommended
G64-7..."
"For larger motors, additional nose weight may be attached to the threaded
rod in the nose."
Overall, the article suggests that this is a nicely designed V-2 kit. The author highly recommends it.
 |
 |
Flights
|
|