| Construction Rating: | starstarstarstarstar |
| Flight Rating: | starstarstarstarstar |
| Overall Rating: | starstarstarstarstar |
| Manufacturer: | FlisKits  |
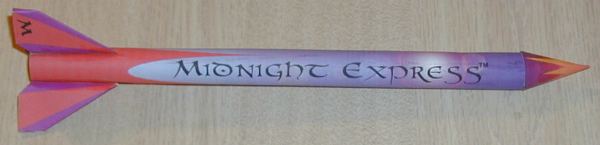
I decided to do a bit of "paper building" with some of the free rockets throughout the Internet (See my "Free" Paper-Rocket Comparison Page). One of the first that I downloaded was FlisKits' Midnight Express™. I downloaded the Pre-printed Pattern Sheet in the PDF format from FlisKits. I printed it on 110lb Card Stock (Georgia Pacific brand purchased from WalMart). I also downloaded and printed the instruction set. Then got busy.
Interestingly enough, the rocket patterns were all contained on a single page and yet there were four pages of instructions. It is a testament to the effort put into this "free" rocket by FlisKits. The instructions are well organized, well illustrated, and very detailed. Excellent by any comparison.
You will need to provide a recovery system including a shock cord and streamer. You will also need clay nose weight. FlisKits recommends a 12-18" shock cord, 12" of Cotton Button Thread for a streamer shroud line, masking tape to attach to the streamer, and an 18" Crepe Paper Streamer.
FlisKits also recommends that you have a pencil, razor knife (hobby knife), white glue, an 1/8" dowel (for shaping the launch lug), a short length of BT-5 body tube, and 3-4 expended engine casings (for shaping the body tube).
CONSTRUCTION:
Without getting into all the details of building, I cut each of the rocket pieces out of the pattern sheet and followed each step in the instructions. The two tough points in building this rocket are the nose cone and the fins.
The nose cone is just a bit tough because of the point and trying to maintain a symmetrical finish. FlisKits points out that it is common to have a gap near the point. Good because I did.
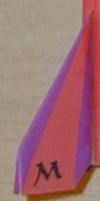 The fins are challenging because of the number of cuts and folds. The fins are not simply a doubling over of the paper, rather, they are built up and have a flat root and trailing edge. The leading edge is sharp, giving the fins an airfoil finish. To accomplish this the lines need to be scored and folded properly to make them look correctly. When finished the fins are a little over 1/8" thick.
I liked the method for rolling the body tube. This is accomplished by lining up 4 motors and wrapping the tube around them. Worked great. The tube has a glue strip. It is cut out separately from the body tube, glued on the inside edge of one side and set aside to dry. Then the other side is glued to the tab, aligned and making the same level as the first side. This makes the seam less noticeable.
The nose cone shoulder and the thrust ring are essentially the same patterns with one being rolled and glued into the nose cone and the other being positioned in the bottom of the rocket.
I used 32 inches of 1/32" Kevlar® for my shock cord. It was attached using the 3-fold paper method (outlined in the instructions) to the body tube. It was glued into the tip of the nose cone per the instructions. Then after that was dry I added Plast-i-Clay Modeling Clay for the nose weight. I added enough to get the Center of Gravity (balance point) to where the instructions indicated.
I added a 24" x 3/4" Nomex® Streamer. I cut this from a roll of Nomex® that I had purchased from the now defunct Rogue Aerospace many years ago.
Overall, for CONSTRUCTION I would rate this rocket 5 points. I understand it is "free", but with the quality of instructions, it must be a 5.
FLIGHT/RECOVERY:
 FlisKits indicate that the Midnight Express™ should weigh in at 0.3 ounces. My weighed 0.4 ounces. What's 0.1 ounce between friends? They recommend the A6-4, A8-3, B6-4, and C6-5 for motors.
My first flight was on an A8-3. The motor is friction fit into the motor mount until it hits the thrust ring. I added a couple of balls of wadding and rolled the streamer. Everything was ready.
Trying to get a picture was funny. Even though between my son and I we have worked out a fairly good system we still missed it. Well, actually I got the trail of smoke. It was a good flight though. Straight and seemingly stable. Ejection seemed early and down it came.
That was fun, so we did it again with a B6-4. This time it went quite high (for a rocket this size) making it hard to see. I saw the tracking smoke and the ejection. The ejection was clearly before apogee. We caught the streamer fluttering in the sky and was able to recover it successfully.
The third flight was a week later on a B6-4. This time when it was going up, there was a very tight spiralling-wiggle. When the tracking smoke was seen, it did seem to be starting an apogee arc. Recovered.
The nose cone shoulder is showing a little wear, but in general the rocket is holding up well. There colors on the body tube show some stains, but this is from the snow melting on it.
For FLIGHT/RECOVERY, I would rate this rocket 5 points. The flight of the Midnight Express™ is very good. Bring trackers because it goes on a B motor.
I give the rocket an OVERALL rating of 5 points. Again, this is a "free" rocket. So as such expectations are set a bit low. The expectations are shattered with the exceptional 4 pages of instructions and the flight of this rocket. It provides a unique rocketry building challenge as well. And FlisKits even allows you to download a blank pattern set so you can "style" it your own way! Nice job FlisKits!
Other Reviews
- FlisKits Midnight Express By Elliott Bavely (June 7, 2009)
Midnight Express (free paper rocket) by FlisKits. This rocket is available as a downloadable PDF file that you print on cardstock then cut and build yourself. The basic design is 3 fins, paper nose cone, and a paper body tube. Since this isn't actually a kit, you must provide a recovery device (streamer is recommended), glue, and some sort of nose weight (clay, for example). I first ...
 |
 |
Flights
|
|