U.S. Rockets Miniroc 2
U.S. Rockets - Miniroc 2 {Kit} (1024, K-24) [1979-]
Contributed by Frank G. Whitby
| Construction Rating: | starstarstar_borderstar_borderstar_border |
| Flight Rating: | starstarstar_borderstar_borderstar_border |
| Overall Rating: | starstarstar_borderstar_borderstar_border |
| Manufacturer: | U.S. Rockets  |
Brief:
The USR Miniroc 2 is a small 24mm minimum diameter 2-stage rocket. It has two
sets of identical swept fins (one set per stage). The fins are identical to
those used for the Miniroc 1.2. Miniroc 2 should be able to fly on anything
from C to G power, depending upon one's ability to make the staging work. The
rocket is very stout, considering the light weight and small size.
Construction:
The kit came with 4 pages of adequate but limited instructions giving useful
diagrams and details on construction and flying along with a parts list. As
with Miniroc 1.2, the instructions suggest that the Miniroc 2 might be good for
egg loft and flexwing competition events. The manufacturer did not completely
edit individual sets of instructions. I discovered the kit was missing one
part--1 launch lug (LL1/4-2). The kit came with 6 nicely cut plywood fins that
appeared to be of good quality. They were taped together in two bunches but
three of the fins were slightly warped. All other components appeared to be in
good shape. Despite the missing parts and warped fins, I decided to proceed
with building, although these factors reduced my enthusiasm for USR kits. I
elected not to contact USR to discuss these failings.
I built the rocket as per instructions except for using 5-minute epoxy throughout the build. I tapered the fin edges as described and used my Estes fin alignment guide for fin installation. This is a minimal diameter rocket and the instructions suggested surface mounted fins. I think that this should be fine. The instructions suggest mounting the sustainer fins even with the aft end of the sustainer tube. I did this but in hindsight it might have been better to mount them ½" forward to allow room for masking tape to be used for motor retention on the sustainer. This is probably not a particularly important issue but some might want to consider this if they are building Miniroc 2. The instructions suggest mounting the booster fins even with the aft edge of the booster. This seems appropriate.
After tacking the fins in place with epoxy, I gave them a nice fillet. I cut my own ¼" launch lug on an angle as suggested and gave the lugs a fillet as well, mounting both of them on the sustainer as suggested.
Construction of the sustainer involves simply gluing on the fins and launch lugs and friction fitting the nosecone. Construction of the booster involves gluing on the fins, being sure to align them with the sustainer fins. The rocket is not designed to use a sustainer-to-booster coupler tube but I used one temporarily during construction to facilitate fin alignment between stages. I think most people would eventually hit upon the same solution, using a spare coupler or spent motor to facilitate alignment between stages during construction.
The recovery system calls for a 24" long piece of ¼" elastic shock cord to be glued into the main body tube using the 3-fold paper method. I installed it as described but added four more feet of equivalent material. I felt the shock cord supplied with the kit is too short.
PROs: The kit parts are stout. Construction is straight forward and should be suitable for a beginner if it weren't for some of the failings of the kit.
CONs: The kit had 1 missing part that I replaced from my own stock. Three fins were warped. The instructions are cobbled together from other USR kits and not properly edited.
Finishing:
I did not fill the grain of the balsa nose cone. I think I would use a plastic
nose come if I were designing this kit as the balsa nose cone is cheap and will
always be prone to dings. The body tubes were very smooth so I did not consider
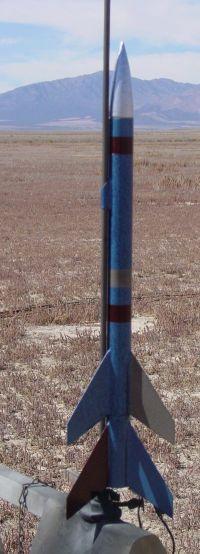
filling spirals. I sprayed the rocket with a single, thin coat of automotive
primer, gave it a brief sanding, then added a single coat of "hammered
blue" automotive spray paint. I then used masking tape to add stripes with
single coats of red and gray "hammered-look" paint.
The finished rocket weighed 66 grams. I substituted 5-minute epoxy for construction throughout construction, which perhaps added a few grams, instead of the recommended yellow wood glue. The final weight listed on the kit pack is 37 grams and the USR web page lists final weight at 37 grams also. I find this to be impossible, as the component pieces weighed 44 grams right out of the package, missing a launch lug. Sanding the fins might have cut this weight by a gram at most. The streamer itself weighed 11 grams. I feel that if I had been extremely conservative in my use of glue and paint, I might have been able to finish this rocket at 60 grams. USR should reevaluate its weight estimates. I think that a better value can be found in kits from other manufacturers.
PROS: Painting was a snap. I chose not to follow USR recommended color scheme which is hard to visualize given that USR shows only black and white drawings and/or photos of their rockets on their website and the instructions only include line drawings of the rockets. I typically do not adhere to manufacturer's recommended schemes anyway.
CONs: I chose not to apply the USR decals that came with the kit. They are less decal and more simply label, giving the name of the rocket. They do not appear to me to be the sort of thing you would add to a rocket if you were really interested in dressing it up, however, they might be useful to have in the event of a judging competition to remind people of the name of the rocket. The weight of the components of the kit exceeded the manufacturer's expected final weight of the rocket.
Construction Rating: 2 out of 5

Flight:
I flew Miniroc 2 twice. The first time I ignored USR instructions in rigging
the motors, the second time I followed their instructions explicitly. Each
flight had its own problems.
I first flew Miniroc 2 the first time on a C11-0 to C11-5. I used cellulose insulation wadding and packed the streamer as I normally would. Ignoring USR instructions, I simply friction fitted the sustainer motor into the sustainer tube, allowing it to extend ½" aft. This extension of the motor itself acts as the coupler to the booster. I then friction fit the booster motor into the booster from the rear, pushing it forward until it contacted the sustainer motor. I made sure that both motors fit very tightly. After inserting the booster motor, I was worried that I would never get it out because it fit so tight. I adjusted the friction fit of the sustainer motor extension into the booster until I thought that it would be adequate for stability and staging. This required fine tuning of the masking tape on the tail end of the sustainer motor. The boost was fast and straight. The booster motor kicked at about 200 feet, leaving the booster attached to the sustainer. The rocket continued to coast upwards but the sustainer motor had obviously not ignited. The rocket arched over and came in ballistic, giving a nice lawn dart. The balsa nose cone was shoved fully back into the body tube and the unlit motor was thrust forward 3 inches, sandwiching the recovery components between it and the smashed nosecone. The booster popped off when the motor slid forward and landed a few feet away. Besides the destruction of the nosecone, the remainder of the rocket was undamaged. In this case, the balsa nosecone turned out to be a blessing as a lawn dart cushion. Had the nosecone been plastic instead of balsa, the airframe probably would have sustained more damage. The sustainer tube was just dinged a little around the front edge. I took the rocket home and tried to be delicate in removing the dirt and nosecone from the airframe, but ended up tearing the shock cord out as well. I was able to shove the motor back out of the aft end using a heavy dowel as a push rod and used my Dremel to remove the glue and 3-fold paper piece that held the shock cord. I replaced the shock cord by gluing it back in as before and used a spare plastic nosecone that matched fairly well to the original balsa. I did not paint the new nosecone.
 For the
second flight I flew it on a C11-0 to C11-5 combination again. I decided to do
a couple of things differently for this flight. I drilled three 1/8" holes
about ¾ of an inch behind the front edge of the booster for venting and
created a ¼" thrust ring on the sustainer motor with masking tape
½" in front of the aft end of the motor. I friction fitted the
sustainer motor into the sustainer tube. At this point I could not use masking
tape to add motor retention, although I wanted to, because as I pointed out
during the build, the instructions called for the sustainer fins to be mounted
flush with the rear of the sustainer tube. I created a thrust ring on the rear
of the booster motor from masking tape and then friction fitted the motor into
the booster. Again, because of fin placement, I could not make a wrap of
masking tape for booster motor retention. The booster-to-sustainer motor gap
was about 1 inch and this space was now vented with the three holes that I had
added. I adjusted the masking tape on the aft end of the sustainer motor to
create what I thought would be a snug, but not tight fit so that staging could
occur.
For the
second flight I flew it on a C11-0 to C11-5 combination again. I decided to do
a couple of things differently for this flight. I drilled three 1/8" holes
about ¾ of an inch behind the front edge of the booster for venting and
created a ¼" thrust ring on the sustainer motor with masking tape
½" in front of the aft end of the motor. I friction fitted the
sustainer motor into the sustainer tube. At this point I could not use masking
tape to add motor retention, although I wanted to, because as I pointed out
during the build, the instructions called for the sustainer fins to be mounted
flush with the rear of the sustainer tube. I created a thrust ring on the rear
of the booster motor from masking tape and then friction fitted the motor into
the booster. Again, because of fin placement, I could not make a wrap of
masking tape for booster motor retention. The booster-to-sustainer motor gap
was about 1 inch and this space was now vented with the three holes that I had
added. I adjusted the masking tape on the aft end of the sustainer motor to
create what I thought would be a snug, but not tight fit so that staging could
occur.
The boost was very nice and straight. The booster motor lit the sustainer but the booster motor kicked, leaving the booster attached to the sustainer. Ouch! The sustainer carried the rocket with booster on a beautiful, high flight and ejection was perfect. The rocket recovered fine and fell fairly fast on the streamer. The rocket was not damaged from the landing, but the booster tube was completely toasted from having stayed with the sustainer throughout the flight. The booster still held its approximate shape and the fins were undamaged. The shock cord recovery system held up fine.
Recovery:
Although the shock cord held up well for these flights, I think that this
rocket would benefit by the use of some sort of a Kevlar®
leader cord. The 3-fold paper glue-in method should still work fine though. I
used 6 feet of shock cord but this is probably the minimum required in order to
avoid body tube dings.
Flight Rating: 2 out of 5
Summary:
The Miniroc 2 flies nicely and is built of rugged stock. I would prefer to use
a body tube coupler for joining the booster to the sustainer but in principle,
the use of the sustainer motor as the coupler should also work well. I have had
many successful multi-stage flights with other rockets, so I don't know why I
could not get release of the booster during staging. I admit that this might be
my fault but I think that this problem could be avoided through the use of a
tube coupler to give smooth release of the booster. I gave the rocket a fairly
low rating because of the missing launch lug that typified my experience with
USR. The overall shoddy nature of the kit components and instructions I think
represents this kit as a poor value.
Overall Rating: 2 out of 5
Sponsored Ads


 Pullover Hoodie.")


 |
 |