| Construction Rating: | starstarstarstarstar |
| Flight Rating: | starstarstarstarstar_border |
| Overall Rating: | starstarstarstarstar_border |
| Published: | 2012-11-26 |
| Manufacturer: | Clone |
 Brief
Brief
The Intrepid was an interesting in-line cluster bird from FSI. I've been building a lot of my FSI clones as upscales of late, but there is no need to upscale this one. It's pretty huge just as it was designed.
Components
- BNC-70AJ main nose cone (Semroc)
- 2 BNC-20Y pod cones (Semroc)
- TA-6070 transition (Semroc)
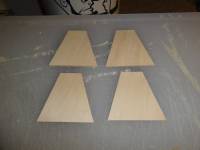
- 3/32" balsa fin stock (Hobby Lobby)
- 2 BT-60 main body tubes 18" (BMS)
- 2 BT-50 pod tubes 9" (BMS)
- BT-70 payload tube 9" (BMS)
- 24mm engine mount kit (Semroc)
- 2 engine blocks CR-2050 (Semroc)
- 1/4" launch lug (Red Arrow)
- 36" length Kevlar shock cord
- 36" length of 1/4" sewing elastic shock cord (Meijer)
- medium screw eye (Lowes)
- medium snap swivel (WalMart)
Construction
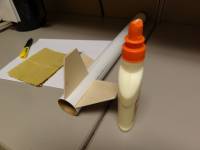
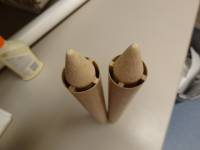
This isn't an FSI project, but more of an Estes take at the Intrepid since the parts I used were all to Estes tolerances. I didn't want to build an exact clone, but more of a suggestion of the Intrepid, so I went with what I was most familiar with. This is a big bird, and as such, I built it in sections. The lower fin can came together first, and the oddly spaced fins were the first problem that I tackled. The Intrepid is for the most part a six fin rocket with two fins missing where the outer pods are attached. To this end, I printed off a template for a 6 fin BT-60 bird and marked the lines appropriately with four fins and two pods. The fins were glued in place first, then I turned my attention to construction of the two side pods. The vented nose cones had to be constructed using four small balsa strips and a BNC-???? nose cone. The balsa strips were evenly spaced around the shoulder of the nose cone to provide an escape for the exhaust gases, then sanded evenly so that they slid into the top of the BT-50 pod tube. Engine blocks were then glued into the pods at the correct depth for Estes D motors. The pods were mounted to two balsa strips cut to the same length as the pod tubes, and the pods were then glued into the spot where the fifth and sixth fins would normally have gone. I tied a 36" length of Kevlar around the motor tube behind the front centering ring as a shock cord mount, and attached it to a 36" length of 1/4" sewing elastic. I clearly have issues when it comes to shock cord length. A medium screw eye was glued into the bottom of the transition, and the payload section was glued together to keep the inevitable loss of the nose cone from happening.
Finishing
As with most FSI kits, the Intrepid had nothing to go on as far as a color scheme was concerned. I'd been working in red/white/black combinations with other projects that came to light around this time, so the Intrepid was just painted with the leftovers from those birds. After priming and filling, no small feat considering the amount of tube spirals present, the entire rocket got sprayed Valspar gloss white. The fin can was then sprayed Valspar classic red, while the nose cone, transition and both outboard cones were sprayed with Valspar gloss black. I upscaled the minimalist "INTREPID" decal scan, which went on the main body tube, and found an FSI logo that I also upscaled to break up the monotony of the payload section. I didn't really realize how much of a rut I'd stuck myself in until my brother-in-law looked at my roadshow collection in the back seat and said "You sure have a lot of white rockets." I guess I need to invest in some grey paint.
Flight
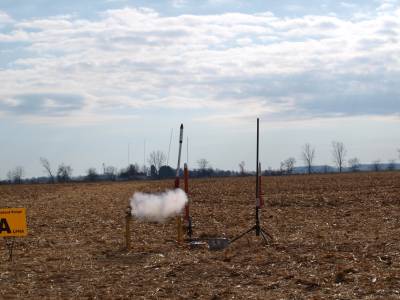
First flight came on a windy, raw day at the TORC field in South Charleston, Ohio. I had the D11-P motors with me, but at the time I had yet to acquire a clip whip, so I just flew it as a single stager. Performance was as expected, with the slow burn of the E9 making for a long, high flight. Also as expected was the windcocking, which took the rocket downrange to the east at a steep angle. Ejection occurred as the rocket was almost horizontal, but slowing enough that it was fairly gentle. I'd used a smaller parachute to cut down on the drift and this worked well as the Intrepid recovered about 200' out in the cornfield, but directly in front of the pads.
I had planned to fly it as a cluster at a Tri-City Skybusters launch in the spring with my brother in law, but I ran out of gas before I could work my way to the Intrepid. It never occurred to me that it would be six months before I got the chance to do the cluster, but that was exactly what happened. I finally got to fly it in cluster form at the inaugural OAMC (Ohio Aerospace Modeling Consortium, formerly TORC,) launch back at the South Charleston field. It was another windy day, and the Intrepid was the last flight I made before starting my range duty. The two D11-Ps were a tight fit in the side pods, and in fact needed some rather forceful suggestion to slide to a workable depth. (No masking tape for these motors, and I'm not really sure they'll come out without damaging the rocket.) Another E9-4 filled the main engine mount, but I gave serious thought to an E9-6 because of the extra thrust from the D11s. I angled the rod slightly into the wind, then attached the clip whip to the igniters, making sure to curl the leads to give maximum space for the clips to touch. When I was satisfied I returned to the LCO table and manned my camera, making sure that it was in burst mode. I was hoping to catch the Intrepid both igniting and leaving the rod, but once it got moving, it moved QUICK. I got ignition and the slightest trace of motion up the rod, but just smoke after that. It was hauling! The rocket windcocked somewhat, but nowhere near what I had expected. Ejection occurred slightly early, which may have had a hand in what happened next. As the Intrepid floated back over the flightline toward the cornfield behind us, something detached from the rocket. I couldn't tell what it was, but the fact that it looked to be mostly white made me think payload section, which was correct. The payload section landed hard behind the parking area, cone first, which caused quite a gash in the balsa. After retrieving the payload section, I started out toward the spot where the rest of the rocket had landed, only to find it being returned by another hospitable flyer. Good thing. My feet were killing me.
Summary
Pros: As with most FSI birds, when was the last time you saw one at the pads? Fairly massive size makes it hard to miss in the sky.
Cons: No more FSI motors around to let this thing rip like it was meant to. No real painting instructions or ideas. EXTREMELY minimal decals.
Related Products

 |
 |
Flights


rr.jpg)

rr.jpg)

rr.jpg)
rr.jpg)


|
|
Sponsored Ads


![Vintage Estes Viper #0820 Model Rocket [4*G-17.25]](https://i.ebayimg.com/thumbs/images/g/Q7EAAOSwN1Nl1kDF/s-l225.jpg "Vintage Estes Viper #0820 Model Rocket [4*G-17.25]")


|
|
George Beever (November 28, 2012)
I always liked this design. A member of our club [SPAAR] had an original back in the day, and it really screamed with those FSI motors. Thanks for the article, I might have to add this one to my list of projects.