| Construction Rating: | starstarstarstarstar |
| Flight Rating: | starstarstarstarstar_border |
| Overall Rating: | starstarstarstarstar |
| Published: | 2012-03-12 |
| Diameter: | 3.90 inches |
| Manufacturer: | Public Missiles  |
| Style: | Sport |
 Brief
Brief
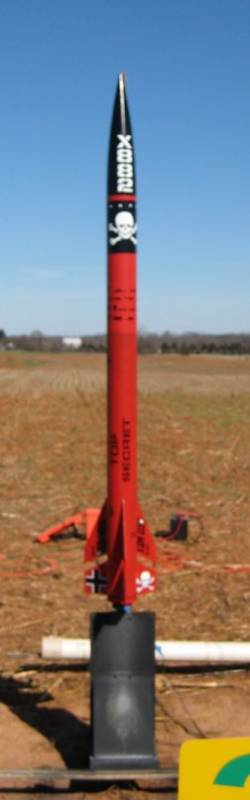
4" Quantum tube version of the PML Endeavour configured for dual deployment.
Components
PML Endeavour Kit (Quantum Tube version)
Add-ons
- PML 54mm motor tube (17")
- PML centering ring (4" to 54mm)
- PML 4" bulkhead plates and coupler bulkhead plates (2 each)
- LOC stiffy tube coupler
- Rail buttons
- 1/4" All-thread (two 12" pieces)
- G-10 altimeter sled
- Misc hardware (u-bolts, quick links)
- CDI eyebolt (for the nose cone)
- Ejection Charge Holders (two from Blastcap Rocketry)
- Aeropack 54mm retainer
Electronics
- PF StratoLogger 100 altimeter
- PF spare mounting hardware
- CDI 9v battery holder
- Featherweight magnetic switch
- Altimeter wiring kit (from Dog House Rocketry - includes wires, terminal blocks, and a switch)
Construction
I decided not to use the stock Kwik-switch motor mount and install a longer 54mm motor tube. I ordered a new tube from PML along with a third centering ring. I cut the new motor tube to length, then epoxied the forward and middle centering rings in place. I mounted a U-bolt to the forward centering ring for the recovery harness attachment point. I also epoxied a small section of plywood to the forward centering ring as reinforcement for the rail button attachment. I measured the reinforcement location, marked the booster section, temporarily installed the motor tube, and drilled through the body tube and into the centering ring. Perfect!
 After roughing up the the appropriate area inside of the booster section, I epoxied the motor tube in place - using the rail button hole for alignment. The trick was to make sure I'd left enough of the motor tube exposed at the bottom to be able to attach the Aeropack retainer base later. Note - the aft centering ring won't get installed until the fins are attached.
Once the motor tube was in place, I also applied an epoxy fillet inside at the forward centering ring and booster section joint. Next, I numbered all the fins and slots and test fit each fin, sanding the slots slightly if needed. I partly inserted the aft centering ring to ensure the motor tube was centered in the booster section befire I tacked each fin in place with a small amount of epoxy. I removed the aft centering ring.
Now it's time for fin fillets. I taped off the fillets on both the fins and booster section and roughed up the areas with sandpaper. I used West Systems 406 filler with epoxy to apply the fillets, smoothing them with a section of dowel. I removed the tape before the epoxy hardened. I also used epoxy to fill any small gaps in the fin slots - this is critical for the next step!
Foam! I decided to use PML's two-part expanding foam to fill the fin can and provide internal reinforcement. After making sure all holes and gaps had been filled, I poured the foam in 3 batches. Once the foam had cured for a couple of days, I trimmed the foam using a hobby knife so it was flush with the trailing edge of the fins. I attached the aft centering ring with epoxy, making sure to line up the rail button hole with the reinforcement section I'd attached. I applied an epoxy fillet at the centering ring/airframe joint prior to attaching the motor retainer (using JB Weld).
Time to build the avionics bay. I used the kit tube coupler and reinforced it with sections of LOC stiffy tube. I had to peel several layers from the stiffy tube to get it to fit into the PML coupler. I left enough room at either end to allow coupler bulk plates to rest flush with the end of the coupler. I sanded the lower inside of the payload section and epoxied the coupler assembly in place - I wiped out any oozing epoxy.

As noted in the components section, I ordered two coupler bulk plates in addition to one extra bulk plate. I stacked and epoxied one bulk plate to one coupler bulk plate to form the end caps for the avionics bay. I mounted a U-bolt and terminal block on each end cap. I stacked both end caps and drilled two holes for the all thread. On the upper end cap, I installed the all thread and attached with bolts and washers. I slid the upper end cap assembly into the top of the payload section and attached the lower end cap over the protruding all thread and fastened it with washers and wing nuts. I then marked the all thread and cut it to length with a razor saw. I used a file to clean up the sharp edges and ran the wing nuts over the cuts a couple times to make sure they worked smoothly.
I measured and cut the altimeter sled from a piece of G-10. I epoxied 1/4" launch lugs to fit over the all thread sections. I then measured and drilled the mounting holes for the altimeter, battery mount, and magnetic switch. I also drilled holes next to the battery mount to allow for a zip tie to be used to secure the battery. I installed the battery mount and secured it with small nuts and bolts. I installed the mounting hardware for both the altimeter and the magnetic switch. I then connected the wiring from the battery to the switch and altimeter.

For the ejection charge wiring, I drilled small holes in the end caps and installed wiring sections from the altimeter wiring kit. I left off the detachable connector for the main charge since that end cap is fixed. I connected the wire directly from the main terminal block to the main connection on the altimeter. I connected the detachable wire section halves for the drogue to the altimeter and end caps. I used a small amount of epoxy to seal the holes in the end caps. After installing a battery, I was able to test the altimeter. I was able to turn the altimeter on and off by swiping the magnet by the appropriate location on the payload tube. I drilled the altimeter staic ports - 4 evenly space holes around the payload section. I connected christmas tree lights to the main and drogue terminals and validated connectivity with the altimeter. With the avionics bay sealed, I was able to draw a vacuum on the bay and watched the lights "fire" - first the drogue then the main.
The nose cone is relatively simple compared to the rest of the rocket. I drilled a hole in the base to allow the eyebolt to just fit through. I drilled a hole in the nose cone shoulder large enough to slip a nut in. The next part is a bit tricky - I was able to get the nut on the eyebolt and tightened it down snugly. I poured a small amount of epoxy inside the shoulder hole to secure the nut. I put the nose cone on the payload section, the drilled a hole for the first shear pin. Once this pin was installed, I marked, drilled, and installed two more pins.
Finishing
I used Krylon gray primer and sanded any rough areas I created (the QT is really smooth!). I did apply some Bondo filler to smooth out some uneven spots on the fin fillets. The nose cone was painted with Krylon Glossy Black, and the payload and booster were painted with Krylon Banner Red.
I contacted Mark @ Stickershock, and he made up a Der Red Max set of decals for the Endeavour. Awesome service, and awesome decals! I finished off the rocket with a coat of Krylon Clear.
Flight
For the first launch, I chose an Aerotech J460T reload in a Rouse Tech 54/852 case with a plugged forward closure. The flight would use the new PerfectFlite StratoLogger 100 altimeter for dual deployment recovery. Ground testing determined ejection charge sizes as follows:
- Drogue: 1.125 grams
- Main: 1.625 grams
Sim details:
- RockSim: 3813
Boost was fairly straight and overall exellent.
Recovery
Booster harness was a 15' Giant Leap Rocketry 1/4" tubular kevlar shock cord with sewn loops. I used quick links to attach it to the u-bolt mounted on the forward centering ring and to the lower eyebolt on the avionics bay. I decided to fly without a drogue chute based on experience with my Horizon. The main harness used another 15' kevlar shock cord and quick links. The main chute was a 48" TAC-1 packed into a 4" by 9" deployment bag from Fruity Chutes. A Fruity Chutes 12" pilot chute (wrapped in a kevlar chute protector) was attached to the top of the deployment bag.
The StratoLogger 100 altimeter was set to deploy the drogue at apogee and the main at 700'. Ejection charges were made using plastic wrap, Quest Q2G2 long lead igniters, and masking tape.
Apogee separation was just visible, and I could follow the rocket as it fell. At 700', the nose cone popped off and out came all the recovery gear. Except... the main didn't deploy from the bag. The pilot chute was nowhere to be seen. Post flight inspection showed that the pilot chute was not present. Despite carefully following my checklist, I can only surmise that I forgot to attach the pilot chute to the top loop on the deployment bag. The SL100 was beeping out 3398 ft.
The rocket sustained minimal damage and is ready to fly again.
Summary
Great kit and awesome motor! I felt really good about this flight despite the error with the pilot chute.
Other Reviews
- Public Missiles Endeavour By Dave Hanson
Single-stage scale-like High Power rocket kit. This was my second kit from PML, and my biggest rocket yet. The parts were typical of PML kits: sturdy, paper-phenolic airframe, heavy-duty plastic nose cone, G-10 fiberglass fins, and assemblies for the "Kwik-Switch" mount and ejection piston. All parts were present and in good shape. I found the instructions easy to follow and well laid-out, ...

 |
 |
Flights


Sponsored Ads


|
|