| Construction Rating: | starstarstarstarstar_border |
| Flight Rating: | starstarstarstarstar |
| Overall Rating: | starstarstarstarstar_border |
| Diameter: | 8.25 inches |
| Length: | 95.00 inches |
| Manufacturer: | Sheri's Hot Rockets  |
Brief:
Sheri's Hot Rockets Saturn V is a high power (54 mm engine mount), 1/48 scale model of the famous NASA moon rocket (Sheri also offers this Saturn V with dual 29mm engine mounts although I wouldn't recommend it as it needs the bigger motors). Sheri keeps a consistent "Buy It Now" presence on eBay or you can order it directly off her website. As of this writing, the list price is $449, although she does have occasional sales where she'll knock the price down a bit and/or offer free shipping. However, as I've noted in other reviews of SHR, most of her kits are literally built to order so be prepared for a wait.
Construction:
The kit that I purchased includes the following parts:
- 1 main body tube, 8.25" x 49"
- 1 tube coupler, 8.25" x 3"
- 1 upper stage body tube 5.25" x 24"
- 1 3.125" Service Module body tube
- 1 Styrene sheet 0.010" thick
- 1 Styrene sheet 0.030" thick
- 1 Fiberboard stock 1/8" x 12" x 12" (for display nozzle mount).
- 4 ¼" ply centering rings (not all the same, but they're marked)
- 6 corrugated styrene wraps
- 2 sheets white cardboard stock
- 125 1mm x 1mm styrene detail strips
- Cast resin Apollo Command Module
- Cast resin LES rocket
- 5 Cast resin F1 Main Engine display nozzles
- 38mm motor mount tube with 54mm-38mm reducer rings
- 54mm motor mount tube
- 5 pieces 3/32" round styrene tubing
- 1 Shock Cord eyelet w/ blind nut
- 1 Shock Cord eyelet with screw end
- 1 piece 1/8" x 1/8" x 3" long hardwood stock
- 1 piece 3/8" round by 6" long hardwood dowel
- 2 piece 3/16" round by 4" long hardwood dowel
- 3 piece ¼" x 3/8" x 36" long square balsa stock
- 2 piece 3/16" x 3/8" x 36" long balsa stock
- 1 piece 3/16" x 1/4" x 18" long balsa stock
- 2 "L" brackets with nuts/bolts/washers
- 5 flathead brass screws
- 2 wood screws
- 2 ¼" launch lugs
- 1 set waterslide decals
- 1-¼" x 1" x 1" fiberboard anchor block for screw eyelet
- 1/8" x ¾" x 6 ¼" plywood fin structure
- 4 Bolt/Washer/Blind nut assemblies (optional for LEM section attachment)
- Full size construction drawing
- 49 page Instruction manual
- Template Manual
- CD-ROM copy of the instructions with a RockSim file
Sheri's kits do not include parachutes or shock cords--she recommends 2 x 55-60" chutes for the lower portion and a 60" chute for the upper portion.
As was the case with the Sheri's Saturn 1B, I purchased my kit shortly after it was introduced, and Sheri subsequently made some improvements. After I noticed on the website that the Saturn kits had been improved with more cast resin parts, I emailed asking if I could purchase the extra resin parts for the Saturn V kits. Sheri was happy to oblige. She'd upped the price of the Saturn kits when she improved it, so I paid the difference between the current price and what I'd paid. The additional parts for the Saturn V were:
- 4 engine fairing assemblies
- 4 fins
- 4 piece upper stage transition shroud
- 5 display engine nozzles (nicer than those originally included)
- 4 "Reaction Control Systems" (the maneuvering rockets on the command module)
- Escape tower parts (I didn't use these)
- A number of detail parts
These cast resin part are a vast improvement over the original kit. As purchased, the fairing assemblies were manufactured from pieces of body tube and plywood with each stringer an individual piece of 1mm x 1mm styrene that was glued into place. Similarly all the stringers on the 2nd-3rd stage transition shroud were individually glued into place. I suspect many modelers wouldn't have bothered and just left the stringers off.
As with the other SHR models, the full size construction drawing is a nice touch--providing quick reference when you're unsure how it should go together. One downside is that this drawing is so big that finding somewhere to put it is non-trivial. I ended up tacking it to the wall...
The 8.25" diameter main body tube is simply massive. The 5.25" diameter third stage body tube is the same tube used in her companion Saturn 1B kit, and the 8.25" tube is of the same 1/8" thick walled, uncoated type. As I did on the S1B kit, I pre-finished the two big body tubes prior to assembly by rubbing slight thinned Elmer's Fill 'n' Finish into the tube surfaces. After it dried, I sanded it down with 180 grit and then 300 grit sandpaper. As before, this worked well, but working a body tube over 8 inches in diameter and 4 feet long took a long, long time. It turned out that this would become a common theme while building this rocket.
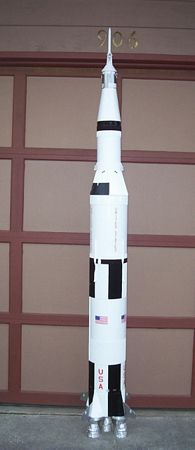
 Make no mistake, this is a big rocket. By far the largest rocket I've built to date. Effectively this is the largest Saturn V rocket you can display with a typical 8 foot ceiling (with the display nozzles in place, it clears my 8ft ceiling by little more than an inch). Previously, the largest rocket I'd built had been the 1/70th scale Apogee Saturn V (yes, I do really like Saturns). While the difference between 1/70th and 1/48th may not sound like that much, remember the effect is three dimensional, effectively making Sheri's Saturn 3 times the size of the Apogee Saturn. With something this big, even seemingly ordinary steps can be very time consuming. Not necessarily a bad thing, but be prepared. This is a long, involved build.
That being said, the actual build of this rocket is relatively straightforward. I think it may have been easier to build than the SHR Saturn 1B, although it did take quite a bit longer due to the larger size. The cast resin engine fairing assemblies were particularly appreciated. The original instructions devoted 10 pages to building up the fairings. With the assemblies, it was reduced to marking the body tube and gluing the fairings in place. I wrapped some coarse sandpaper around the body tube to sand the appropriate body tube contour to the fairings, thick CA was used to attach the fairings, and then epoxy fillets were added for strength. The fins are then simply glued to the fairings (again, attached with CA then epoxy fillets). During an email exchange with Sheri after my Saturn was completed, she suggested adding small screws to anchor the fairings to the body tube if you plan to use particularly high thrust engines. Since mine was already finished, I didn't bother to retrofit the change, but if you're planning to build one as a flier, it would be a worthwhile addition. A more robust fin attachment may also be in order. Between two flights and two cross-country shipments, I think I've knocked every fin off at least once.
The 49 pages of instructions for the basic assembly of the rocket are reasonably good (and as noted, the full size construction drawing is helpful), plus there are several more pages of templates and patterns for making the various parts and pieces. As was the case with the Saturn 1B, the instructions for adding additional details were weak--basically little more than "shape the part from balsa stock per the template", although anyone capable of building this rocket really doesn't need much more in the way of details. The cast resin detail parts were a nice additional, although they are not all that detailed. Again, if you want to make it super detailed you'll need to modify or make parts from scratch. Having already decided that this was to be a flier, I didn't worry about adding additional details.
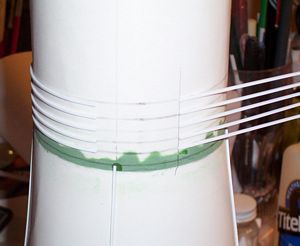
Like Sheri's Little Joe II and Saturn 1B kits, this kit uses corrugated styrene sheets to simulate the external stringers. The corrugated sheets are pre-cut to the appropriate width, although with a main body tube circumference of over 25 inches, it is necessary to glue three sections of styrene together to get the necessary length (using pieces of the 0.010" styrene as a doubler). Attachment of the wraps was similar to that for the Apogee Saturns: taping the wraps in place then using CA to seal the edges to the body tube.
Again, as with Sheri's other kits, the tube couplers need to be cut down to the appropriate diameter, although at least the main body tube coupler is pre-cut to length. (I fear cutting a length off that massive 8.25" body tube would have proved challenging.)
 One step that proved somewhat difficult is centering the upper stage transitions. Most kits provide centering rings to locate the smaller diameter body tubes in the center of the transition. Sheri's kits simply provide a solid bulkhead, and the smaller tube is butt glued to the center of the bulkhead. It works, but it is tricky to get everything correctly positioned and centered. In fact the entire 2nd-3rd stage transition was tricky. The transition shroud is made from 0.030" styrene, and per the original instructions, the stringers were individually glued into place, which was tedious and difficult. With the additional cast resin transition shroud pieces, it's a relatively straightforward matter to fit and glue the cast shroud pieces in place. However, one thing I'd change is the attachment of the shroud to the bulkhead: per the instructions the shroud overlaps the bulkhead with the corrugated wrap at the top of the 2nd stage and everything would match up. However, with the cast resin shroud pieces on top of the styrene transition, the base of the shroud ends up significantly larger in diameter than the top of the 2nd stage, making for a very noticeable step. If I had it to do over again, I'd fit the shroud to the top of the bulkhead, then cover the bulkhead/shroud joint with the cast resin pieces.
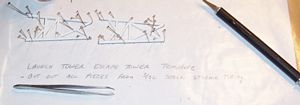 This uses the same cast resin Apollo capsule as the Saturn 1B kit. It's big, solid, and heavy at 8 ounces (although as it turned out, not quite heavy enough). The additional parts Sheri sent me included cast resin parts for the escape tower. However, as with the Saturn 1B, I elected to scratch build the escape tower from styrene tubing. I think the scratch built tower looks better, and I sort of enjoyed the challenge.
Sheri includes ¼" launch lugs, but given the large size and weight, I felt these would be insufficient so I left them off and I fitted rail buttons. Unfortunately I overlooked a detail when adding the buttons: rails are rather wide and initially I didn't provide sufficient clearance for the rail to clear the engine fairing. I strongly recommend the addition of the rail buttons--just be sure to center them between the fairings.
Finishing:
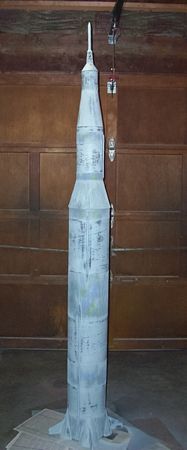
As noted previously, I pre-finished the body tubes before starting assembly. But this thing is big. Really big. It takes a lot of priming, sanding, and painting to paint. In fact, I went through more than three 12oz cans of automotive primer and another three plus 12oz cans of Krylon color while painting this Saturn. I did make things a little simpler by painting the main rocket before adding the detail parts, which I'd painted separately.
Masking for the black roll patterns was particularly troublesome since sealing around the sharply defined corrugations was extremely difficult. This was particularly true for the 2nd-3rd stage transition. Despite my best efforts, I got a lot of bleed through of the black paint. A trick that I successfully used to 'patch' the black bleed through on white/black patterns is dry film typing correction tape. It's delicate to work with, but it can provide straight, crisp color breaks, and the color match is generally at least as good if not better than touch-ups of white paint with a paintbrush. With a coat of clear, the fix is nearly invisible. I then used Krylon Chrome to paint the fins and lower fairings and the Command Service Module.
The waterslide decals by Space Model Systems are beautiful, reasonably easy to apply, and come with good instructions on placement. (Although once again, it's time consuming to apply them.) After masking off the chrome painted areas, a coat of clear finished everything off [Note: you do not want to clear coat chrome paint--it ruins the chrome finish. Been there, done that.] The effect is striking. It was a whole lot of work, but the result was a really good looking, really big Saturn V model.

As purchased, I wonder if I would have built this kit (and if I had, there is a good chance I would have left all those stringers off the fin-fairings and the 2nd-3rd stage transition). But the post-purchase improvements make it worthwhile. I still have reservations regarding the rough surface body tubes and the detail parts could have better detail, but overall it makes for a good kit. I'd rate it between a 3 ½ and 4. Giving it the benefit of the doubt, I'll call it a 4.
Construction Rating: 4 out of 5
Flight:
As previously noted, Sheri's kits do not include recovery components. Although she recommended two 55"-60" parachutes for the lower section, I ended up going with a single 90" X-form chute, connected with a generous length of nylon strap. For the upper section I went with the recommended 60" chute with a harness to hold it horizontal to protect the escape tower on landing. After my less than successful experience with the Saturn 1B harness, I decided on overkill. I drilled a hole through the top of the upper stage and the upper transition coupler, epoxied a nut inside the coupler, and threaded a (removable) eye bolt through to attach the harness. It also acts as a positive retention for the upper transition and Apollo capsule.
For positive engine retention I added an Aero Pack 54mm engine retainer. Sheri includes parts for a 38mm-55mm motor mount adapter, but for it's first flight with a 38mm motor, I invested in an Aero Pack 38mm-54mm adapter. The Aero Pack retainer and adapter are outside this review, but they are fantastic--definitely five stars!
With parachutes, chute protector, engine retainer, six cans of paint, epoxy, etc. (but less engine), this Saturn V weighed in at a whopping 12 pounds. Before it was finished I'd gone into RockSim with Sheri's baseline file, and decided an I211W-S would be ideal for the first flight. Unfortunately the weight in Sheri's RockSim file was rather optimistic, and my Saturn V was over 3 pounds heavier. Suddenly an I211 was marginal for velocity off the rail, but since I'd already purchased the motor and since a 38/480 was at the time the longest 38mm casing I had, I was somewhat committed.
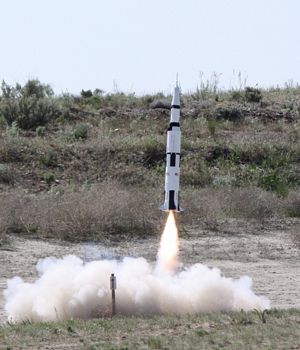
First flight was at "Fire in the Sky 2009", better known as FITS, a major high power launch held in central Washington over Memorial Day weekend. Showing up at pretty much any launch with this rocket will make you a center of attention, and FITS was no exception. As previously mentioned, the rail buttons proved to be an issue when the launch rail wouldn't clear the fin fairings. (To help hide the black buttons I'd centered them in the black section of the roll patterns.) So there was a false start and a minor thrash while I relocated the rail buttons. But finally everything came together. Liftoff of a big Saturn V is spectacular, and this was no exception. There was a slight weathercock off the rail (remember that marginal velocity off the rail) but the flight was spectacular. I'm not sure about the altitude. RockSim said 610 ft, but it didn't look that high to me. Perhaps my perception was fooled due to the large size. At any rate, ejection occurred a moment after apogee and the chutes opened shortly there after. There was a minor problem: the lengthy shock cords for the upper and lower sections become entangled so the two sections came down together. The main concern was that the entangled shock cord had the effect of reefing that big main parachute, so descent was a little more rapid than I would have liked, however, touchdown damage was minor. The most serious being one fin being snapped off.

After repairs and a cross-country shipment came the big test. This was going to be my Level 2 Cert Flight at LDRS 28. Motor selection was a 54mm J275W-S (we had a discussion at FITS, it was agreed that the only appropriate propellant selection for a Saturn V is White Lightning). Of concern was the rocket CG. With the 38mm I211W, the CG was already close to the recommended aft CG limit. The J275W was going to be roughly a pound heavier so I'd gone to work on the Apollo capsule. I drilled and ground out a large cavity in the base of the capsule and epoxied enough lead shot in the hole to raise the total weight of the Apollo from 8 ounces to an even pound. Of course this had the undesirable affect of making the rocket even heavier, but I saw little choice.
The LDRS cert flight became a challenge but for an unexpected reason. Even at LDRS, a 7.5' Saturn V will make you a center of attention and I was surrounded by photographers as I prepared the rocket on an 8ft rail. Even with the J275, RockSim predicted that it wouldn't reach stable velocity until a few inches before it left an 8ft rail. It was windy when the Saturn V was launched, and I feared a weathercock off the rail, but the flight was magnificent and almost perfectly vertical with a slow (by mod-rock standards) boost. RockSim had predicted 1600 feet, and that appeared to be about right. Motor ejection occurred right at apogee, and both chutes opened moments later to a round of applause. I figured I was home free. Wrong.


While the lower half of the Saturn descended nicely, the upper portion caught a thermal and started drifting. At times it definitely appeared to be going up. It drifted so far I lost sight of it before it touched down. I knew I had to try, but with little more than a general area where I thought it came down, I was not optimistic that I would ever see it again. If someone had asked me to list everything that might have gone wrong on my cert flight, I would never have even considered losing the rocket, but suddenly that was a very real possibility.
Amazingly, I found it. It took over four hours and two separate trips out. I found two other lost high power rockets and headed back to the launch area midway through the search since I literally couldn't carry any more. I'd like to say it was a properly devised search that yielded the recovery, but in reality it was more luck than anything else. After landing, the wind had dragged it through a corn field knocking the escape power off in the process, but I was able to backtrack through the knocked down corn and located the missing tower. The result was a successful Level 2 high power certification.
Recovery:
A couple comments on the flights: On large rockets like this that are intended to come down in two portions, I generally make a point to insert the upper section parachute first so that as the sections pull apart, it'll be sure to pull out the lower section chute. This is especially important on this big Saturn V. Even using a fairly generous ejection charge (over 2 grams on the second flight), the chute protector has yet to leave the body tube. Putting the upper chute on the bottom increases the risk that the two sections will get tangled (as happened on the first flight), but that is definitely preferable to the possibility of the lower section parachute failing to exit the rocket. Also, as the cert flight demonstrated, the upper section can use a smaller chute (or if using a 60" chute reef it a bit).
This rocket is a fine flier that can't help but look magnificent in flight. I give it a full five stars.
Flight Rating: 5 out of 5
Summary:
Be forewarned: building this rocket takes a commitment well beyond the $449 sticker price (plus I figure around another $200 for parachutes, motor retainer, paint, etc.) It's big, complex, and will take a major commitment of time to do the rocket justice. I also remain less than thrilled with the rough surface body tubes, although the strength and weight is more readily justified on a big high power rocket such as this. The cast resin parts that were added after my original purchase are a major improvement, but the detail parts could be a little more detailed.
I really like this rocket. I don't know how often I will actually fly it. It's not trivial to put so much time, effort, and money at risk, but it's a magnificent flier and pretty much guaranteed to draw a crowd. But perhaps the best endorsement I can give is, should this Saturn V meet an untimely demise, I'm pretty sure I'd build another.
Overall Rating: 4 out of 5
Sponsored Ads


 |
 |