Fishhead Rocketry Gooney Vector G Original Design / Scratch Built
Scratch - Gooney Vector G {Scratch}
Contributed by Bill Eichelberger
| Construction Rating: | starstarstarstarstar_border |
| Flight Rating: | starstarstarstarstar |
| Overall Rating: | starstarstarstarstar_border |
| Published: | 2010-01-22 |
| Manufacturer: | Scratch |
(Contributed - by Bill Eichelberger - 01/22/10) 
Brief:
I've long flown the Goony flag, but a recent thread at TRF showcasing different Goony creations got me wondering if I was neglecting the Goony side of my brain. After much introspection it was determined that not only was I neglecting the Goony side, but the rest of it as well. With that decided, I began spending time at www.ninfinger.org studying the Estes catalogs trying to find suitable candidates for "goonification". I came up with a couple before switching to the Centuri catalogs, where I had an Epiphany. I realized that Goony was a life force all its own and that no rocket could be safe from parody. Not even the Centuri Vector V.
Construction:
Parts List:
- PNC-60 nose cone
- 7.5" BT-60 main body tube
- 1.75" BT-80 lower body tube
- 2 CR-2060 centering rings
- 3 CR-6080 centering rings
- 6080 paper transition
- BT-20J engine tube
- engine hook
- CR-520 engine block
- 3/32" basswood fin stock
- 24" length Kevlar® shock cord
- 24" length 1/8" sewing elastic shock cord
I've forever been intimidated by rockets with paper transitions, and that, coupled with the need to eventually make my own 6080 centering rings (this was a "spare parts" build,) made me put this idea onto the back burner once I had gathered the bulk of the parts. My first attempt at a paper transition had come to a bad end due to some apparent miscommunication between the program and my printer, an occurrence that took the wind out of my sails in a big way.
I got reinterested in the project one Friday night with a Sunday launch breathing down my neck. I found the tools I needed to successfully make the rings and transition, and Jay Goemmer pointed me in the right direction to find a widget that allowed me to print off a five fin BT-80 fin marking guide.

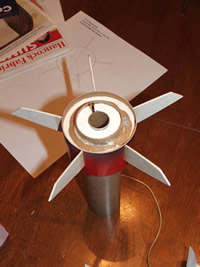

Things went pretty quickly from that point. I decided to stick with the stock size fins, so that meant going with the Estes Viking-style fin orientation. I also decided to go with an internal launch lug mounted on the side of the BT-60. This meant that I'd need to make holes in my beautiful handmade centering rings, so I found and icepick and gouged my way through both. It also meant that I'd have to find a way through the transition, also not a problem, but also not an aesthetic high point of this bird.
Finishing:
The basswood fins didn't need a lot of help hiding the grain, so I went with one coat of thinned Fill & Finish and a couple of coats of primer, which was how it looked for the first two flights. From there I 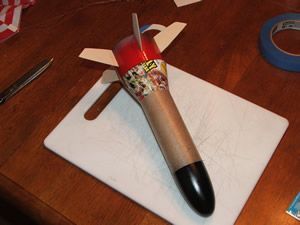 sprayed the fin can with a no-name blue, Valspar silver and Testor's Candy Apple Red that I'd wanted to try for a long time. The nose cone had been sprayed silver when I did the mid-section of the rocket, which played right into the Testor's, which is supposed to be sprayed over silver or gold metallic. I was a little concerned about the possibility of crazing, but the Candy Apple coated nicely and looked great without a hint of crazing. I had planned to print up a set of stock decals to finish the project, but some of the no-name blue metallic pulled away from the scrap of BT-80 that made up the lower body tube during the unmasking and I kind of lost my enthusiasm for the project. For those who might be interested in following in my clown shoe footprints, Sandman has a decal set that he put together.
Flight:

Flight day turned out to be beautiful from the start, and with the sun already up and warming things up by the time I awoke, I decicded that the time was right to spray a coat of primer on the rocket to improve the looks a little. By the time I had everything ready to leave a couple of hours later, the primer was dry and I thought everything was going my way.
Ten minutes later I was parked off the side of US 27, realizing that despite the beautiful day, the convertible may have been a mistake. Despite my careful packing of the days birds, two were damaged, one of them being the Vector G. Turns out that the hasty fin attachment on Saturday evening was over a painted section of the scrap BT-80. I didn't think to sand the paint to rough it up, and something as slight as falling over in the back of the car was enough to spring a fin despite the double fillets. Once at the field I roughed up the area where the fin had been, then re-glued it with LocTite Gel CA. Good enough for a couple of flights, I hoped.
With a field the size of the VOA, I felt comfortable trying with a C6-5 for the first flight. I checked the fins for any wiggles I might have missed and announced it as a heads-up flight. The Vector G leapt off the pad quickly and arced to the north in the light breeze. Much better than I had hoped for. Ejection was perfect and recovery, while a decent walk into the tall grass, was likewise.
The second flight, also on a C6-5 (because it was all I had,) was almost a carbon copy of the first. The only difference was a fin breaking off on recovery, but again it was easily reattached with gel CA. Subsequent flights are planned on cozy B6-4 Field using A8-3's and B6-4's, likely after I break off and reattach the remaining fins.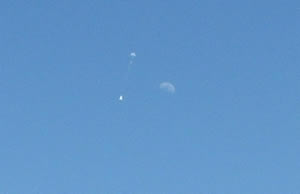
Recovery:
Several years ago I won an Ebay auction for some clear plastic parachutes that came 10 for $1. They got shuffled around during our move in 2005 and recently resurfaced. I hadn't thought of a parachute when I left the house, so I had to scramble come flight day. The chute performed perfectly, and it would be difficult to find fault with the deal now.
Summary:
Pro's: Performance. The sheer gooniness of it all.
Con's: Some of the "spare parts" I used had been previously used as paint tubes which made fin attachment a challenge. The pizza and wing ad that I used for the transition was too thin and slick and wouldn't accept the thin CA that I normally use to beef cardstock up.
Sponsored Ads


 |
 |