Tinkerbell
By Steve Lindeman
2015-04-16
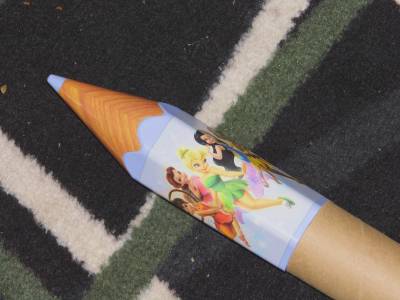
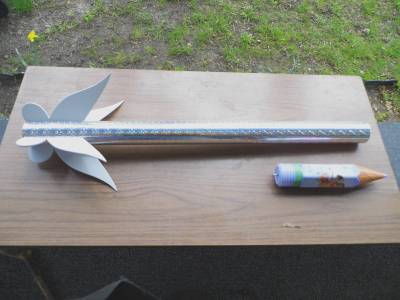
Tinkerbell is going to be a scratch built 38" long, 2" dia. rocket with a 29mm motor mount. She will have a custom 8" nose cone that is a plastic pencil cup holder that I bought on clearance at Wal-Mart for a buck (actually I bought 2 as I was going to build one for my daughter as well). BT will be slotted for TTW fin construction and will be wrapped in self adhesive prismatic paper. Fins will be custom made in the shape of fairy wings. I'm using Open Rocket 15.03 for layout and sims. This will be my 2nd mid-power scratch build but 1st with a 29mm MM.
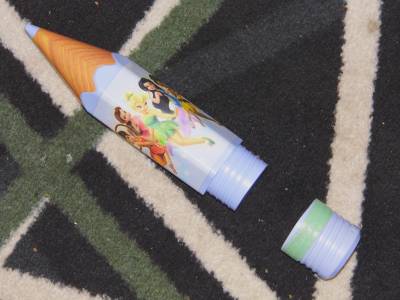
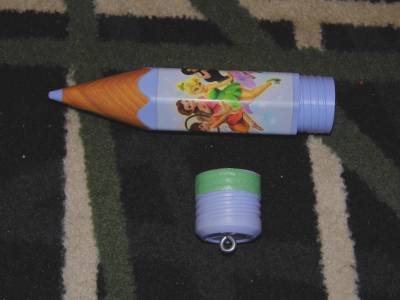
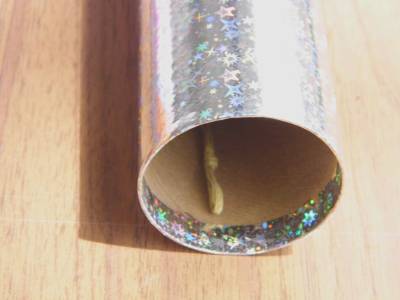
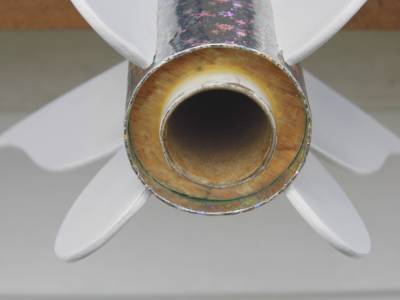
Parts & NC
2015-04-16
The parts for this build will come from my stock pile of balsa and tubes and will all be hand cut with the exception of the NC which is the inspiration for this rocket. Here's a shot of the NC.

Motor Mount
2015-04-20
The truth is that I build this MM specifically for G or possibly a 29mm H motor this past winter before I knew what it would end up in. I had made several different size centering rings to fit the different size tubes that I have on hand so once I found the NC for this build I just had to grab the right rings and glue them on. While building the MM I was not thinking about recovery so I had to go back after it all dried and drill a 1/16" hole in the top ring so I could thread some Kevlar through and tie around the MM. For this I used 30" of 300# kevlar and will be knotted on the other end so that it is just inside the end of the BT for attaching elastic cord to.
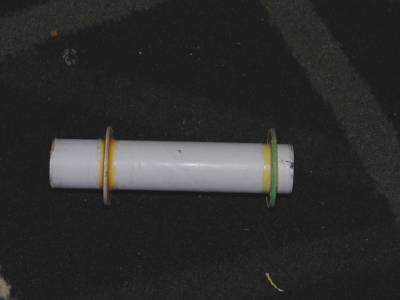
29mm MM
Finished MM

Nose Cone
2015-04-20
I cut a 1 3/4" disc out of some 1/8" plywood to aid as anchor support for the screw eye. A hole was then drilled in the center and screw eye installed. The bottom of the screw eye will also allow me to add washers for nose weight to aid in balancing rocket with different size motors. 2 layers of green painters tape were wrapped around top of base collar to give it a snug fit in the BT.

Screw eye attachment

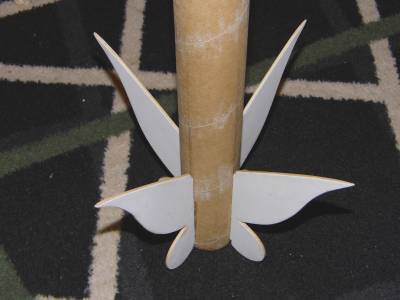
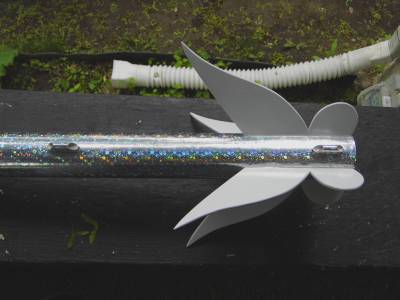
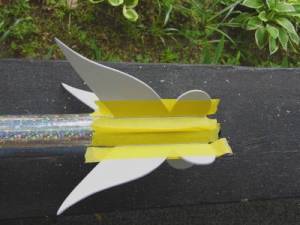
Wings
2015-04-20
Next up I went to the web in search of Tinkerbell for the wing design. After looking at several photos I drew up the pattern for my wings the copied it to cardboard. After cutting it out I then used this pattern to trace out the 8 parts for the wings. These were then glued together with superglue in their respectful pairs with wood grains going in opposite directions. They were then lightly brush coated with white glue and paper covered. The four wings were then stacked and placed under two 6# bags of corn cob pet bedding overnight to press them out flat.
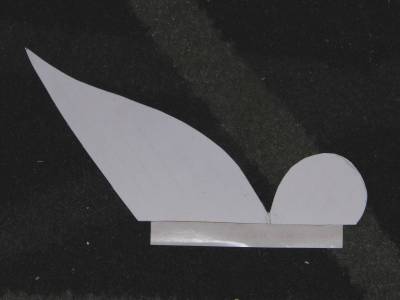
Wing Pattern
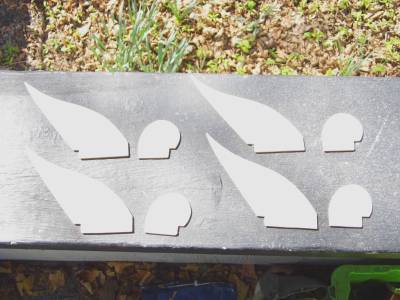
Wing pieces
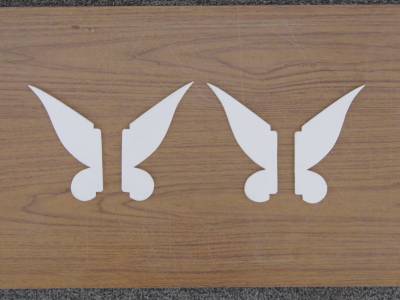
Glued together & paper coated

Body Tube
2015-04-21
Work on the BT started with filling the spirals with HobbyLite and then a light sanding after that dried. Next step was to cut the fin slots in the BT. First I made a template for the fin location and marked the BT where the slots would be. Then I used a small piece of aluminum angle molding to use as a guide for my Exacto knife and cut out the slots. After the slots were cut I then wicked some superglue around the openings and then sanded them smooth when dry.
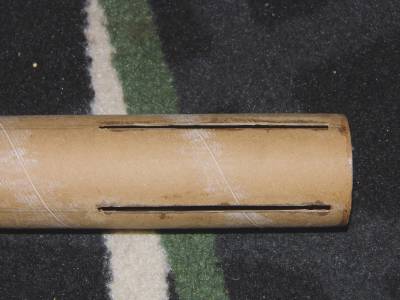
Fin Slots
After slots were finished I did a test fit of all parts to ensure all would go together as designed. Fin tabs will need be to be sanded down for proper fit but all looks good so far.
Test Fit
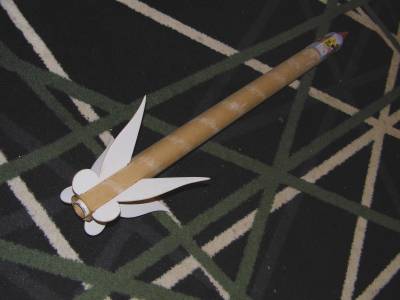
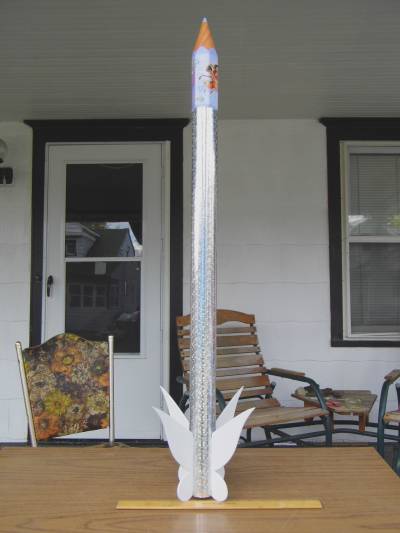
Painting & Covering
2015-04-26
Wings were given a final gloss coat of white and after dry were given 2 coats of Dupli-Color Clear Effex so they look like they are dusted with fairy dust. Now for the fun part. The BT is not going to be painted but instead will be cover with some contact prism wrap that I found in the clearance isle at Wal-Mart. After making measurements I cut a piece of wrap 31" x 6 3/4" to give me a 1/2" overhang on both ends. BT was then marked with a line the length of the tube to aline the wrap. After tube was wrapped overhang was trimmed in 1/4" strips and folded over. Slots were then reopened with an Exacto knife. After that everything was test fitted again. Launch lugs were also covered at this time. I then glued them to a 1/8" balsa strip and after measuring and notching the covering on the rocket where they were to be mounted they were glued on.
Top of BT
Bottom of BT
Wrapped BT (picture dosn't do it justice)
Final Test Fitting
Launch Lugs
Now I just have to glue it all together once I figure out what epoxy I'm going to use for the fillets. This will be the first time I've built one this way so not sure what to use (I'm thinking probably some 10-15 min. epoxy). Will have to do some research first.

Glueing it all together
2015-05-01
Today I made a trip to my local Hobby Lobby and purchased some Ultrafast Crystal Clear epoxy cement made by Hammer Head America. Package says that it sets in 5 min! and cures in 24 HRS! and it was mis-priced at $3.47 (the rest were priced at $7.99) so decided to try it. Will be doing some mock-up fins first to see how it works before doing the actual rocket as I want to try to avoid any mistakes at this stage of the build. Fins were now tacked in place with a bead of superglue on the root edge before masking for the fillets.
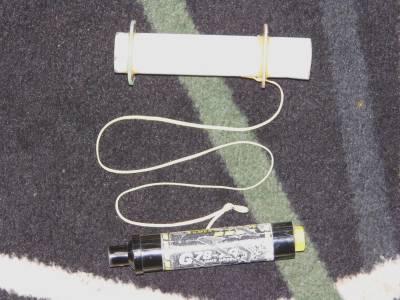
Fin Fillets & Parachute Installed
2015-05-16
Yesterday I taped off the fins and BT leaving an 1/8" gap in preparation for the epoxy fillets. I did two fins at a time as I didn't mix enough epoxy to do all four at once and as it turned out was a good thing because this epoxy sets fast. As epoxy set on each fin I removed the tape for a nice clean line down the fin and BT. Rocket was then set aside to cure for a couple hours. Looks great!
I then went and installed the 24" parachute by attaching it to 9' of 1/4" elastic cord which was tied to the NC and the Kevlar loop inside the BT. After that rocket was set aside to allow epoxy to finish curing.

Masked for fillets
Rocket is now ready for its maiden flight which will be on either a 24mm Estes E9-6 with an adapter or my last 29mm econojet F27-8 that I found in the bottom of my range box. Open Rocket says 650' for the Estes E motor and 1133" for the F motor. I may also try one of the new Estes E or F 29mm Pro motors if I can come up with a little extra cash. Wind on launch day and launch site will determine which motor I use.
Motor Selection
2015-05-22
Made it out to Hobby Lobby yesterday with a 40% off coupon and purchased a twin pack of the new Estes Pro Series E16-6's. End price, $15.90 with tax. God I Love Hobby Lobby! As soon as I got home I took one out and checked it for fit in the rocket. Needed 2 wraps of tape to get a good friction fit. Checked balance and its right on the money. Just need to add some dog barf and she's ready for her maiden flight on the 30th at Michigan International Speedway with the J.M.R.C. bunch. Re-ran the sim for this motor and it says 786'. Sounds good to me. Can't wait. T - Seven days and counting.
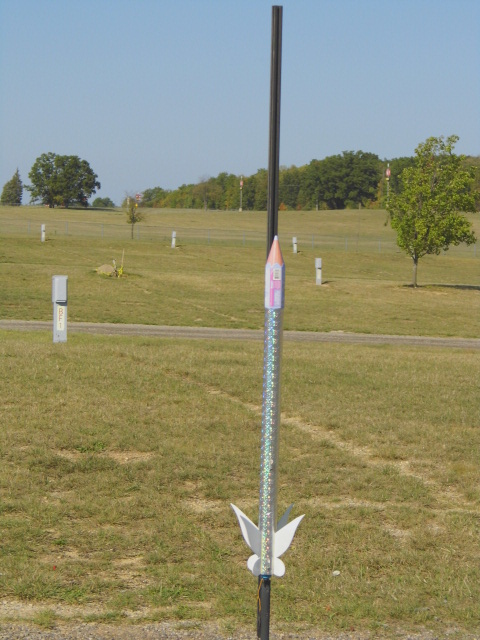
Maiden Flight & Recovery
2015-05-30
Maiden flight took place at 12:21 pm on 5-30-15 with the J.M.R.C. club in Brooklyn, MI at Graves Farm Campground by M.I.S.. Engine used was one of the new Estes 29mm E16-6 motors and was launched in between rain showers with a low wind of maybe 4 mph. Flight was perfect to between 700-800' as predicted by sims. Parachute deployed at apogee and decent was just right with rocket landing down range for a nice long walk of at least a couple hundred yards or so. Recovery showed no damage at all. All-In-All, an excellent first flight and motor choice for this rocket.
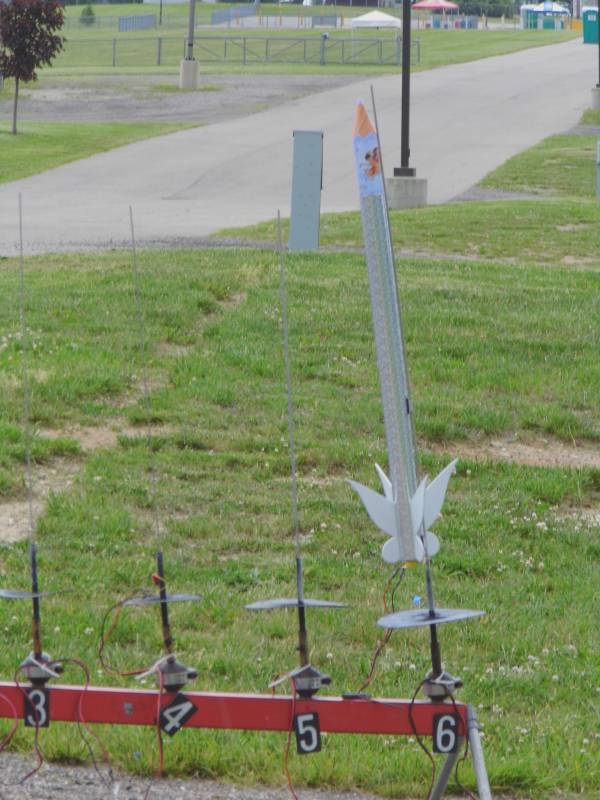
Tinkerbell in 5...4...3...
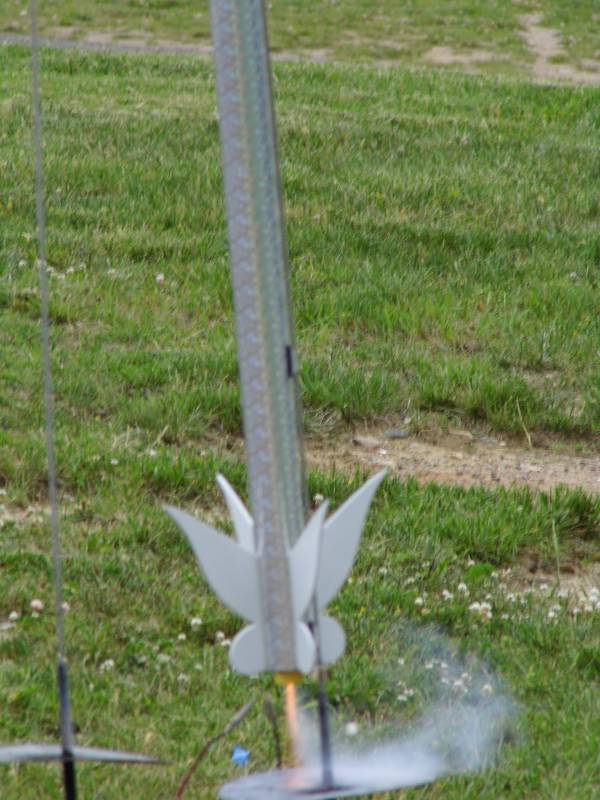
Tinkerbell launch
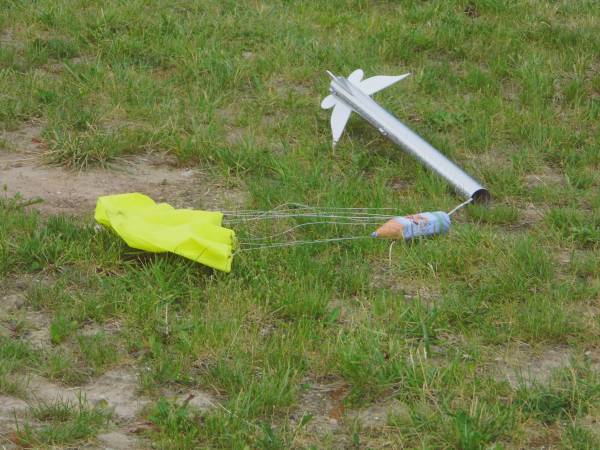
Tinkerbell recovery
(Looking back on this photo it looks as if I only have about a foot or so of shock cord but trust me, the cord is 9' long)
Post flight Comments
2015-07-17
This rocket now has 3 flights under its belt and is proving to be a beautiful flyer on the Estes E-16's. Not sure I want to tempt fate and try an F motor as I'm starting to get some damage to the bottom of one fin from landing on hard surfaces. And if I don't want to lose it would need to downsize the parachute which of course will result in more damage from faster descent. Should have made the fins from plywood. When I get around to its sister ship (as I said, I bought 2 different color pencil holder cups) I may do just that. This one was just an experiment to see if I could do it with what I had on hand and it's proving to be a blast. I also like the comments that it gets from other fliers at club launches.
Final Flight
2017-09-25
Well I tempted fate on Saturday Sept. 23, 2017 and flew it on an F20-7W. I added rail buttons to the rocket and it was a beautiful launch. Altitude was around 1100'. Wind was light but enough to blow it across the range and out into a farmer's alfalfa field. Lost sight of it as it came down behind a tree line. Spent an hour looking for it to no avail. M.I.A.
Last shot of Tinkerbell

Sponsored Ads

, Launch Pad/ Controller, Glue, Four AA Batteries, and Two Engines")


 |
 |