Scratch Noodle Toober Original Design / Scratch Built
Scratch - Noodle Toober {Scratch}
Contributed by Dick Stafford
| Manufacturer: | Scratch |
Brief:
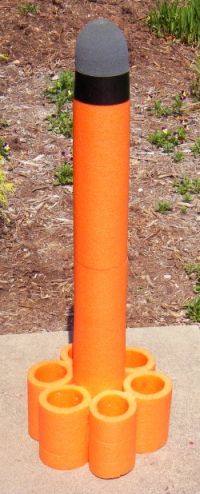
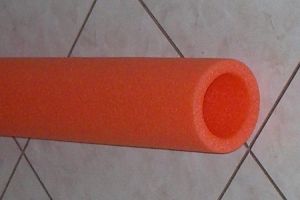
When I saw a pool noodle with a 2.5" hole down the middle, I immediately
saw a rocket. A tube finned rocket. Boink recovery. What a way to start the
Spring! I named the rocket Noodle Toober to pay homage to MDRA member Dave
Webber's Toober, which
has logged 200 high power flights.
Construction:
The components/materials include:
- Pool noodle: ~60" x 3.5" with a 2.5" center hole
- Apogee 24mm tube
- Foamboard (centering rings, bulkhead)
- Soft packing foam (nose cone)
- 1/4" dowel
- Wrapping paper tube (inside tubes and payload section's shoulder)
- Easter egg and kitty litter (ballast)
- Kevlar® twine
- 3/8" elastic
- Bamboo skewers
- Gorilla glue
- Gorilla tape
- Carpenters glue
I started by roughing the design out in RockSim and from there arrived at 5" for the length of the tube fins. I cut the fins using a custom sized guide made from a section of scrap 4" tubing. The dense foam cut well with a regular old hacksaw. I wanted mid-separation so I also cut the remaining ~28" chunk in half.
 I pondered
all sorts of fin attachment methods, the best of which may have been some
1" nylon doohickeys from the Home Depot hardware section, however, I
decided on an el cheapo method. I glued the tube fins together in pairs using
Gorilla Glue then glued the pairs to the main tube all at the same time. This
required four hands and some small bungee cords. As I was peeling off the loose
blobs of glue, I decided some extra support was needed, so I ran bamboo skewers
through each glued transition, both at the top and bottom of the tube fins.
These pegs were cut flush and I now have plenty of epoxy stirrers.
I pondered
all sorts of fin attachment methods, the best of which may have been some
1" nylon doohickeys from the Home Depot hardware section, however, I
decided on an el cheapo method. I glued the tube fins together in pairs using
Gorilla Glue then glued the pairs to the main tube all at the same time. This
required four hands and some small bungee cords. As I was peeling off the loose
blobs of glue, I decided some extra support was needed, so I ran bamboo skewers
through each glued transition, both at the top and bottom of the tube fins.
These pegs were cut flush and I now have plenty of epoxy stirrers.
The motor tube is about 12" of Apogee 24mm tubing held in place with foamboard rings. Carpenter's glue was used for the tube-ring interface and Gorilla glue for the ring-noodle interface.
I made custom sized liner tubes for the area between the top ring and the top of the aft noodle section, the top 4 inches of the payload noodle, and for the payload section's shoulder. I also added a foamboard bulkhead to keep the chute from blowing up into the payload. You see, this description is not in time sequence--I had already found that it got too heavy for boink recovery. I also hadn't left enough room for a chute, so the bulkhead is recessed a couple of inches into the fabricated shoulder. Oh well, stuff happens in real time design.
I turned the cone on my drill press from a piece of 4" thick soft foam. I installed a dowel in the foam using Gorilla Glue. This was hard to work with being so soft, but I got it turned. When I went to install it, I found 2 problems. First, it is round and the noodle is slightly ovate. I held it on with skewer pegs and a wrap of Gorilla Tape (the black stripe in the pics). Problem #2 is that the cone tapered from the get-go, and it would have been better to leave it full diameter for a couple of inches. No big deal, just something learned with 20/20 hindsight.
When thinking boink recovery, I didn't account for the nose weight required to make the rocket stable. A suitably sized plastic Easter egg, some kitty litter, and some more Gorilla Tape did the trick. This of course went in before the cone was finally taped on.
I have Kevlar® twine glued to the motor mount and elastic glued to the top section's shoulder. A small chute will be picked from the range box at flight time.
Finishing:
Finishing? We don't need to steenkin' finishing!
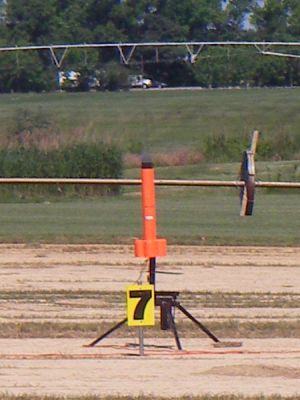
Flight:
I decided to fly the Noodle Toober on a F39 reload, which should have enough
punch to get it going. Since I didn't provide for positive retention, I made a
quick and dirty clip out of a coat hanger to augment the standard friction
fitting. I have had success with this method before. The wire clip fits around
the nozzle and through the slots in the closure. Legs extend down the side of
the motor mount. The clip is slipped on and wrapped with masking tape. I opted
for an 18" chute and used both dog barf and a chute protector.
Since I bought my 24mm RMS case, I have been using the Copperheads that come with the reloads. So far, my experience has been much better than ~5 years ago when I quit using them. The flight was quick and low. The draggy Noodle Toober stopped quickly after burn out.
Recovery:
Ejection was late but the recovery was successful. The launch got a laugh from
the crowd and they wondered why I bothered with a chute at all!
Summary:
This is just another goofy rocket that is good for a few grins. It is a poor
performer since it's so draggy. If anyone builds one, I recommend a 29mm motor
mount.
Sponsored Ads


")

")
 |
 |