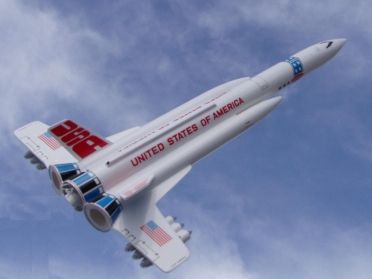
Centuri U.S.S. America
Centuri - U.S.S. America {Kit} (5310) [1976-1982]
Contributed by Larry Zeilmann
| Construction Rating: | starstarstarstarstar |
| Flight Rating: | starstarstarstarstar_border |
| Overall Rating: | starstarstarstarstar |
| Manufacturer: | Centuri |
| Style: | Futuristic/Exotic |
 Brief:
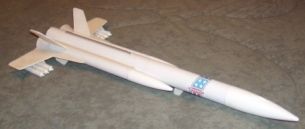
This represents my second cloning of the four available Centuri Super kits.
Like all the Super kits, the USS America is a single stage model rocket that
recovers with a dual parachutes in a unique level configuration. The original
kit was classified as a skill level 3 kit.
As described by Centuri in their 1977 Catalog:
"In the year 1983, the president approved the building of the U.S.S. America Presidential Command Post. The keel was laid at the San Diego Space Shipyards and the great bird first took to the skies in 1986. America now serves as a Presidential aerial command post center and diplomatic courier. Able to land at large conventional airports, the America helps maintain peace on earth as well in space. The ship's Orville/Stine nuclear rocket engines place the craft in earth orbit and augment the six ramjets used for atmospheric travel. These combined systems economically transport high government officials to global trouble spots."
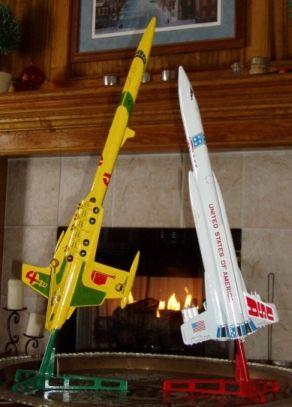
Having just finished the cloning of the Centuri S.S.V. Scorpion, I was open to suggestions on what kit should be my next cloning project. Amazingly, I can't remember anyone saying, "Clone another Super Kit". When I dropped hints that I favored the Super Kits A few preferences streamed in for the ESS Raven. However, my eye had already zeroed in on the USS America.
Construction:
As in my previous cloning projects, the first step is download the very large
instructions from JimZ's web site. All fin templates are included in the
instructions. This kit was unique in that the fin patterns called for
3/32" balsa. I had durability concerns about building the fins in such
thin balsa. Having already built some confidence working with matting board on
the Scorpion clone, I began experimenting using it as a substitute. A single
sheet of matting board from the local Hobby Lobby measures .055" thick.
Thinking the single thickness was too thin, I decided to lay up a two layer
laminate of the matting board. This resulted in a almost indestructible fin
that was slight thicker. Only a very astute eye would notice the thickness in
the final project.
With fin material decided on, and tubing on order from the Semroc Aeronautics Corp., only two hurdles remained. The America uses a very unique multiple nose cone set that has limited availability. For this I turned to Mike Schmidt of Moldin Oldies. Mike has complete USS America nose cone sets that he sells for $20. These sets contain every nose cone and tail cone required to clone this great kit. Take it from a lazy cloner, why reinvent the wheel?
 The final hurdle represents a finishing issue, and I will address it later. As
in my past clone projects, I transferred fin patterns to the matting board
using carbon paper. Here is the list of parts need to clone this great kit:
The final hurdle represents a finishing issue, and I will address it later. As
in my past clone projects, I transferred fin patterns to the matting board
using carbon paper. Here is the list of parts need to clone this great kit:
- 1 PNC-165 nose cone/cockpit
- 2 PNC-103 nose cones
- 6 ram jet nose cone/tail cone sets
- 1 ST-16 upper body tubes (7.5" BT-60)
- 1 ST-16 Lower Body Tubes (12" BT-60)
- 2 ST-10 Tank Body Tubes (9.4" Semroc Corp)
- 1 ST-7 Body Tube (3.0" BT-20 or Magnum "D" conversion with BT-50)
- 2 wood dowels .088" diameter x 12" length
- 1 launch lug (8" long x 7/32" diameter)
- 1 coupler HTC-13 (BT-56 coupler from Semroc Corp.)
- 2 paper shrouds
- 1 TR-7 thrust ring .4" long (Standard thrust ring for 18mm Motor or substitute a 24mm thrust ring)
- 1 EL-1 engine hook
- 2 50-60 centering rings
- 1 die-cut fiber sheets .055" thick
- 1 decal sheet
- 1 Shock Cord .125" x 38"
- 2 20" parachutes
- 128" shroud line
Instructions are clear and easy to follow. However, with this kit I elected to try a different method cutting the matting board. After transferring the fin tracings, I free hand cut out two sets of the tracings with a very sharp pair of scissors. I then coated the surface of each matching fin set with Elmer's glue and pressed the sets together between some book stacks till they dried. The weight pressing the laminated fins help press out excess glue and prevented warping while they dried. I then soaked the entire fin matting board parts in thin CA to stiffen them. After that, I cleaned the edges of the parts on a belt sander. The instructions also suggest cutting these parts from 3/32 sheet balsa. I chose not to use balsa because of its lack of durability.
The only other parts requiring some fabrication were the paper conical main motor nozzles. For these I printed the available patterns on regular printer paper. Carefully, formed and glued them together. At this point they are very fragile and will crush or crease easily. With care I inserted the two 60/50 centering supports illustrated on the die-cut card. I then stiffen the entire assembly with thin CA glue. This permanently, holds the 60-50 ring in place and greatly improves the cones durability. Finally, I insert each cone assembly in its respective ST-10 tank body tube. After getting the proper alignment I again use a second coat of thin CA to increase the stiffness and permanently cement the cone into the tube.
As in my previous clone attempt, I addressed the need for an 8" launch lug by using another 3/16" x .014 seamless aluminum tube purchased in packs of three from Hobby Lobby. Care in cutting will provide an excellent substitute.
 Finishing:
One of the reasons I picked this classic kit for cloning was that I perceived
it as having an "easy" finishing requirement. How difficult can an
all white glossy finish be? As in the past, I first sprayed every thing with
three coats of primer/sealer paint. My personal favorite is Kilz. This is what
helps the matting boards finishing characteristics excel. I then sanded this
before painting with a finishing color. I elected to use three coats of high
gloss white Krylon. For the ram jet nose and tail cones I used a Testors paint
pencil to hand paint these items in a Chrome finish. If you suffer from a shaky
hand, you might consider taping them off first before painting. The nozzle
openings of the paper cones were also painted using this method.
For decals, I printed my own on ink jet decal paper available from several vendors on the internet. The final hurdle for this project mentioned above was finding a clean (non-yellowed) copy that would fit on a single 8.5" x 11" sheet of decal paper. For this I turned to Kurt's Decal Page on the Ye Olde Rocket Shoppe web site. Kurt Schachner had already solved this problem and was kind enough to make a cleaned version available for the public.
I set about printing my own decals on an ink jet printer and sealing them with Krylon Clear glossy spray on sealer. Again the only application issue of concern is removing the trapped bubbles while avoiding any stretching. Past experiences help improve on these areas. Again, keeping the application surface wet and blotting the bubbles away can minimize both issues.
Construction Rating: 5 out of 5
Flight:
The original kit calls for a C5-3S or C6-3. Of course the C5-3S is no longer
available. So I elected to perform a "Magnum D" conversion. However
The USS America's finished launch weight proved to be slightly less than the
SSV Scorpion. Since my finished kit weighed in at 8.1 ounces, it is scheduled
to fly on a D12-5.
Preparation is easy with the built-in Centuri baffle design, however, I will add a few sheets of wadding to protect against anything that might slip past the baffle. Motor retention is by the standard Estes engine hook.
Even though this rocket has yet to fly, as I am waiting to finish the complete Super kit set and fly them all together in the spring or summer. Conversation on internet rocket forums, report that the CG should fall at 8.25" forward of the center body tubes aft edge. I will be adding modeler's clay to the nose cone to achieve this CG location.
Recovery:
Like all the Centuri Super Kits, the recovery harness is quite complex and
unique. I chose to use the recommended horizontal recovery method illustrated
in the instructions. Unlike the Scorpion, the America didn't appear to need any
additional considerations to prevent the harness from snagging on deployment.
I guess the recovery method is probably worth a 5, but I downgraded it to a 4.5 because of it's complexity makes it prone to complications.
Flight Rating: 4 out of 5
Summary:
I love these Super Kits! Several forums have rumored an internet rocket kit
provider developing a reproduction of these kits for the public. I asked this
vendor if they could substantiate any truth to this rumor. Their response was a
hopeful "maybe".
Of the four Super Kits, I believe this to be the simplest to clone and yield great results with minimum effort.
In a recent eBay auction, I watched an unopened version of this kit sell for $450 dollars. I figure mine cost me about $25 dollars in parts. The Ninfinger Centuri Catalog Collection displayed the USS America's debuting in the 1977 catalog at an amazing $9 dollars! Who wouldn't love to see one available for that price!
Overall Rating: 5 out of 5
 |
 |
Flights
Sponsored Ads


|
|