Scratch Turd Burd Original Design / Scratch Built
Scratch - Turd Burd {Scratch}
Contributed by Matt Wedel
| Manufacturer: | Scratch |
Brief:
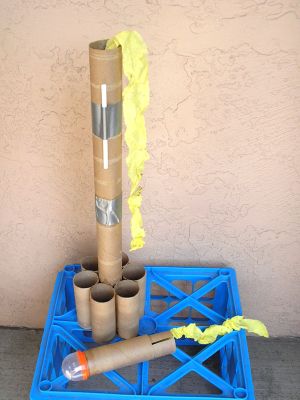
This is an 18mm tube-finned garbage rocket with streamer recovery. I built it
to take a break from a serious rocket project that I'd been working on for a
month. I wanted something that I could build quickly from stuff laying around
the house, but I also wanted it to fly well. It succeeded on both counts.
Construction:
Components list:
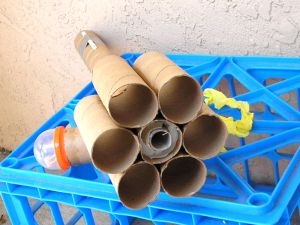
- 3 paper towel tubes
- 8 toilet paper tubes, 6 for tube fins, 2 for the nose cone
- cardboard from a cereal box
- a paperclip
- a plastic drinking straw
- a plastic pod from a 50 cent toy machine
- crepe paper
- Elmer's glue, plastic cement, duct tape
I probably should have put the motor mount in first, but I decided to start building with the fins. I love tube fins because there are no alignment issues--you just stand the tubes on end and glue them together. I added thick glue fillets between adjacent fin tubes and between the fin tubes and the body tube.
I've been surfing a lot of rocketry websites lately and seen a couple of warnings about not making rockets out of paper towel tubes. Evidently they are not very strong. I've also been building paper rockets, so my first instinct with any wood-based product is to smear glue on it and laminate it for strength. For the Turd Burd, I used two more paper towel tubes to strengthen and lengthen the body tube in one step. I cut one of the tubes along its entire length so that it could be rolled up more tightly and inserted into the aft body tube (without glue). Since it was rolled into a tighter circle than it had been when it was intact, the edges overlapped. To get maximum contact between this tube and the two body tube sections, I marked the extent of the overlap, pulled out the cut tube, and trimmed the edge until it fit neatly into the existing body tube. I also marked it halfway along its length. I didn't want to put glue on the coupler piece or it would get scraped off as I slid it into the body tube, so I smeared glue down inside the existing body tube with a piece of scrap wood. Then the coupler piece went into the body tube to its halfway mark.
I repeated the process on the other end to attach the other paper towel tube, which forms the forward half of the rocket's body tube. The cut tube inside not only creates an exceptionally strong bond between the two external tubes, it also has enough overlap with both to ensure that they stay lined up correctly. All of that glue contact area is more than enough to firmly join the tubes, however, I did not like the look of the naked tubes butted up against each other so I put a couple of turns of duct tape around the joint and then glued down the edges of the duct tape. I'm not sure if that was a cosmetic improvement or not. In the long run it probably is a good thing, because one of the joys of flying this rocket is the disbelieving looks you get from other rocketeers. With the duct tape on it looks fragile, yet the fact that it is far stronger than their blister packed "instarocs" can be your little secret.
The nose cone has three pieces: a toilet paper tube for an external cylinder; a second toilet paper tube that is cut, rolled, and trimmed to form the shoulder; and a plastic bubble pod from one of those coin-op toy dispensing machines that you find in supermarkets and drug stores. The shoulder tube is nested inside the external tube using the same method described above for joining body tubes. I glued the lid of the bubble pod onto the base with plastic cement and glued the base to the top of the external tube with CA followed up with generous fillets of Elmer's both inside and outside the external tube.
 The motor
mount and centering rings are cut from cereal box cardboard. The motor mount is
a piece of cardboard smeared with glue and rolled around an 18mm motor casing
(be sure to pull out the motor casing right away so it doesn't get glued in).
The piece of cardboard is about half an inch longer than a motor casing. I left
a "panhandle" about 2 x 1/2 inches on one corner, so that before
rolling the piece of cardboard had roughly the same shape as the state of
Oklahoma. Start rolling with the panhandle and it will form a very strong motor
block (assuming you smear liberal amounts of glue all over everything). I
wanted positive motor retention at the other end, so I used a bent paperclip to
make a motor hook.
The motor
mount and centering rings are cut from cereal box cardboard. The motor mount is
a piece of cardboard smeared with glue and rolled around an 18mm motor casing
(be sure to pull out the motor casing right away so it doesn't get glued in).
The piece of cardboard is about half an inch longer than a motor casing. I left
a "panhandle" about 2 x 1/2 inches on one corner, so that before
rolling the piece of cardboard had roughly the same shape as the state of
Oklahoma. Start rolling with the panhandle and it will form a very strong motor
block (assuming you smear liberal amounts of glue all over everything). I
wanted positive motor retention at the other end, so I used a bent paperclip to
make a motor hook.
I traced the front of the body tube and the motor mount onto another piece of cardboard to make centering rings. I laminated several of them together to form two thicker, stronger centering rings, glued these onto the motor mount, and glued the whole thing into the rocket.
I should have put the motor mount in before I put the fins on, because I could have traced the right end of the body tube to make the centering rings. As you can see in one of the photos, by the time the motor mount went in the back end of the body tube, it was no longer a very good circle. I had to trim the centering rings up before they would slide into the body tube, and they did not make a good seal all around the tube. I patched all the holes with strips of sketch paper covered with glue.
There is no shock cord and no parachute. At ejection, the nose cone separates from the body tube and both pieces come down on streamers. The streamers are pieces of crepe paper that are glued to the inside of the body tube and the nose cone.
Flight
and Recovery:
So far, I have only flown this bird on C6-5s. Flight prep is dead easy. Crepe
paper is relatively fire resistant, so I skipped the wadding. Just wad up the
streamers, stuff them in the body tube, and you're set. Make sure that the
streamer for the nose cone is packed into the body tube of the rocket,
otherwise it may just stay up in the nose cone. Not that the nose cone would
probably be hurt if it just fell, but toilet paper tubes can be hard to spot on
the ground and a good length of brightly colored crepe paper makes recovery a
lot easier.
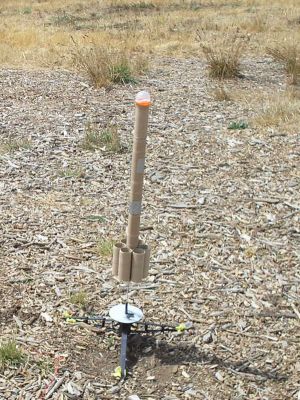
Oh, I had skipped on adding a launch lug because I could fit the launch rod between the tube fins and the body tube. Once the rocket was on the pad, it leaned away from the launch rod at an alarming angle. I had a drinking straw in my range box for emergency launch lug replacements, so I slid it over the launch rod, leaned the rocket up against it, and duct taped it in place.
This rocket is a real crowd pleaser. I've only taken her to one launch, but I had three straight, stable flights on the Cs. The liftoff is satisfyingly slow and noisy, and she only goes up to about 300 feet. There was a steady breeze blowing, but she didn't weathercock at all and the wind didn't carry her very far either. At the end of each flight, she landed within 100 yards of the launcher with no visible wear and tear other than some soot on the crepe paper streamers. When they wear out, I will just glue some more in.
Summary:
PROs:
- No messing around with fin alignment, sanding, sealing, painting, decals, shock cords, parachutes, or wadding.
- Assembles in less than 24 hours using ordinary household materials.
- Costs virtually nothing. I spent 50 cents on this rocket to get the toy pod that I used for a nose cone. If it was springtime, I could have used half of a plastic Easter egg and bought a candy bar instead.
- An attention getting rocket, both on the flight line and in the air.
- Good carrier for Poop-a-troopers (little plastic men with parachutes).
- Probably a good carrier for parasite gliders although I haven't tested that yet.
- An essentially disposable test vehicle if you want to try potentially rocket-losing activities like CHAD staging.
- Flies straight even in a stiff breeze.
- Durable.
CONs:
- Doesn't fly very high. I'll build the next one for 24mm motors.
- Ugly as sin. May make you a subject of scorn and derision, both around the house and at the flight line. Bring one of your show horse rockets, too, so people can see that you're a craftsman with a sense of humor and not a backwoods pyromaniac.
Sponsored Ads

 - Ancient Prophecy - 1st Edition - Rare")


 | Intermediate Rocket Kit | Step-by-Step Instructions | Science Education Kits | Great for Teachers, Youth Group Leaders and Birthdays,Blue")

, Launch Pad/ Controller, Glue, Four AA Batteries, and Two Engines")


 |
 |