Scratch Streamliner Original Design / Scratch Built
Scratch - Streamliner {Scratch}
Contributed by Mark Van Luvender
| Manufacturer: | Scratch |
 Brief:
I chose to build the Streamliner for this contest as it truly spoke to me as something I could do--that doesn't happen often.
Construction:
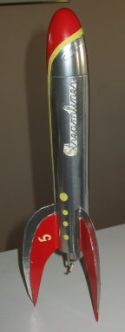
This rocket started out as an Estes Baby Bertha kit. In order to create the "Streamliner", I cut a wedge shaped section out of the body tube starting just below where the nose cone shoulder ends. Once the cut was made, the edges were glued together to create the sleek tapering airframe for the Streamliner.
The tapered body made the motor mount assembly a little interesting. Not one for perfection, I basically cut the centering rings down a little bit at a time until they fit pretty well in the body tube then glued the motor mount in place.
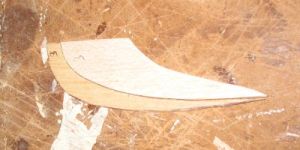
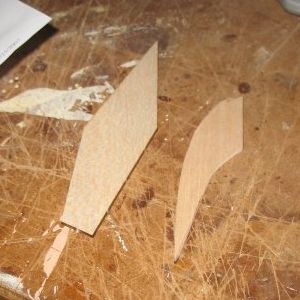 Next up was the fins. If you look closely at the sample picture, the fins are actually two different widths. I took the stock fins from the Baby Bertha and cut the shape of the thicker (red) section of the Streamliner fins from them. I then found some ridiculously thin balsa to cut the top (silver) section of the fins. This balsa was very thin and flexible, so I strengthened these fin sections with printer paper and wood glue, letting them set overnight under a box containing part of my Stephen King collection. The next day, the fins were cut from the pink paper, and they were glued to the bottom sections to complete the fin. The fins were then glued to the body tube, as was a launch lug.
Recovery for the Streamliner is stock Baby Bertha, as is the nose cone.
Finishing:
Finishing the Streamliner presented some challenges as most of it is silver, and I've not yet found a way to clear coat silver and have it stay silver. So, I had to paint the red first, then mask it off and do the silver, and then do the rest without touching the silver. I printed the decals at home, and they are the only part of the build I'm not happy with. Oh well. She even sports the EMRR logo on one side, and that's the best decal on her!
Flight:
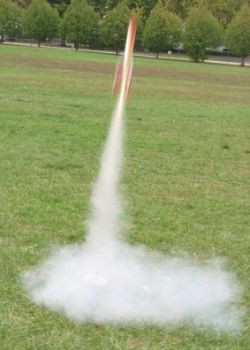
For the Streamliners first flight, I chose to fly her at my kids school. My first grader had a "Spotlight" week and asked if I would come with some of my rockets and talk about them as well as launch some of them for his class. We invited all the first grade classes as well as my other sons third grade class for the launch so he could help me. I showed the gathered classes (4 classes in all) the rockets I was launching and told them about EMRR as a great resource for information on model rockets as I showed off the logo on the side of the Streamliner.
Recovery:
This first flight was an A8-3 to keep it low on her first flight. Man, it was great! Shot off the pad very quickly and perfect apogee deployment with a gentle return to earth. Next planned flights will be on a B4-4 and possibly a C6-5.
Summary:
I'm very happy with how this turned out! It was my first major kit bash, and I had a lot of fun with it. I'm very glad I made the decision to build this rocket.
Other Reviews
- Kit Bash Streamliner By Steve Lindeman (August 28, 2013)
The Streamliner was the fifth in a series of Baby Bertha kit bashes that I did while building my Goonybird fleet. The first four kits were used to make four of the original Goonybirds from Estes but now it was time for somthing a little different. I remember seeing this model in a Design This Rocket contest and being a lover of retro rocket designs, I knew I wanted to build it ...
#Related Reviews
- Clone Cloud Hopper By Steve Lindeman
Cloud Hopper was my second Goonybird clone that I built by kit bashing an Estes Baby Bertha and as a result has an 18mm motor mount instead of the 13mm that the original Cloud Hopper had. Components Components used for this build were one Estes Baby Berha Kit (1261) and the plans ...
- Clone Missile Toe By Steve Lindeman
Missile Toe was number three in my line of cloned Goonybirds that was built by kit bashing another Baby Bertha kit. As such the plans and decals were downloaded from Ye Old Rocket Plans (http://plans.rocketshoppe.com/estes/est0854/est0854.htm) and used for construction guide. ...
- Clone Sky Shriek By Steve Lindeman
The Sky Shriek was clone number four of the original Goonybirds that I built. And as such is another kit bashed Baby Bertha . The plans were downloaded from http://plans.rocketshoppe.com/estes/est0855/est0855.htm . I then followed these to build the Sky Shriek with the ...
- Clone X-15 By Steve Lindeman
In all fairness I can't do a brief description on this kit as there is a small story behind it. As is normal for me this is not an actual review of the Estes NASA X-15 (0889) [1988-1989]. It is a kit bashed, clone by transition. I came about the idea of doing the X-15 as the G-15 after ...
- Clone Zoom Broom By Steve Lindeman
Zoom Broom was the 1st of my Goonybird clones modified for 18mm motors as a result of being kit bashed from a Baby Bertha. Components Starting with a Baby Bertha kit (EST 1261) that I purchaced at my local Hobby Lobby, all components except the balsa wood and decals were used to ...
- Excelsior Rocketry Der Goony Max By Bill Eichelberger
Der Goony Max is an inspired bit of lunacy from Excelsior Rocketry, and I guess depending on where you stand on the Goony issue, this series is either genius or a waste of a good Baby Bertha. Speaking as the one-time-owner of an original Goonybird Cloudhopper, I happen to fall on the genius ...
- Kit Bash GoonyHawk By Steve Lindeman
Here I go again. For those of you that have followed my Goonyness this was Baby Bertha kit bash #14. Again this is not a kit review of the original Estes Hawkeye (Kit #0873) [1986-1996] It is another of my many kit bashes. All ...
- Kit Bash GoonAries SST By Steve Lindeman
Here I go again. For those of you that have followed my Goonyness this was Baby Bertha kit bash #10. Again this is not a kit review of the original Estes Aries SST (Kit #1927) [1983-1984]. It is another of my many kit bashes. ...
- Kit Bash Goony Target Drone By Steve Lindeman
Lucky or unlucky? For those of you that have followed my Goonyness this was Baby Bertha kit bash #13. As such I wanted to play it a little safer with this one so I choose a simpler design. Again this is not a kit review of the original Estes ...
- Kit Bash Goonymarc By Steve Lindeman
The Goonymarc was number eight in my line of modified Baby Bertha kit bashes. I started with the plans from Jim Z's for the Estes kit #654 with the thought of building the glider version of the Bomarc but ended up with the parachute version (kit #657). All templates and decals for this build ...
- Kit Bash NASA Goonasus By Steve Lindeman
One again this is not a kit review of the original NASA Pegasus (Estes Kit #1376) [1982-1986] but another of my many Baby Bertha kit bashes (#12 for those following my Goonyness). All fin patterns and decals came from http://plans.rocketshoppe.com/estes/est1376 ...
- Kit Bash Snarky Jr. By Steve Lindeman
The Snarky Jr. (a.k.a. Goony Shark) was kit bash #6 in what was to become a long list of Baby Bertha's that I converted into various Goony Birds and such. The inspiration for this one of course came from my DynaStar's - Snarky and the fact that I wanted to be able to fly it in the smaller ...
- Kit Bash Streamliner By Steve Lindeman
The Streamliner was the fifth in a series of Baby Bertha kit bashes that I did while building my Goonybird fleet. The first four kits were used to make four of the original Goonybirds from Estes but now it was time for somthing a little different. I remember seeing this model in a&n ...
- Kit Bash USGF Goonasus By Steve Lindeman
For those of you still following my Goonyness this was Baby Bertha kit bash #11. Again this is not a kit review of the original but another of my many kit bashes. All fin patterns and decals came from http://www.spacemodeling.org/JimZ/est0806.htm . The major ...
- Kit Bash USSF Goonyflash By Steve Lindeman
For those of you following my Goonyness this is Baby Bertha kit bash #9. So OK this is not a kit review so much as it's actually another of my kit bashes. All fin patterns and decals came from http://www.spacemodeling.org/JimZ/estes/est1909.pdf . The main ...
- Mo' Skeeter By Chris Gonnerman
This is my Mo' Skeeter, a 320% upscale of the classic Estes Mosquito . It's a rear-ejection model, which avoids the visible nose cone line that most Mosquito upscales suffer from. Components This rocket consists of a Baby Bertha cone , 6" of BT-60, 6" of BT-20, two 20-60 ...
- Modification Baffled-Boat-Tailed-Bigger-Baby-Bertha By Mike Goss
It all started one day after I opened a Baby Bertha kit and found that the motor mount had the wrong size adaptor rings. The rings were for a BT-50 and not a BT-20. I thought about replacing the rings with a correct set, but then the creative juices started to flow, what could I do with this ...
- Modification BioHazard By Dwayne Shmel
This is a kit bash of a Baby Bertha that transforms a mild mannered rocket into mean, green, flying machine--the BioHazard. Modifications: One challenge was the tight fit of three 18mm motor mount tubes inside the BT-60 body tube. The 3 tubes were glued together and the inside "hole" was ...
- Modification Sky Goon By Stan McKiernan
This is a Goonie of one my favorite classic boost gliders, the Sky Dart. The Sky Goon starts as a Baby Bertha and adds wings, stabilizer and engine pod. Modifications: The rear of the nose cone is removed, leaving about 1/2" of shoulder which is glued to the body. The engine mount is built ...
Related Products
Sponsored Ads


 |
 |