M2L2 - Mini Marz Lander Launcher Modification
Modification - Mini Marz Lander {Modification}
Contributed by Dick Stafford
| Manufacturer: | Modification |
| Style: | Futuristic/Exotic |
Brief: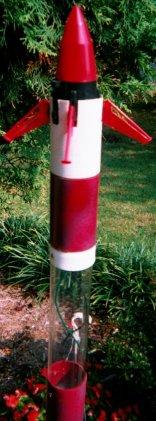
For this 2-stager, an Estes Mini Marz Lander serves as both the nosecone and second stage. The main rocket has a 29mm motor mount, while the Lander flies on 13mm motors. This review will focus on the method of adapting the Lander to the booster rocket.
Construction:
- One Estes Mini Marz Lander
- One booster made from a 2" diameter mailing tube. The booster includes a 29mm motor mount, fins made from copper-clad G10 circuit boards, and Blacksky rail buttons.
- One additional 2" x 44" mailing tube, with full-length telescoping tube (bought from The Container Store).
- One 2" x 8" clear plastic mailing tube, with plastic end caps (also from The Container Store)
- 12" of 24 ga wire, screw terminal connector, G10 plate, G-Wiz altimeter
- Two plywood bulkplates (1/4")
- One eye bolt with related hardware.
- Misc. nuts and bolts to attach the payload section
- 1/4" tubular Kevlar shock cord
- Whatever chute I grab from the range box
I originally bought the Mini Marz Lander to use as a fixed nosecone. However, I just couldn't bring myself to cut it up and remove its legs. Instead, I decided to use it as a nosecone as-is, and to try to stage it from the booster rocket.
Rummaging around my "bone yard", I found the remains of a 2" diameter rocket that had a 29mm motor mount. A bit much for what I needed, but it was the right diameter (2"). I needed some more tubing and a way to mount my G-Wiz altimeter. I went to the Container Store and found both cardboard and clear plastic tubes in this diameter. The latter seemed perfect for an altimeter bay, since I'd be able to see the LEDS on the G-Wiz with the rocket fully assembled.
I used about 12 inches of the paper tube to extend the existing booster (the white section just above the silver-colored booster), and made a payload section out of another 7 inches (the red section above that). I made a shoulder using a piece of the telescoping tubing, a home made plywood bulkhead, and an eyebolt.
I removed one of the plastic caps from the clear mailing tube and inserted the tube into the end of the paper tube. The fit was tight, and to make sure it wouldn't come apart, I attached it with four small screws. The other plastic cap became the closure for the top of the altimeter bay, and is also attached with small screws. A plywood bulkhead was bolted to it, and the pair was drilled to accept the wiring for the altimeter. The altimeter-end of the wires were tinned and a small set of screw terminals were mounted on the other end. This bulkhead was glued onto another small section of cardboard tubing (the red section above the clear bay).
The final component is an adapter for the Lander (the small white tube at the top, just beneath the Lander). This was notched to match the Lander's legs and launch lugs. A small piece of the telescoping  tubing was glued in, and this assembly slid into the fixed portion of the adapter. This was meant to be quickly removable to facilitate wiring the Lander's igniter.
Flight:
To prep the altimeter, G-Wiz was mounted to a section of G10 that fit snugly into the clear tube (a board from another application). It was inserted and the upper cap was secured with 2 screws. The igniter was inserted into the Lander's motor and secured with masking tape. The igniter leads were attached to the screw terminals, and continuity was visually confirmed at the G-Wiz. The lander used Estes wadding and the booster used a Giant Leap Kevlar pad.
I have tried this three times, but it only worked once. The logs should appear at the bottom of this page. The first time, the Estes igniter (this had thin tail wires soldered to it) lit but the motor didn't go. It was still taped into the motor at recovery. The next time, the home-made Igniterman igniter didn't fire. The igniter worked on the ground later that day, I suspect the problem was that the G-Wiz never armed due to the slow acceleration under F20 power. Of course, I could have determined this by seeing if the G-Wiz flashed out an altitude, but DUH, I didn't. On the third try, I used a Quickburst igniter. This time the Lander staged, but I had another minor problem. I had the G-Wiz set to detect launch rather than the burnout of the booster, so the Lander took-off shortly after launch. It arced to the side, and the booster, sans nose cone, continued up. Well, the flight was fun and both pieces were recovered, so I shouldn't complain.
Summary:
This rocket's booster design is overly complicated since I threw it together instead of thinking it through. However, my main goal was to stage the Lander, and that finally worked. The result was a unique rocket that got the crowd's attention. This is also was the biggest range of thrust levels that I.ve seen in a staged rocket, with the G motor's thrust being approximately 64x that of the A10 in the Lander.
Other Reviews
- Modification Mini Marz Lander By Robert Geer
A Modified Mini Marz Lander with a lengthened motor tube to accept Apogee's C6, 13mm x 83mm, motor. Modifications: Parts needed are (1) 13mm Airframe Tube 3.25", (1) 13mm x 18mm x 0.25" centering ring, (1) 13mm x 0.25" Engine block. The first thing I did was to enlarge the holes on either end of the lower section using 220 grit sandpaper rolled inside out on my hobby knife. This also ...
#Related Reviews
Related Products
 |
 |
Flights
|
|
Sponsored Ads
 (2pk) SEM-KM-10")
 SEM-KM-11")
 SEM-KM-11")
 SEM-KM-10")


 Blue Bird Zero™ KMX-06")


|
|
Dick Stafford (March 26, 2011)
Name is actually M2L2 - Mini Marz Lander Launcher