| Construction Rating: | starstarstarstarstar |
| Flight Rating: | starstar_borderstar_borderstar_borderstar_border |
| Overall Rating: | starstarstar_borderstar_borderstar_border |
| Manufacturer: | Contest Craft  |
Brief:
A "Contest Craft" version of the Edmonds Deltie, this micro-sized
glider is designed for 1/4A boost-glide competition.
Construction:
I'm not sure if these are even commercially available anymore--they were
introduced for NARAM 45 in 2003, and I picked mine up from BMS at NARAM 46, not
seeing them listed in Bill's current catalogue.
The parts list is pretty basic. It includes:
- 2 1/16" balsa laser-cut sheets
- Balsa nose cone and screw eye
- BT-5 booster tube
- Streamer
- Launch lug
- Balsa angle (for marking tube)
- Paper clip (for holding wing/tail in place to set)
Building Delties is a snap and this one was only slightly more challenging than a standard size, mainly due to the delicate nature of the parts and that I was building this for potential competition use.
Construction starts with removing the laser cut parts from the sheets, which was very easy since they were very well cut by BMS. Next, I marked the CG on the fuselage/boom using a template provided in the instructions.
The ease of Deltie assembly is due to the fact that there are no airfoils to mess with (or mess up). Instead, a triangle is formed with the pre-cut balsa pieces so that the bottom of the triangle is angled slightly to provide decalage (lift). It's practically impossible to not build this right as the parts are notched and form very straightforward joints. First the two top legs of the triangle are bonded together, then the tail leg is tacked in place. Finally, the fuselage is attached along with vertical rudders on the ends.
The fuselage is cut to enable a slight amount of decalage for the tail, but in order to achieve this I had to hold the tail tight against the fuselage while it set. This was simplified by using the provided plastic paper clip, which held up fine during the couple of hours it took for the yellow glue to completely cure.
The final step of glider construction is bonding side pieces to the nose of the fuselage to form the slot into which the booster pod hook slides.
Pod construction was also a fairly quick project--glue together 3 pre-cut pieces to form the hook, mark the body tube (the nifty little balsa angle worked very well here), and bond the hook to the rear of the tube. While the glue is tacky/still setting, I also attached the Kevlar® recovery cord (external mount) and the launch lug into the fillet between the hook and the body tube.
To reduce the strain on the Kevlar®/glue joint, the shock cord is also reinforced with a strip of tape at the front of the body tube. The streamer and nose cone are then attached to the Kevlar®, and the bird is ready for flight.
Total construction time, excluding time spent waiting for glue to dry was about one hour and that included plenty of time for sanding and filleting of joints.
To trim the glider for flight, the instructions show balancing the glider on a pencil to determine the CG, and comparing that to the target CG mark made on the fuselage at the beginning. In my case, I had to add a tiny amount of clay to the nose to get the proper CG, and a few hand tosses supported that this was about right.
Finishing:
Because I intended to use this for competition purposes and paint does funny
things to CG/CP relationships on gliders, I skipped the finishing aspects of
this, figuring I could always apply thinned red dope to it later if satisfied
with the flight performance.
Construction Rating: 5 out of 5
Flight:
This is a tiny, fragile glider designed for 1/4A motors. Don't even think about
trying anything higher up the impulse scale.
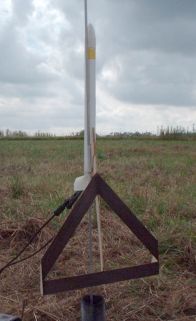
I caught a beautiful day for the test flight--clear skies and barely a trace of wind (gusting to 3 mph). I loaded the 1/4A3-3, set the booster and glider on the rod, and stood by with a stopwatch to time the glide.
The boost started off great. It was straight and fast, although towards the end of the brief thrust curve the glider separated. The pod then flopped around a bit before popping the streamer, and landed gently right by the pad. The glider though, went into a heavy nose-first death dive, beating the pod to the ground by at least 5 seconds.
Recovery:
Upon examination of the glider, the cause of the erratic flight was
apparent--the fuselage of the glider broke under the stress of the boost, which
shortened the glider by about 1.5 inches and took my nose weight with it. With
so little mass to begin with, this had no chance to glide. All of the glue
joints were fine, so I can only conclude that this exceeded the "speed of
balsa"--material failure.
Flight Rating: 1 out of 5
Summary:
Since I copied all pattern sheets, I'll repair the fuselage and this time I
think I'll paint the fuselage with a thin CA for added strength.
I'm sure 1/4A is an incredibly challenging class to design and build for, but I was disappointed that this fared so poorly on its first flight. I've had reasonably good success with other Edmonds kits (and BMS materials), but this one clearly underperformed. I'd recommend any of the larger Delties but not this one.
Overall Rating: 2 out of 5
 |
 |
Flights
Sponsored Ads


|
|