Scratch Procrastinator Original Design / Scratch Built
Scratch - Procrastinator {Scratch}
Contributed by Matt Gillard
| Manufacturer: | Scratch |
I entered the box of parts competition because it looked like fun, I had mentioned it to a few of my friends in my rocket club, and before I knew five of them entered it as well. So off went a large box with the parts for 6 entrants, and a few weeks later another box returned -it was like Christmas going through the box. Next was the task of splitting op the box between the 6 entrants. At the end 6 "equal" bags were formed and randomly given out. I was quite pleased with my bag, others had complete rockets in the, one had a parasitic glider, another had helicopter rotor blades. So what did I have?
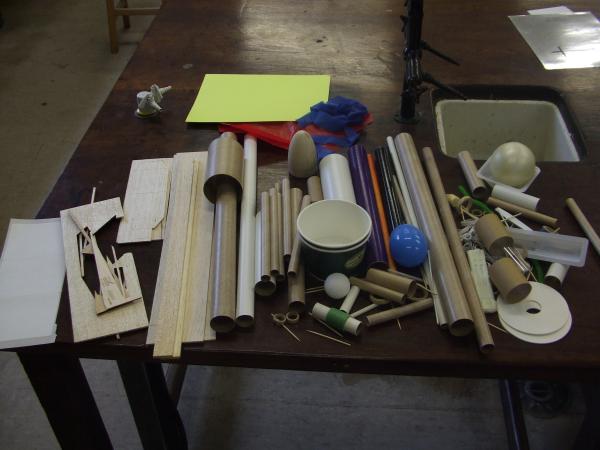
I'm not going to list it all but here is a flavour:
- Loads of tubes of various sizes, several small BT5 etc
- Couplers
- Balsa sheets - one of a complete set of fins, another 2 sheets of really low grade balsa
- Three noses comes, as different sizes
- Lots of toothpicks
- Various couplers
- Small sheets of printer labels
- Ice cream tubes
- A polystyrene ball
- Motor mounts
- Engine hooks
- Pipe cleaner
- A 14 inch parachute canopy
- Length of elastic.
Well what to do.
Gliders were out, helicopter was a possibility, cluster, two stage. After spending several weeks dry fitting parts and changing my mind I decided on a rocket in my head. The criteria for my rocket was
- It could not be too big - 14 inch chute.
- Clustered - but able to launch on a single motor
- Draggy
- Unusual.
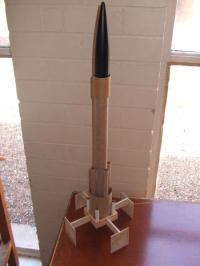
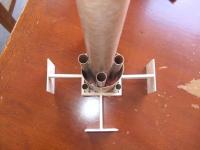
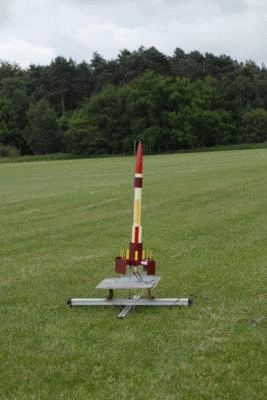
The main body tube chose itself - it fitted the nose cone I wanted to use. The motor choice was going to be 24mm as I was heading for a draggy model, so I would need a motor capable of lifting it. There was going to be at least 4 external motor pods - opted for 13mm.
The base was going to be bulky, and was going to have tabs on it, so the rocket would rotate as it boosted.
Building
|
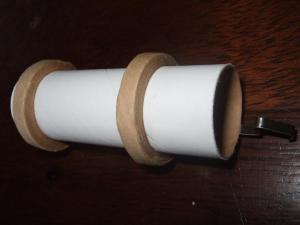
The motor mount was a fairly standard construction. A 24mm motor mount tube with a motor retention clip, an engine block at the end and two centering rings to fit the body tube. The motor mount was then glued into the body tube. |
 |
|
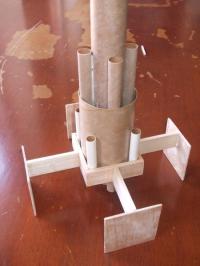
Four BT20 tubes 190mm in length were then glues to the outside of the main body tube. These were to take 4 A10 - PT motors as a cluster. The joins between the body tubes were filleted four times with wood glue, and then model filler was used to give a smooth finish. The shock cord was anchored to the body tube using Estes tri fold paper method - I was tempted to cheat and add some Kevlar here, but integrity got the better of me. |
 |
|
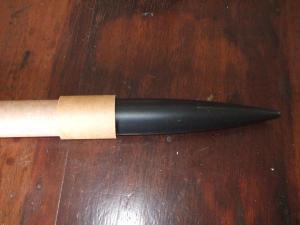
The nose cone had the flash removed and was then sanded down to remove the seam. Two coats of sealer gave it a smooth finish with no imperfections showing. The main body tube etc was then given three coats of sanding sealer, and rubbed down with 200 paper in between, to remove the spirals. |
 |
|
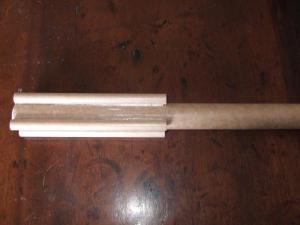
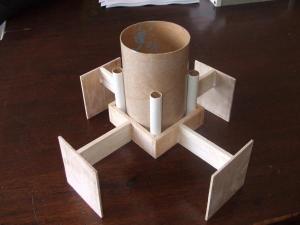
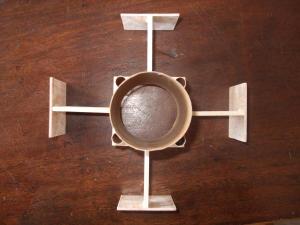
Using a strip of thick balsa, 7mm by 26mm, I made a box around a large coupler. This box was going to have the fins and rotation tabs added. The balsa was quite badly marked and was the soft type of balsa that I usually avoid. The box was sanded several times and filled with model filler to remove all of the dents. Using the same balsa strips I then added 4 64mm struts to the middle of each side of the box. These would have the rotation tabs added to them. A larger coupler (40 mm diameter) - with some deep spirals had four thin strips of balsa wood glued to the inside. This was just right size to side over the body tube. The spirals were filled and had to have several coats of sanding sealer before it was smooth. |
 |
|
Using four almost square balsa fins that were part of a model kit, I added the fins. This was one the part that I like about the rocket, the fins are at right angles to how they would normally. It still gives stabilization but looks a bit different. Also as the rocket was going to be rotating, the fins would not hinder the spinning. |
 |
|
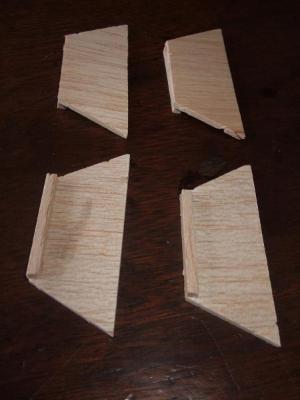
The corner spaces between the box and the couple were just the right size for body tubes, which were added for decoration. Four trapezium shaped pieces of balsa had a 3mm square strip of balsa added to the short edge, and then were glued to the struts. These were to provide spin. |
 |
|
The top of the struts were then drilled to accept four cocktail sticks, just for decoration. |
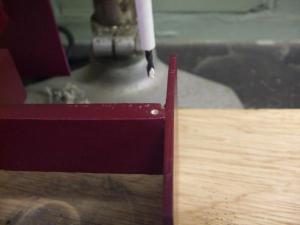 |
The entire of the coupler base unit had three coats of sanding sealer added, with all the fiddly bits, the sanding down was quite tricky.
The main body tube fitted neatly into the large coupler base.
 Finishing
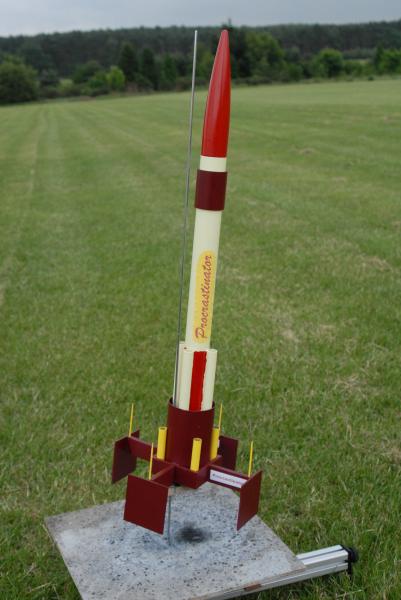
- I went for a red/yellow finish
- Everything was given two coats of primer.
- The main body tube was given 4 coats of light yellow spray paint.
- The nose cone was given three coats of red gloss
- The base unit was given three coats of rouge.
- The four decoration tubes were hand painted enamel yellow
- The decoration coupler was sprayed rouge
- The cocktail sticks were hand painted yellow
The box of parts had no sticks or decals in it, other than three address labels.
Given various pleas on TRF about the lack or entrants with only a few weeks to go I came up with the name of the rocket to be PROCRASTINATOR. Partly because I knew it would be towards the end of the month before I submitted and also because I new that this would be a draggy, slowish rocket.
Flights
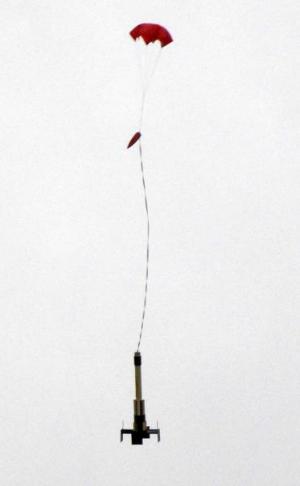
First flight took place with another box of parts entrant. It was a still day, and was slightly raining - which ruined the stickers as I had not varnished the rocket yet. Motor choice was a D12-3. It could have been a D12-5, as I reckon that it would be about a four second delay for apogee.
 The take off was good, the rocket started to rotate after about 50 foot, and the
rotation got faster and faster as the D12 burnt. Ejection took place after apogee as expected. The recovery was scarily
fast, as expected. This rocket needs a 24 inch 'chute. It hade a 14 inch chute! On handing the rear protruding fins all
popped off.
The take off was good, the rocket started to rotate after about 50 foot, and the
rotation got faster and faster as the D12 burnt. Ejection took place after apogee as expected. The recovery was scarily
fast, as expected. This rocket needs a 24 inch 'chute. It hade a 14 inch chute! On handing the rear protruding fins all
popped off.
Again I had expected that to happen.
Second flight took place a week later with three of the other UK contestants. The flight was on a D12 again. It was a straight flight with a slight oscillation until the spinning kicked in. As soon as the spinning kicked in, the flight was arrow straight which was really pleasing to see. Ejection was just past and again fins popped off on landing.
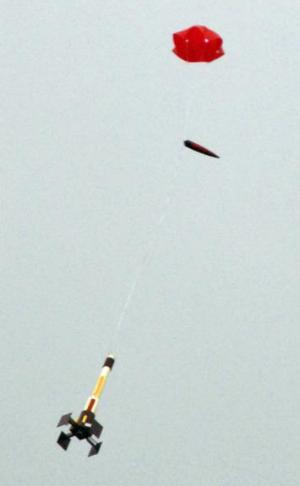
Third flight was time for the procrastinator to be clustered. Four A10 -PT were added, in addition to the D12-3. The procrastinator jumped off the pad. The flight was much higher and the extra speed really did make the rocket spin. Again the recovery was fast and again the fins popped off.
After the competition is finished I'm going to have two 24 inch chute on this rocket.
Sponsored Ads


")


")


 |
 |