| Manufacturer: | Scratch |
Project OMEGA
(A Toho Studios production)
By Mark Schrader
Project OMEGA: Stop Monster Zero !
|
|
||
| |
| A Planet in Peril... The signs from the recently deployed deep space sensors were clear. Something big was headed this way. And if the visitors from the so-called Planet X were to be believed, it was another monster—this one much worse than the self defense forces had countered previously. The media had recently dubbed this new threat “Monster Zero.” “Monster Six” would be more like it, he thought, trying unsuccessfully to keep his cynical side at bay. The only good Prof. Hideo Itokawa could think of as a result of his country’s latest round of “monster trouble” was that his space program had received a huge influx of resources. He looked up from the data printouts and out at the launch complex where hundreds of workers scrambled to assemble the massive Omega booster. But for what purpose? The Agency had done a remarkable job implementing his plan to upscale his sounding rockets, creating a massive booster capable of launching a sizeable payload outside of earth’s orbit. The Agency chiefs had gone so far as to deviate from their naming convention for new rocket systems. They had gone straight from Lambda to Omega—an appropriate step considering the peril faced by the planet. Prof. Itokawa had even developed what he thought might be the first step in ridding the planet of space-borne invaders once and for all. Its genious was in its simplicity. An electrified net charged by an orbiting platform trailing a highly conductive cable in the earth’s own magnetic field. The simple prinicple of generating a current through a changing magnetic fields would charge the power grid with an irresistible force. No creature could survive this awesome power. But how to deploy the system? The Agency simply had not yet developed the means of putting men in space that it needed to field and operate the grid. Only the American Gemini program, which the Americans were using to learn to actually work in space, had developed the expertise and technology necessary to pull this off. That’s when it hit him…Grissom. Prof. Itokawa had traveled to America as a visiting lecturer some years ago. Captain Virgil Grissom was the intense young man at his lecture at the Air Force Institute of Technology whose insightful questions had forced him to reexamine the critical elements of his theories of rocket propulsion and design that had resulted in the Omega booster. Grissom was the leading American astronaut and had just completed the latest manned Gemini mission with another astronaut. If anyone could lead the Agency in its mission to deploy the electrified grid he had designed to destroy Monster Zero, it was Gus. The raw power of his massive Omega booster coupled with the finesse and expertise of the American Gemini-Titan manned space program might be just what it took to save the planet… |
 |
|
 |
||
 |
||
 |
||
Initial Idea
 I was excited that the theme "multiple
engines" was chosen for DESCON 14. After a rushed and lackluster entry in
DESCON 13, I was anxious to get started with a deliberate plan for this
contest. I’ve built several clustered, staged, and even parallel staged
rockets before, but which of these would make the best possible entry? Easy:
all of the above! A large model rocket using a three engine cluster in the
booster, two parallel stages, all mated to a 24 mm sustainer.
I was excited that the theme "multiple
engines" was chosen for DESCON 14. After a rushed and lackluster entry in
DESCON 13, I was anxious to get started with a deliberate plan for this
contest. I’ve built several clustered, staged, and even parallel staged
rockets before, but which of these would make the best possible entry? Easy:
all of the above! A large model rocket using a three engine cluster in the
booster, two parallel stages, all mated to a 24 mm sustainer.
My original idea was to use the Japanese Lambda sounding rocket as a scale subject. Unfortunately, after I’d done all the scaling I realized that the gap I’d have to stage across was on the order of 20+ inches--too risky without electronics. I did like the look of the Lambda design, though. That’s where the 1960s science fiction genre came into play. What if the Japanese space program had received a massive boost because of the monster threat from space during this time frame? Toho Studios, producer of all those great monster movies I enjoyed as a kid, also dabbled in sci fi and included several space-based monster themes in their movies including my all time favorite--Monster Zero. I thought it would be a neat “what if” scenario if Toho brought in contemporary space programs into one of their films.
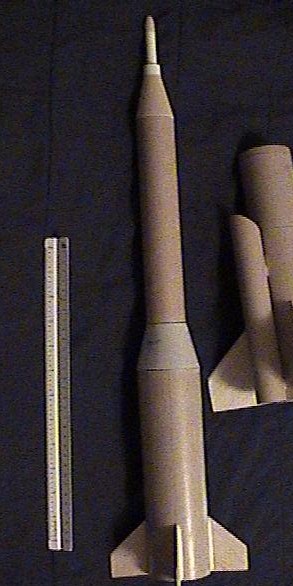
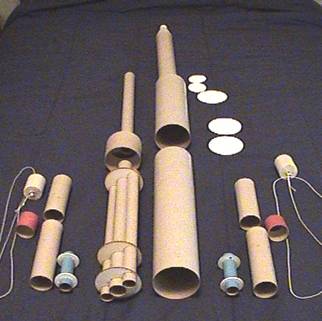 My intent was to keep the basic lines of the
Lambda sounding rocket but to make this a manned rocket. I had considered a
Gemini Titan nosecone from Balsa Machining Service and actually purchased one
for this project but opted instead for a simple balsa BT60-20 balsa transition
section I had in my parts box. The booster is BT80 with parallel stages of
BT55. The shape of the strap on boosters is consistent with those of the
Lambda. The sustainer is BT80 transitioning to BT60 with a paper transition
section.
My intent was to keep the basic lines of the
Lambda sounding rocket but to make this a manned rocket. I had considered a
Gemini Titan nosecone from Balsa Machining Service and actually purchased one
for this project but opted instead for a simple balsa BT60-20 balsa transition
section I had in my parts box. The booster is BT80 with parallel stages of
BT55. The shape of the strap on boosters is consistent with those of the
Lambda. The sustainer is BT80 transitioning to BT60 with a paper transition
section.
The booster is a three engine cluster (1X24mm and 2X18mm) and I used three 1/8th inch plywood rings from Thrustline Aerospace. The parallel stages have single 18mm motor mounts.
Booster Construction
 The booster is BT80 with a three
motor cluster. The central 24mm motor stages the sustainer. The two outer 18mm
motors fire their ejection charges after sustainer ignition to deploy two 12
inch mylar parachutes. The shock cords are lengths of 100 pound kevlar cord
from Apogee attached to eyebolts in the uppermost centering ring.
The booster is BT80 with a three
motor cluster. The central 24mm motor stages the sustainer. The two outer 18mm
motors fire their ejection charges after sustainer ignition to deploy two 12
inch mylar parachutes. The shock cords are lengths of 100 pound kevlar cord
from Apogee attached to eyebolts in the uppermost centering ring.
Booster fins are 1/8th inch balsa and have two inch tabs extending through the wall to the central 24mm motor mount tube.
Fin Slotting
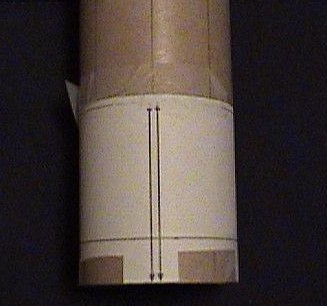 One tip to pass on for tube slotting. I use
fin wraps printed from the free program VCP to use as guides for fin slotting.
Simply print out your wrap with the appropriate thickness of fin stock, tape
securely to your body tube, mark the upper and lower extents of your slots, and
cut with either a hobby knife or Dremel cutting wheels.
One tip to pass on for tube slotting. I use
fin wraps printed from the free program VCP to use as guides for fin slotting.
Simply print out your wrap with the appropriate thickness of fin stock, tape
securely to your body tube, mark the upper and lower extents of your slots, and
cut with either a hobby knife or Dremel cutting wheels.
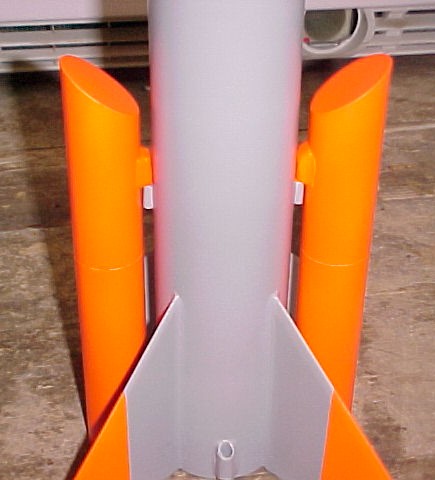
Parallel Booster Attachment
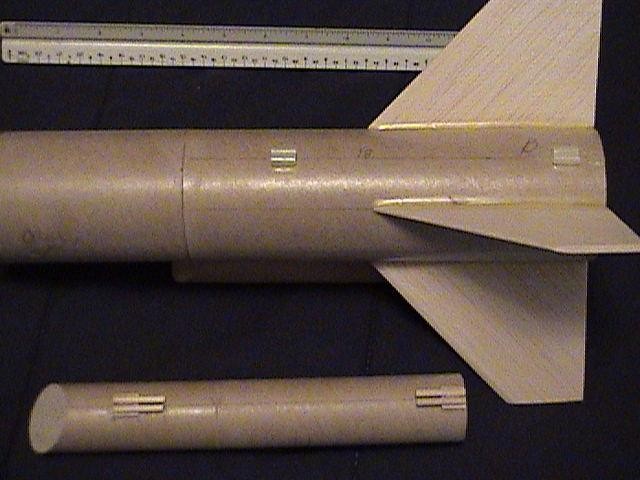 Parallel boosters are attached to the
sustainer using 1/8th inch dowels and launch lug stock. I used
1/16th inch basswood stock attached to the parallel stages as a
standoff for the dowels. Sets of parallel launch lugs are then glued directly
to the main booster. This arrangement provides positive attachment to the
booster in the event that its motor doesn’t light. You don’t want to
risk a booster coming off under thrust and then lighting.
Parallel boosters are attached to the
sustainer using 1/8th inch dowels and launch lug stock. I used
1/16th inch basswood stock attached to the parallel stages as a
standoff for the dowels. Sets of parallel launch lugs are then glued directly
to the main booster. This arrangement provides positive attachment to the
booster in the event that its motor doesn’t light. You don’t want to
risk a booster coming off under thrust and then lighting.
The BT55 parallel booster sections are connected with a tube coupler. They are have kevlar shock cord attached to the motor mount in the rear and to the balsa bulkhead in the front.
I used Apogee Fix It epoxy clay to build up the area around the dowels and standoff to give a more aerodynamic appearance.
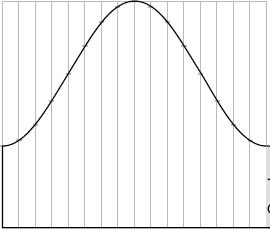
 I cut the booster tubes at an angle after I
had glued the balsa bulkhead in place. I used a technique based on one
published in Apogee newsletter #121. A quick and dirty way to come up with a
template for cutting tubes at angles is to do a screen capture of the page in
the newsletter, paste into your favorite photo editing program or PowerPoint,
and crop so you are left with this graph.
I cut the booster tubes at an angle after I
had glued the balsa bulkhead in place. I used a technique based on one
published in Apogee newsletter #121. A quick and dirty way to come up with a
template for cutting tubes at angles is to do a screen capture of the page in
the newsletter, paste into your favorite photo editing program or PowerPoint,
and crop so you are left with this graph.
Now you need to adjust the width of the image to equal circumference of your tube and the height to give you the desired angle. Print and cut out the guide, allowing enough extra width to form a tab. Tape around your tube and cut along the black line.
http://www.apogeerockets.com/education/downloads/Newsletter121.pdf
Sustainer Construction
 The sustainer is BT80 transitioning to BT60.
Centering rings are standard Estes paper and the transition is made from two
layers of card stock and a small section of BT80 tube coupler stock. The paper
transitions were printed from VCP. Once securely fastened, the transition was
filled with Elmer’s Fill N Finish, sanded, filled, sanded, etc, until I
had smooth seams.
The sustainer is BT80 transitioning to BT60.
Centering rings are standard Estes paper and the transition is made from two
layers of card stock and a small section of BT80 tube coupler stock. The paper
transitions were printed from VCP. Once securely fastened, the transition was
filled with Elmer’s Fill N Finish, sanded, filled, sanded, etc, until I
had smooth seams.
Sustainer fins are made from 3/32 inch balsa and are surface mounted.
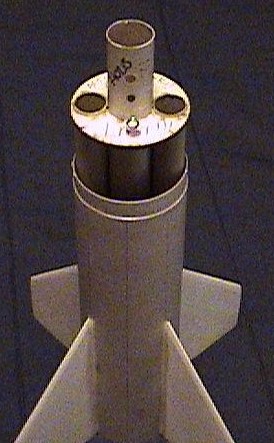
Capsule Construction
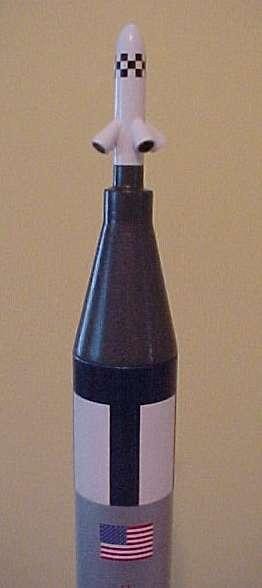
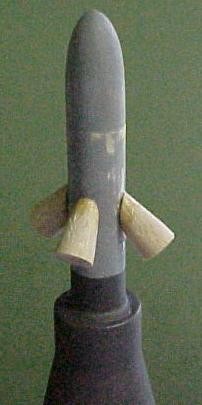 The “capsule” is made from a
BT60-20 balsa transition section. On top of this is an escape tower made from a
length of Apogee 10.5mm motor mount tube and balsa nosecone. I drilled holes in
the base of the small nose cone and top of the capsule and used
1/8th inch dowel running through the escape tower to attach it
firmly to the capsule. The “nozzles” are made from 5/16th
inch hardwood dowel. For each, I sharpened the end of the dowel in a pencil
sharpener, sanded, and cut to identical lengths. I then used an Xacto miter box
and razor saw to cut them at angles and attached to the escape tower with CA.
The “capsule” is made from a
BT60-20 balsa transition section. On top of this is an escape tower made from a
length of Apogee 10.5mm motor mount tube and balsa nosecone. I drilled holes in
the base of the small nose cone and top of the capsule and used
1/8th inch dowel running through the escape tower to attach it
firmly to the capsule. The “nozzles” are made from 5/16th
inch hardwood dowel. For each, I sharpened the end of the dowel in a pencil
sharpener, sanded, and cut to identical lengths. I then used an Xacto miter box
and razor saw to cut them at angles and attached to the escape tower with CA.
Recovery
 The recovery system if fairly straight
forward except for the booster. The parallel stages use zero delay motors and
pop off at motor burn out. The sustainer recovers conventionally. For the
booster I use the time delay of the motor to deploy the two parachutes after
the sustainer has ignited.
The recovery system if fairly straight
forward except for the booster. The parallel stages use zero delay motors and
pop off at motor burn out. The sustainer recovers conventionally. For the
booster I use the time delay of the motor to deploy the two parachutes after
the sustainer has ignited.
The two parallel boosters recover on 12 inch mylar parachutes, the booster recovers on two 12 inch mylar parachutes, and the sustainer recovers on one 18 inch mylar parachute.
Finishing
 I wanted
this rocket to have the look of a 1960s sci fi rocket on the bottom and a NASA
Gemini-Titan on top. The booster is primer gray with flourescent orange trim.
The flourescent orange is Pactra Racing Paint which is actually designed for RC
car bodies. It goes on fairly thick and is very soft initially as it cures, but
it results in a smooth and very bright finish.
I wanted
this rocket to have the look of a 1960s sci fi rocket on the bottom and a NASA
Gemini-Titan on top. The booster is primer gray with flourescent orange trim.
The flourescent orange is Pactra Racing Paint which is actually designed for RC
car bodies. It goes on fairly thick and is very soft initially as it cures, but
it results in a smooth and very bright finish.
The "Gemini-Titan" section is white and aluminum silver. The roll pattern is made with a US Insignia Blue solid color decal sheet. The insignia blue color looks really nice and has a bit more depth than straight black.
The capsule is painted with Testor's Metallizer Gun Metal. These are good paints but make sure you have a well built up primer coat if applying to paper tubes or the paint tends to have a flat finish.
Decals were scavenged from various other kits and old plastic models.
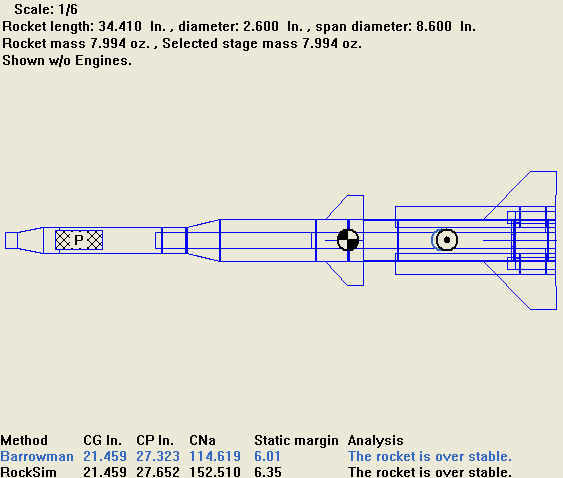
Final Simulation
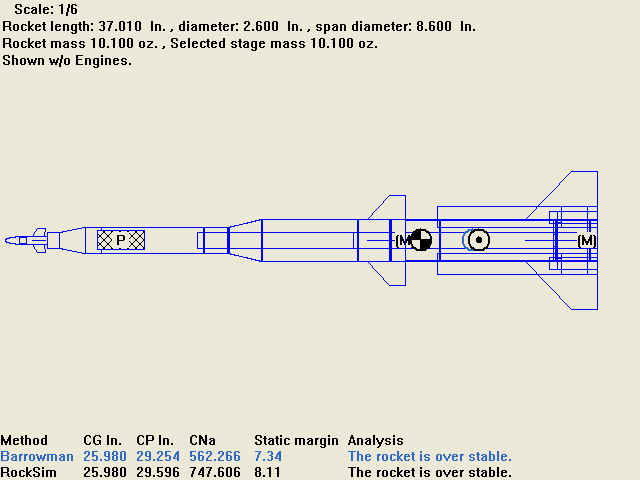 Once I completed finishing, it
was time to get the real weights and CGs to input into Rocksim. Rather than use
the mass and CG override function, I prefer to add mass offsets to my designs
in Rocksim so that the CG and weight are right. This lets me go in and add
noseweight in the simulation if I need to.
Once I completed finishing, it
was time to get the real weights and CGs to input into Rocksim. Rather than use
the mass and CG override function, I prefer to add mass offsets to my designs
in Rocksim so that the CG and weight are right. This lets me go in and add
noseweight in the simulation if I need to.
I also used a set of small fins above the capsule to try to simulate the effects of the nozzles.
Final weight of the complete model is only 10 ounces. Loaded weight for the first flight was just about 16 ounces.
Flight Report
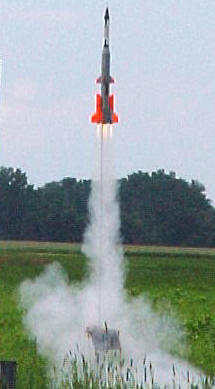 First
flight was on 14 Aug 04 at a Buffalo Rocket Society launch in Geneseo, NY.
Engine selection was critical for safe deployment of the recovery systems. I
chose B6-0s for the parallel stages since these would burn about half as long
as the engines in the booster and would allow the parallel stages to deploy and
fall away first. I chose a D12-0 in the booster for the long burn time and
because I'd heard somewhere (TRF?) that C11-0s had caused staging problems
because of the relatively small amount of powder in them. Finally, I chose
C6-3s to round out the booster cluster. These would have about the same burn
time as the D12 and the three second delay would be adequate to allow recovery
system deployment. This model screams for an E9-0, though!
First
flight was on 14 Aug 04 at a Buffalo Rocket Society launch in Geneseo, NY.
Engine selection was critical for safe deployment of the recovery systems. I
chose B6-0s for the parallel stages since these would burn about half as long
as the engines in the booster and would allow the parallel stages to deploy and
fall away first. I chose a D12-0 in the booster for the long burn time and
because I'd heard somewhere (TRF?) that C11-0s had caused staging problems
because of the relatively small amount of powder in them. Finally, I chose
C6-3s to round out the booster cluster. These would have about the same burn
time as the D12 and the three second delay would be adequate to allow recovery
system deployment. This model screams for an E9-0, though!
For the sustainer I chose a C11-5, mainly to keep my recovery walk to a minimum and to help insure finding all the pieces.
Flight prep seemed to take forever. The 12 inch mylar chutes were a tight fit in the BT20 tubes and require careful packing to ensure a good chute deployment.
After a thorough check and recheck of everything, I was ready. I attached my clip whip to the igniters and returned to the ready line. 3-2-1-nothing. I'd forgotten to connect the battery end of the clip whip! If that was all I'd forgotten, I would be in good shape.
Another countdown and whoosh--Project OMEGA screamed off the pad with all engines lit. The boosters popped at less than 100 feet and I had two good chutes. The sustainer lit nicely and took off at around 20 degrees from vertical. I'd say an apogee of ~900 feet. The booster deployed both chutes but only one opened (stiff mylar). This was enough though as it recovered safely in the tall grass. The shiny mylar chutes were a good choice and I managed to find all four components. The rocket was undamaged. A successful flight and quite a crowd pleaser!
Conclusion
 As
satisfying as building and flying this rocket has been, one of the best
elements of the project was learning more Gus Grissom. As I tried to interweave
Japanese monster movies with actual NASA programs of the 60s, I learned just
what a hero Grissom really was. He was a mechanical engineer, a combat pilot,
test pilot, astronaut, and an American patriot. What a huge loss for the space
program and the nation. You can bet that if we'd needed him to help save the
planet--he'd have been there!
As
satisfying as building and flying this rocket has been, one of the best
elements of the project was learning more Gus Grissom. As I tried to interweave
Japanese monster movies with actual NASA programs of the 60s, I learned just
what a hero Grissom really was. He was a mechanical engineer, a combat pilot,
test pilot, astronaut, and an American patriot. What a huge loss for the space
program and the nation. You can bet that if we'd needed him to help save the
planet--he'd have been there!
Detailed Gus Grissom Biography from NASA
"If we die, do not mourn for us. This is a risky business we're in, and we accept those risks. The space program is too valuable to this country to be halted for too long if a disaster should ever happen."
Lt Col "Gus" Grissom
Sponsored Ads
 SEM-KM-11")
 SEM-KM-11")
 SEM-KM-10")
 (2pk) SEM-KM-10")


 Blue Bird Zero™ KMX-06")


 |
 |