Scratch Bon Bon Original Design / Scratch Built
Scratch - Bon Bon {Scratch}
Contributed by Zoe Balkwell
| Manufacturer: | Scratch |
Brief:
Being new at model rocketry, I didn’t choose a very extravagant style of rocket, but I tried! :) Using My Box Of
Parts, I found a nose cone and a body tube that fitted together, and I was on my way. My aim was to make a simple but
pretty design, so i look at what was in my box and ended up with the design I finally used.
 Construction:
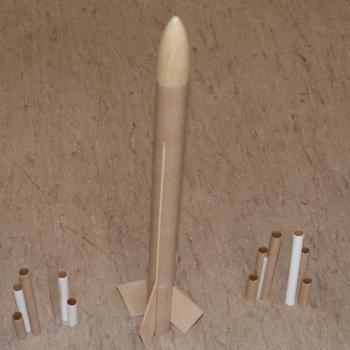
- 6mm radius tube
- Ply Wood to make my fins
- Nose Cone
- 22mm Radius Body Tube
- Engine Block
- Parachute 10 inch
- 2 equal length skewers
 Firstly I designed the style of fins I wanted. These can be seen in the photos, two fins being
1 cm smaller overall than the other two. I then used my small tubing to measure 4 evenly measured lengths. I then
recorded this length and added 2.5 cm on the length and measured another 4 small diametre tubes. I then measured
another 4 tubes with an extra 5 cm onto the original smaller tube’s length. I then joined them together by curving
them around the body of the rocket, smallest to largest. Two will have to have the same orientation, whereas the other
two will have to be placed around the rocket differently, so make sure they will fit when attached. Do this for the
remaining 3 sets of tubes. Attach the fins, smallest opposite each other and largest opposite each other. Then attach
the sets of 3 tubes, smallest tube placed against the largest fin. Repeat this until all sets of tubes have been fitted
and fins are intact. Use two equal length skewers and attach to the side of the body tube in line with the small fin on
both sides. Attach parachute in the usual manner and paint as required.
Firstly I designed the style of fins I wanted. These can be seen in the photos, two fins being
1 cm smaller overall than the other two. I then used my small tubing to measure 4 evenly measured lengths. I then
recorded this length and added 2.5 cm on the length and measured another 4 small diametre tubes. I then measured
another 4 tubes with an extra 5 cm onto the original smaller tube’s length. I then joined them together by curving
them around the body of the rocket, smallest to largest. Two will have to have the same orientation, whereas the other
two will have to be placed around the rocket differently, so make sure they will fit when attached. Do this for the
remaining 3 sets of tubes. Attach the fins, smallest opposite each other and largest opposite each other. Then attach
the sets of 3 tubes, smallest tube placed against the largest fin. Repeat this until all sets of tubes have been fitted
and fins are intact. Use two equal length skewers and attach to the side of the body tube in line with the small fin on
both sides. Attach parachute in the usual manner and paint as required.
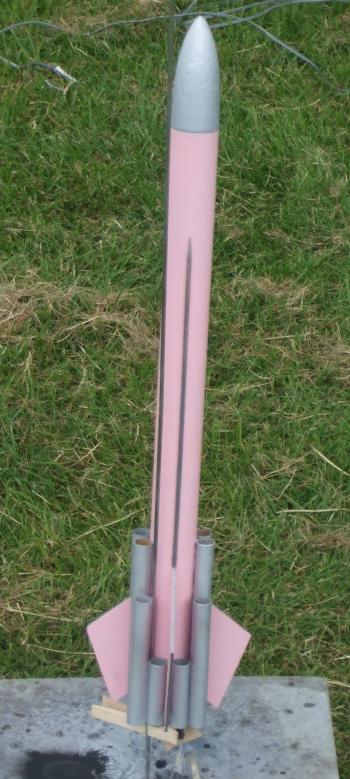
Flight:
3 flights had a very good launch on a B motor, and 1 exciting launch on a C motor. I was really impressed as there
was no damage whatsoever and the parachute was released just as the optimum height was reached.
Summary:
Easy and Quick Build, with a very nice flight, and no considerable drawbacks
Other:
paint some of the smaller details like the skewers before putting them onto the rocket... otherwise it gets very
tricky to get a nice finish... as i learnt!!!

Sponsored Ads

 - Ancient Prophecy - 1st Edition - Rare")


 | Intermediate Rocket Kit | Step-by-Step Instructions | Science Education Kits | Great for Teachers, Youth Group Leaders and Birthdays,Blue")

, Launch Pad/ Controller, Glue, Four AA Batteries, and Two Engines")


 |
 |