| Manufacturer: | Rocketman Enterprises  |
Note: This is a slightly shortened, edited version of John's review and fewer pictures. Visit John's site for the full review or enjoy the bulk of it here.
The Rocketman Enterprises Big Kahuna kit was the "over the top" rocket I just had to build. (There is actually a long story behind this.)
This kit marks my entry into "level 3" territory although I have not done the documentation for Tripoli level 3 certification. Rockets this size are really too impractical for me. This rocket requires a huge amount of storage space and was difficult to build and paint. 38mm and 54mm high-power rockets are much easier and more fun. Even with that said, this rocket is awesome in person!
You get a 4 foot nose cone, four 4 foot body tube sections and three plywood fins plus the expected motor mount tube, centering rings, couplers, bulkhead, three parachutes and hardware. But, no instructions. The rocket is 19 1/2' tall.
The Story
The company I work for has been doing fantastically well. Everyone at the company got a $10,000 bonus at the beginning of this year.
One of my fellow workers, Tom, suggested we find a fun and creative way to spend the bonus money, or at least a substantial fraction of it. Some of us agreed that this was a noble goal. This left me with quite a challenge. I had just gotten into rocketry again and had built four rockets (Quest, Estes, AeroTech, and Loc/Precision) and had found the Big Kahuna kit by Rocketman Enterprises. There were also a story with pictures of an actual launch Rocketman did for Joe Boxer, the underwear company. Needless to say, I'd found my impractical purchase (and cheaper than E.T.)! Impractical because it uses an "M" motor and I didn't even have my level 1 certification at the time.
The Kit
OK, here's a new one for me: this kit came with no instructions at all. When I talked to Ky Michaelson of Rocketman, he told me: "It goes together like any other high power kit." OK, so I built the Praying Mantis to see how his rockets go together. Luckily, I got help from Dennis Kieselhorst and Ky Michaelson.
You can see from the picture below that the kit is pretty impressive before you even start putting it together. Those body tubes are 4 feet long each!
![[Tubes]](/images/archive/images2/rp_re_big_kahuna01.jpg) The kit included, four 4' body tubes, three
18" tube couplers, one 4' nose cone, three triangular fins, one 98mm motor
mount tube, three 1/2" plywood centering rings, one 1/2" plywood
bulkhead, three parachutes, and other hardware (not shown).
The kit included, four 4' body tubes, three
18" tube couplers, one 4' nose cone, three triangular fins, one 98mm motor
mount tube, three 1/2" plywood centering rings, one 1/2" plywood
bulkhead, three parachutes, and other hardware (not shown).
Of course, a kit this size has lots of body tube seams to full. I calculate that I had 288 feet of seam to fill (11.5" O.D., 16 feet of tube, 2 inches between seams). The finished rocket is heavy. The large PML tubes and heavy wood fins add up, not to mention the fiberglassing of the fins tothe motor mount tube.
Since there were no instructions, there were several possible configurations. I had four 4' body tubes and a nose cone. I could have made the rocket split in two for dual deployment, which I was too new to realize at the time. I chose to have the base of the rocket (motor mount and fins) and the next section permanently epoxied together for strength. I still had the choice of having the nose pop off by itself or with one or two body tube sections. I decided to use the center body tube section to contain the three parachutes and have the nose and top body tube section land with a single parachute and the bottom three sections land with a pair of 'chutes. This way, there would be a whole section for payload. which came down with the nose and was protected from the ejection system.
To pressurize a single tube section to 15lb/in2, I would have needed to use more than 38 grams of black powder! Dennis Kieselhorst suggested I mount a 6" tube inside the section and just pressurize that, which I decided to do. Even that took 10+ grams of powder.
Launch Attempt at Balls 98
This rocket was a monster to manage all the way through the project, and launching it was no exception. It didn't fit in my suburban because the fins added too much size at the top, so I had a courier drive it up to Black Rock while I took the rest of the rockets and supplies in the suburban. Many of my co-workers came, most of them in a limo! They know how to travel in comfort.
Glitch 1: Waiting for Motors
We spent most of the first day (Saturday) setting up camp and waiting for Mike Gillette to show up with the three Rocket Dyne Systems motors I'd ordered. He got stuck in the mud and wasn't able to get to the range until 3:00, leaving too little time to build the motors and fly before the waiver closed at 4:00. Once Mike built the O3500 motor, it was a truly impressive sight (about 6 feet long).
Glitch 2: Premature Ejection
The next morning, we went out to fly the Big Kahuna. I hadn't built a hatch to access the altimeter from outside, so I just hooked everything up and turned it on and we assembled the rocket. While trying to get the rocket onto the Quad-Pod the first time, the altimeter fired prematurely and the payload section and nose flew past me almost 20 feet. A healthy ejection charge!
I went back and borrowed an Olsen wiring harness so that I could turn the unit on from the outside by twisting the wires together and then pushing them back inside. This was less satisfying than being able to see the display, but at least we could turn the altimeter after the rocket was upright.
Glitch 3: Broken Launch Lug
There were no launchers large enough (1" rod) supplied, but I brought my Quad-Pod as a backup and we had to use it.
![[Setting Up]](/images/archive/images2/rp_re_big_kahuna02.jpg) We loaded the motor and assembled the two main
sections. Next we threaded the base section onto the launch rod and then
attached the recovery and payload sections. Then we tried to set the rocket
upright. One of my motor retainers caught on the plate of the Quad-Pod and when
we tried to turn it the bottom launch lug was torn off the rocket. Trying to
manipulate a 110+ pound rocket is no easy matter and even though the launch
lugs were fiberglassed on, the P.M.L. tubing wall separated.
We loaded the motor and assembled the two main
sections. Next we threaded the base section onto the launch rod and then
attached the recovery and payload sections. Then we tried to set the rocket
upright. One of my motor retainers caught on the plate of the Quad-Pod and when
we tried to turn it the bottom launch lug was torn off the rocket. Trying to
manipulate a 110+ pound rocket is no easy matter and even though the launch
lugs were fiberglassed on, the P.M.L. tubing wall separated.
I had my West System repair kit with me so we slathered some epoxy onto the broken area, added some duct tape to hold it together and let it to cure in the hot desert sun. Not a beautiful repair, but it did hold.
Glitch 4: Igniter Pulled Out
In the afternoon, I decided that the epoxy had cured fully (more-or-less) and we went back out to try again. We put the rocket together for the third time and after much discussion and struggling, got the rocket upright on the Quad-Pod. Unfortunately, while doing so we managed to pull out the igniter from the motor!
We had to lower the rocket yet again and try to push the igniter back inside the motor. This is no easy task with a 6 foot tapered grain motor. I went back to the line and managed to borrow a rod from Paul Robinson who helped me a lot that weekend. Thanks Paul and Kosdon East!
Glitch 5: Quad-Pod Too Small
![[Launch Pad]](/images/archive/images2/rp_re_big_kahuna03.jpg) We put the rocket together for the fourth time
and after much discussion and struggling, finally got it onto the Quad-Pod and
upright. By this time, though, the wind had come up and the Big Kahuna was very
precarious balanced on the Quad-Pod with the rod.
We put the rocket together for the fourth time
and after much discussion and struggling, finally got it onto the Quad-Pod and
upright. By this time, though, the wind had come up and the Big Kahuna was very
precarious balanced on the Quad-Pod with the rod.
When a gust of wind would come up, we would have to steady the rocket to keep it from tipping the Quad-Pod, even with the sand bags. Even though the Quad-Pod claims to hold 200+ pound rockets, it is not stable with such a heavy and long rocket. We decided that flying the rocket was too dangerous and sadly loaded it back into the truck for the ride home.
Yes, we're going to try it again. The Siebel people who came all seemed to have a good time and most are ready to go see the rocket launch when I do solve the problem of the launcher. The Big Kahuna will fly.
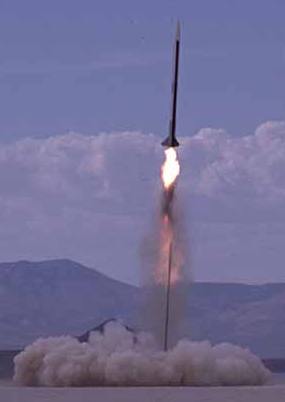 Flight of September 1999:
A year more experience, and particularly making more contacts with fellow
rocketeers, allowed this launch to be much easier and more successful. Once the
rocket was up all pictures were taken and the electronics were armed, it was
back to 750 feet for the actual launch. The blast was thunderous and the rocket
lept right off the pad, making a perfect flight.
700 feet away was far enough for caution, but close enough to get a good experience of the mighty O3500 motor. The rocket was also so large that a 200mm zoom lens makes it look like we're right next to it.
The boost was very nice, although the motor didn't burn as cleanly as it might have (perhaps because it sat for a year before being used). We saw some uneveness in the boost and there were bits of propellant on the ground at the launch site.
The rocket separated right at apogee, but the two sections got tangled. Three 'chutes were used: two for the booster (12 feet long) and one for the nose cone/payload section (7½ feet long).
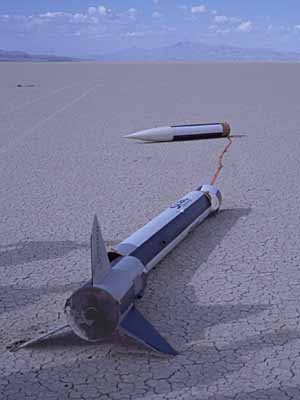 The rocket came down safely about 500 feet
down-range, but the landing broke the unreinforced PML phenolic in two places:
right above the fin can, and near the forward end of the booster. The nose
cone/payload section was unharmed.
The rocket came down safely about 500 feet
down-range, but the landing broke the unreinforced PML phenolic in two places:
right above the fin can, and near the forward end of the booster. The nose
cone/payload section was unharmed.
Given the large size of this rocket and the lack of reinforcing of the tubing, I was surprised that it performed so well in flight and survived the rough landing as well as it did. Yes, I would do a few things differently if I was building this rocket again!
The Big Kahuna has been retired after it's spectacular flight. Thanks to everyone who helped me with this beast and to all my co-workers who made the trek to Black Rock (twice!) to watch the launch.
Sponsored Ads


")

 |
 |