| Construction Rating: | starstarstarstarstar_border |
| Flight Rating: | starstarstarstarstar_border |
| Overall Rating: | starstarstarstarstar_border |
| Published: | 2010-11-13 |
| Manufacturer: | Binder Design  |
Picture Courtesty of Binder
Design

Brief:
Binder Design’s Gangsta is a single stage, 2.6-inch diameter, 29mm,
four-finned sport rocket, measuring 24.25-inches in length. I wonder if a black
rocket named Gangsta is politically correct, yet I’m drawn to it because
of the unique fin design and long nose cone on such a stubby rocket.
Construction:
The First thing I notice after opening the shipping box is the packaging. At
first glance you might think this was your standard thick plastic bag full of
rocket components. Closer inspection reveals a bag within a bag. The inner bag
is partitioned in such a way that the smaller components are separated and
relatively easy to view. This feature allows one to inventory the parts without
opening the bag.
The Gangsta consists of:
- 4.5-inch motor tube
- 2x fibrous centering rings
- eye-bolt and quick link for shock cord attachment
- 4x very nice plywood fins
- 11-inch airframe tube (per the parts list, mine is 11.25-inch)
- 13-inch exposed length nose cone
- 0.25-inch x 4-inch launch lug
- vinyl decals
- 12-foot tubular nylon shock cord
- 18-inch nylon chute
I am especially impressed with the recovery system components. The parachute is a very nice 8-shroud line design that I’m sure I’ll use in many rockets.
The instructions are among the best that I’ve seen, nine pages plus a fin alignment guide. The instructions include many useful diagrams plus Rocksim CP data.
Construction is very straightforward. I used AeroPoxy “5min” epoxy with glass fiber reinforcement for most of the construction. The AeroPoxy kicks slower than the hardware store 5-min epoxy, and has a one to one mix ratio. I figure that with the glass fiber reinforcement it’s as least as strong as most “15 min.” epoxies.
The fit of all the parts is excellent. The only problem I had is with the eye-bolt assembly. The eye-bolt itself is a #6; unfortunately the nut provided is a #8. Also, a quick link is provided for attachment between the eye-bolt and the shock cord. The instructions warn you to attach the quick link to the eye-bolt before gluing the forward centering ring in place; otherwise you may never be able to reach it. In my opinion, this quick link is of little or no value, and only adds weight aft in a rocket that inherently has very little stability margin. I used it, but I recommend saving it for another project.
I deviated from the instructions in a few areas. The launch lug is cut down from 4-inch to 2.5-inch for no other reason than I think it looks better. T-nuts are installed in the aft centering ring for motor retention. Instead of internal fillets, I tacked the fins to the motor tube with 5-min. epoxy and poured PML’s two-part foam in the fin can. After it cured, I used an old steak knife to trim the excess foam. I then epoxied the aft centering ring in place. At this point the aft end of the rocket felt so rigid that I allowed myself to use smaller external fillets than I otherwise would have. The foaming process is also much quicker than applying conventional internal fillets.
After construction was complete I used Elmer’s Carpenter’s Wood filler to fill the fins and the body tube’s shallow spiral grove. This was followed by two coats of Krylon white primer, sanded in-between coats, and a final coat of Rustolium gloss black. The finishing touch was the large vinyl Gangsta decal. The decal was very easy to apply and looks great.
I downloaded the Rocsim file for Gangsta from the EMRR archive. This was posted by Binder Design, so I guess you could say it’s the “official” Rocksim file. Comparing my Gangsta to the Rocksim file, I found my CG to be significantly farther aft. In order to get my measured CG to match the Rocksim CG, I had to add a 120g mass object centered on the fins. This seemed excessive, but when I weighed my Gangsta it was 318g, which is very close to 120g over the Rocsim file! I didn’t weigh the two-part foam when I was mixing it; the nature of the foam makes you work kind of fast. I assumed it would have weighed about the same as internal fillets, but apparently it weighed significantly more. To compensate for my tail-heavy rocket I had to add significant nose weight, about 75g of bird shot held in place with 8g of epoxy. My Gangsta now weighs about 400g, double what the Rocksim file says it should. So much for the instructions reminder to build light! If I lose this one perhaps I’ll buy another, and use conventional internal fillets for sake of comparison.
The nose cone fits very loose. The instructions acknowledge this, and state that it’s intentional. I can appreciate this, however it took 6 full wraps of some fairly heavy masking tape to get a snug fit.
Construction Rating: 4 out of 5
 Flight:
When I put the rocket on the rod it was apparent the launch lug was binding.. I
worked the rocket up and down the rod a few times and it felt a bit better, and
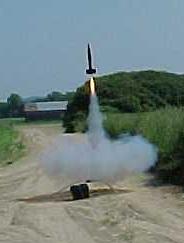
I wanted a picture for this review, so I decided to go for it. The wind was
blowing at ~5mph with gusts. The Gangsta’s first flight was on an F20-7
EconoJet. Coming off the rod the rocket seemed to weathercock quite a bit. My
guess is that the binding contributed to it. Either the velocity was too low
coming off the rod due to friction, or binding caused the rod to whip. The
rocket was definitely on it’s way down and moving fast when the chute
finally deployed. The Gangsta landed on a hard packed dirt road without a
scratch.
The second flight was on a G38-7 EconoJet. This flight was much straighter than the first one, with only a little weathercocking. Ejection occurred pretty close to apogee, hard to say for sure because at ~2000 feet this rocket is little more than a dot. Again, recovered without a scratch.
Overall I’m very pleased with how this rocket flew. I would like to think that if it hadn’t been for the tight fit on the rod the F20-7 flight would have gone much better. With sufficient nose weight this rocket should be able to fly on a wide assortment of engines. I would have loved to put a G80-10 into it, but that will have to wait for a very clear, calm day.
Flight Rating: 4 out of 5
Summary:
The Gangsta is a quality rocket with a unique look. With proper attention to
nose weight, the Gangsta should provide good flights on a wide variety of
engines. At first I thought the $39.99 asking price was a bit high for such a
small rocket, but considering the quality of the components I would say that
it’s actually quite fair.
Overall Rating: 4 out of 5
Other Reviews
- Binder Design Gangsta By Frank G. Whitby (April 20, 2007)
Brief: Scott Fisher sold me a bunch of these kits for use in a rocketry class taught at the University of Utah Museum of Natural Sciences in the fall of 2006. Photo Courtesy of Binder Design Construction: The experience with the Gangsta kit was excellent. A dozen 4th and 5th graders put these kits together on a Saturday morning, requiring about 3 hours of class time. ...
 |
 |
Flights
|
|
J.C. (July 30, 2003)
Sponsored Ads


|
|
Mike Fisher - Binder Design (July 27, 2003)