Modification More G-Force DD Modification
Modification - More G-Force DD {Modification}
Contributed by Frank Hermes
| Manufacturer: | Modification |
Brief:
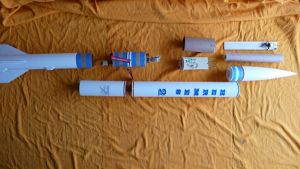
See prior article describing what basically was a MMT modification to the G-Force kit--I kept that modified booster section onl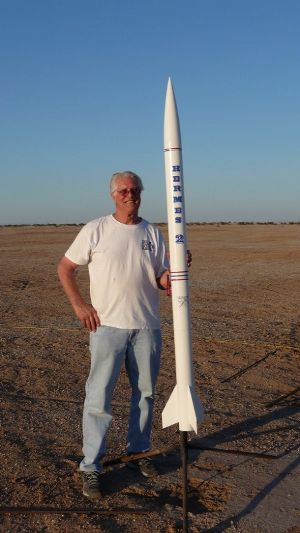 y, and added scratch components to turn it into a dual-deployment version. I added a fully redundant dual-deployment mid-section e-bay for the flight computers and the two-CD3 CO2 ejection systems. I also added an upper-section e-bay for a GPS telemetry systems and a nosecone e-bay for an RF tracker. The rocket grew from 57" to 81" in the process.
Construction:
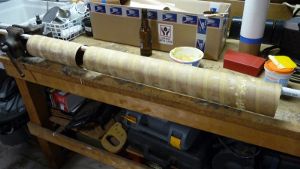
I liked working with the phenolic couplers I had ordered for the original mod (in an effort to beef the G-Force up a bit) from Giant Leap (GL). So, after doing the basic enhancement design on paper and then in RockSim, I ordered pre-cut airframe tubes from GL rather than new cardboard tubes from Public Missiles.
I ordered a 12" section for an extension to the booster section and a 29" section for the upper airframe from what was left over from the initially 48" tube, I cut a 1" section for the mid-section coupler/e-bay.
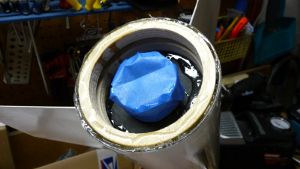
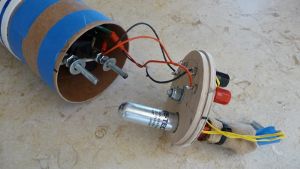
I purchased and modified two 4" x 8" phenolic e-bays from GL. I used one for the flight computers/CO2 ejection system in the mid-section coupler and one for a slide in/out e-bay for the GPS system in the upper airframe.
I got a 4" Intelli-Cone from PML for the RF tracker rather than try to do one myself from the original G-Force nosecone.
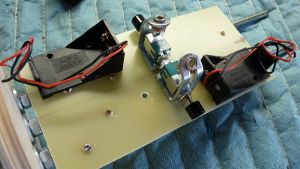
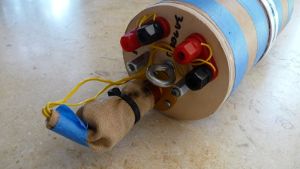
I constructed the deployment e-bay to house a G-Wiz HCX as the primary altimeter and a Ozark ARTS2 as the secondary altimeter. I wanted to keep the two systems totally redundant/isolated, so I incorporated a pair of on-off pushbutton switches (from Mouser) and a pair of modified audio-jack (also from Mouser) 4-point shunts for the e-matches used for the Rouse-Tech 12-gram CO2 systems. I fabricated some mounts for the switches and jacks from some aluminum angles I had laying around and some Radio Shack banana jacks for the e-match terminals.
In order to minimize the size of the total-of-four airframe holes I needed for the switches and shunts in the coupler/e-bay, I did not want to use the audio plugs that normally fit the audio jacks, so I fabricated a couple of "Remove Before Flight" pins for the shunts out of 8-penny double-headed nails.
I used standoffs to mount a Big Red Bee TX tracker onto the FG sled in the upper airframe e-bay and just tie-wrapped (due to lack of space) a Big Red Bee 70cm GPS telemetry system to a basswood sled I made for the nosecone e-bay.


Finishing:
To help with the finish of the airframe tubes, I once again utilized slightly diluted Elmer's Wood Filler in the spiral grooves of the GL phenolic tubes. Due to the impregnated resin, the filler did not adhere as well as to the PML cardboard tubes from the original G-Force kit, so it took about three applications of filler and primer paint to sufficiently fill in the grooves.
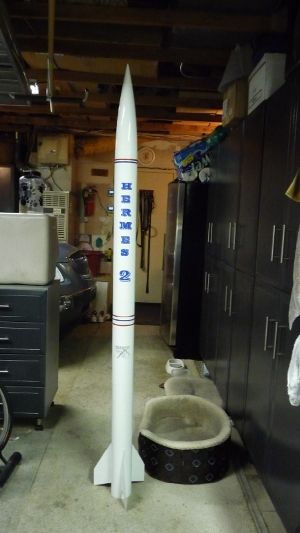
Once they were filled, I applied a few coats of gloss white and applied some custom decals and some pinstripe tape.
Flight and Recovery:
I had planned on test flying the rocket on a mid-sized I motor before I went to a J and attempted my Level 2 certification flight. I wanted to keep everything in sight since this was my first experience with flight computers, dual-deployment, e-matches, CO2 systems, rivets and shear pins. I also wanted to ground-test for separation due to my lack of experience.
So by the time I got everything finally ready on launch day, it was late evening and the sun was getting short. I decided to go with a small J motor and gamble that it would all go well and I could get my L2 with the initial flight in this configuration.
I stuffed a Cesaroni J285 in the back and headed for the pad. Rather than having to fully build up a motor, the CTI Pro38 configuration saved me a bunch of time and worry at that point.
At the pad, I removed the shunt pins and turned each flight computer on and was rewarded with the proper sequence of beeps. I prepped the motor igniter and headed back to the launcher. The rocket is quite overstable with all the additions, so when it left the rod it tilted a bit (there was no wind) before it got up to speed and really started flying. Once on the way, it flew straight and true.
With the small J and a loaded weight of over 11 pounds, it only flew to ~2200' AGL so I was able to see everything OK. Both chutes popped at the proper time and it came down about 600-700 yards away, mostly due to its initial tilt off the rod as opposed to any wind. I used a choked down 42" for the drogue and a b2 Classic II 60 for the main. There was virtually no damage to the rocket (I beefed up the tail--see earlier article--with a couple of 75mm to 98mm centering rings and some FG cloth.
Summary:
This L2 project was really a prelude to my next project and my Level 3 certification. I learned a great deal building the DD recovery system. Since the rocket grew so large and heavy, there is not much use for the tracking devices. Even using the biggest 38mm J motor I could cram in the back, it only sims out to less than 3,500' altitude, but it was fun and definitely educational!
#Related Reviews
- FSI Nova By Mark Kulka
Sport rocket with pass-through transition. This is a clone of FSI's third rocket model as it appeared during the first half of the 1970's. The following parts were all obtained from Semroc Astronautics: ST-1160 (6") - lower body tube ST-8F90 (9" cut to 8") - upper body tube ST-940 ...
- Modification Cherokee D (Cloned from a CC Express Kit) By Ronald West
My clone of the very popular Este's K-47 Cherokee-D that was available from 1971 until 1983. Its 3FNC design and D power really packs a wollop off the launch pad. My review is very similar to the other Cherokee-D with the exception I used a E engine hook to allow either a E or with a spacer, ...
- Modification Meanie w/Quick Change Motor Mount By Nick Esselman
I had the idea one day to make a switchable motor mount so that I could fly a rocket on various motor sizes and configurations. I searched the web and found I wasn't the first to have that idea (no surprise there). Then I connected with Mark over at True Modeler Rocket Kits . He is selling his ...
- Modification Pipsnitch By Chan Stevens
What do you get when you rummage through the build pile 2 nights before a 2009 challenge deadline trying to come up with stage bash ideas? The answer is the decidedly low-labour Pipsnitch, a saucer-based screamer. It made use of one of the many clearance-sale Snitch's I'd picked up at about $3 ...
Related Products
- Aerotech G Force
Sponsored Ads


 |
 |