| Manufacturer: | Public Missiles  |
Kerry's Ptery
From the first time I saw a Pterodactyl Jr. kit, I knew I wanted to build one. My local hobby store owner told me there was a shipment of new PML kits coming in and I wanted to see the kits up close before I bought one. The shipment day arrived and I ran down to the store only to find a fellow member of our rocketry club had beat me to it. I still ended up buying the PML Small Endeavor kit. At our next launch, Brian shows up with the Pterodactyl Jr. rocket all built and I decided I still wanted one after seeing his close-up. A few days later I was getting ready to run over to Hobby Town and place my order when my girlfriend tells me that she wants a Pterodactyl Jr. kit. So I did the only honorable thing, I ordered two.
The current Pterodactyl Jr. kit uses the new Quantum tubes, which are a plastic polymer. It’s a little heavier than Phenolic but it significantly stronger. The kit contains: (Fig. 1)
|
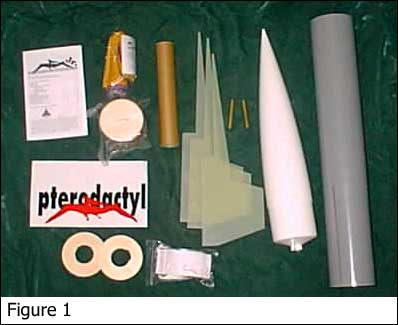 |
After checking to make sure all the parts were included in the kit, I checked the fit of the parts. Two of the fins needed a little filing down to fit into the pre-slotted airframe.
I am amazed that virtually no manufacturer of high power rocket kits included any form of positive motor retention. I placed a call to Ed at Giant Leap Rocketry and ordered up a couple of his motor retention systems. I do need to give PML credit for supplying RockSim 4.0 data on their website. Not only do they have the design of the Pterodactyl Jr., they also have an alternate design that incorporates a 29mm motor adapter. This is great for running simulations before heading out to the range.
The Pterodactyl Jr. assembly instructions are clear, easy-to-read, and nicely illustrated. There are even nice instruction tips to make sure your construction goes well. As obvious as it may be to some people, their first tip is to “Be sure to scuff all parts to be bonded using medium sandpaper”. These types of tips are great for people new to building high power rockets.
First step is to put together the motor mount. The piston
ejection system is connected directly to the motor mount with a nylon strap. In
order to save wear and tear on the nylon strap from the ejection charges, I
have added a 4” Nomex® protector (again from Giant Leap Rocketry).
| The only departure from the instructions here was a quick wrap of Kevlar® string around the motor mount and strap (Fig. 2). This isn’t an attempt at greater strength, it was simply to keep the strap tight to the tube while the epoxy cures. Notice also, two small pieces of masking tape to keep the corners of the strap down. After the epoxy dried, all the string not epoxied into the strap was removed so the fins would fit flush to the motor mount. The instructions recommend 5-minute or 15-minute epoxy, instead I used West Systems’ 105 epoxy resin and 205 fast hardener. The described combination should yield a dry-time of about 2 hours. The added strength of the connection should be worth the extra wait. The epoxy that was left over was used to assemble the piston and brush the inside of the piston with a liberal amount of epoxy. Putting a coat of epoxy inside the piston should help protect it from the heat of the ejection charges. | 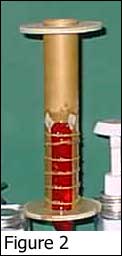 |
Since I had some time to kill while the motor mount was drying, I decided to be constructive with my time and start prepping some other parts. Using medium grit sandpaper, I scuffed up the inside of the airframe where the centering rings and fins will attach. I also scuffed up along the outside of the airframe along the fin slots and up the airframe where the long fins attach to the airframe. Next I took to a little more sanding and roughed up the places on the fins where the epoxy will be put. The nosecone got a nice hot soapy wash in the sink with a rubber kitchen scrubber to remove any excess mold release agent. This can wreck havoc with your attempts to get primer and paint to stick to the nose.
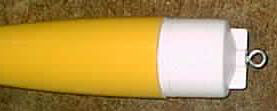 |
The nosecone got sanded down using a small electric hand sander with a fine grit paper. I just did enough to remove the seam lines and mold marks as well as a little more scuffing to be ready for the primer. A mix of two hour epoxy was poured into the nose cone, then an eyebolt was screwed in. This was all left to dry with the nose standing up so the epoxy would run back down and seal the eye bolt in place. |
| Using a shock cord tip from Ed at Giant Leap, the piston strap was wrapped with Kevlar® string and epoxied into place. Before doing this, I slipped a Nomex® shock cord protector over the piston strap to minimize ejection charge damage. | 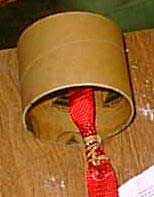 |
 |
Finally, a set of motor retainers (also from Giant Leap) were put into the aft centering ring. A small bit of epoxy will ensure they aren't coming out. Then the aft centering ring was epoxied into place. As you can see, some painting has been done. The first coat of yellow went on and now needs to be sanded over. However, it is ready to fly. Hopefully it will go up this weekend. |
Other Reviews
- Public Missiles Pterodactyl, Jr. By John Meckley
(by John Meckley) This is a fairly simple kit to put together -- basic through-the-wall fin mounting and single body tube/nose cone construction. This kit has a "piston"-type ejection system and since the body tube is relatively short in relation to the forward end of the tapered fins, there's really no opportunity to use the "zipperless design" that I favor. ...
 |
 |
Flights
|
|
G.B. (February 1, 2001)
Sponsored Ads


 PML 21382")


|
|
B.O'B. (January 1, 2001)