Scratch Postal Tube Mk II Original Design / Scratch Built
Scratch - Postal Tube Mk II {Scratch}
Contributed by Brad Shea
| Manufacturer: | Scratch |
Brief:
Postal Tube Mk II is a tube-fin, single stage, HPR rocket suitable for level 1
certification. It uses simple construction techniques and is a reliable flyer.
Construction:
The parts list:
- 2 Standard 36" x 3" postal tubes (~$3.50 / tube at UPS Store)
- 1 LOC 38mm x 15" motor mount tube. (Length is not critical)
- 2 Birch plywood 1/4" thick centering rings
- 1 Small/medium eyelet bolt
- 1 3-5" piece of coat hanger wire
- 1 20'x 3/8" Kevlar® shock cord
- 1 3" LOC nosecone
- 5 Min epoxy (standard)
- 5 Min epoxy (metal bonding or high temp)
- 1 3/8" Brass launch lug (3" long)
- 1 42" Hexagonal panel of rip stop nylon
- Shroud lines (nylon camping string/rope)
- Optional: 1 LOC 29mm to 38mm mount adapter
This is an easy rocket for anyone to build, but I would recommend that you purchase centering rings or you have help from someone who is skilled at making them. I had help from a friend and without his help I'm not sure I would have gotten the rings completed without a lot of trial and error.
 Since the centering
rings were homegrown, a Dremel or similar tool was helpful. Standard HPR motor
mount construction was used. First a ring was fully fitted and glued on an inch
or so from the front of the MMT which was a leftover 15" section of 38mm
tube. Next an eyelet bolt was added to this facing the front of the rocket.
Because of the fact that the tube was narrow and long and my hands are large, I
elected to tie off my Kevlar®
shock cord at this time. To keep the epoxy from dripping all over the shock
cord I used a Ziploc bag and a rubber band. This partially completed assembly
was pushed into the tube and epoxied into place. Once the epoxy set, additional
epoxy was added to the rear of the first centering ring. Once this was
completely set, I placed the rear centering ring onto the MMT and glued in
place on both sides. I elected to use high temp glue for the rear centering
ring since it would be exposed to higher direct heat.
Since the centering
rings were homegrown, a Dremel or similar tool was helpful. Standard HPR motor
mount construction was used. First a ring was fully fitted and glued on an inch
or so from the front of the MMT which was a leftover 15" section of 38mm
tube. Next an eyelet bolt was added to this facing the front of the rocket.
Because of the fact that the tube was narrow and long and my hands are large, I
elected to tie off my Kevlar®
shock cord at this time. To keep the epoxy from dripping all over the shock
cord I used a Ziploc bag and a rubber band. This partially completed assembly
was pushed into the tube and epoxied into place. Once the epoxy set, additional
epoxy was added to the rear of the first centering ring. Once this was
completely set, I placed the rear centering ring onto the MMT and glued in
place on both sides. I elected to use high temp glue for the rear centering
ring since it would be exposed to higher direct heat.
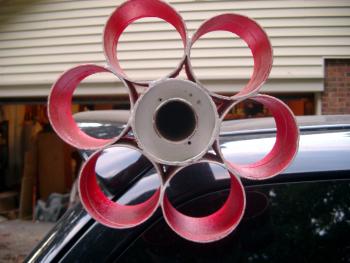
The above picture shows the detail on the way the tube fins are attached (epoxy on three points - main tube, and each side tube). The same picture also shows the two small holes I use for the coathanger wire-based motor retention.
I used the full length of the Postal Tube so no cutting was required. For the Tube fins I cut the tube using a hand saw in a miter box. Next I took a spare 3" x 30" tube section (actually a leftover from a previous rocket that didn't fly well) and I cut six 3" long sections from this. These sections were sanded and checked against one another to assure that they were close to the same length. I decided to mount these flush with the rear of the tube to make it easy to stand the rocket up without a stand. The tube sections were glued to the rocket using 5 minute epoxy. An added benefit of tube fins is that you get very strong attachments due to the fact that each tube is glued in three places (to the main tube and both adjoining tubes).
My friend is handy with his wife's sewing machine and was kind enough to make a 41" parachute to go with my rocket. I would advise buying one if you are not able to sew yourself, but this is a skill worth learning as the total cost of the chute ran around $10-15.
A 3/8" section of brass was flattened on one side via Dremel and grinding stone. Metal bonding epoxy was used to attach this to the main tube just about where the motor mount tube ends inside. A 3/8" dowel and a level was used to help align this to the main tube, but mostly this was an eyeball operation.
My friend recommend a cheap and simple way to retain the motor using coat hanger wire and a drill. Essentially you drill a small hole in the rear centering ring and create a piece of coat hanger wire with about a 75-90 degree bend in it. This slips into the hole and then when aligned with the motor, the bend holds the wire from slipping out. The remaining wire is bent into a hook shape that holds onto the rear of the motor. This entire assembly is then tied to the tube using a plastic zip tie. Prior to inserting it, the motor is friction fitted using masking tape to further reduce concerns.
I used a standard LOC 29mm to 38mm adaptor to allow the use of the H128W motor that I purchased on a level 1 promotional deal. This was taped to the motor mount and friction fitted as well. The motor retention held the entire assembly into the rocket.
 Finishing:
Due to time constraints I had very little chance to properly finish this
rocket. I completed the rocket the night before the launch, however, I tried to
paint enough make it easier to find. I painted the tube fins and the bottom
inch or so of the main tube with a fluorescent orange, but because of the paint
or the lack of priming, the paint was mottled, odd looking, and easily rubbed
off. I painted the remaining portion of the main tube with white primer. I left
the nose cone unfinished since this roughly matched the tube in color.
Because of the lack of time to allow for proper drying, the rocket was still a bit sticky when I had to leave for the launch. I packed it into a garbage bag for transport. Ugly but functional was the kindest way to describe it.
I have since found that the cardboard that the tubes are made of is hard to finish. I have sanded it and primed it but it is prone to "shag" and it is best not to expect perfection--at least if you lack experience finishing this material.
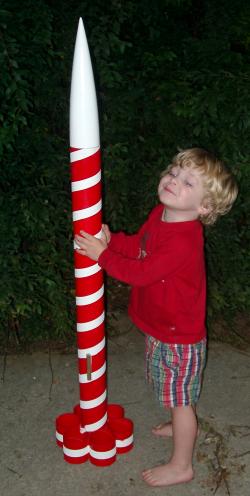
The picture on the left shows the repainted rocket with my 3 year old son for comparison of size.
Flight:
Any H motor should work for a first flight. I used an Aerotech H128W with a
short delay. Simulation data seemed to indicate that anything from a G to a
J350 can be used if an appropriate delay is selected.
The rocket was prepared using standard cellulose wadding from the local big box hardware store. This was not only the rocket's first flight, but it was also my first HPR reloadable motor attempt. I had prepped one G64 partially before but never anything else. I was familiar with the process on paper but had no experience. I made a number of mistakes including mixing up the O-rings from the aft and foreward closures and initially left out the ejection charge! I caught all of the mistakes before going to the LCO but it was a trying day. My 7 year old was along and between her requests for water and chips and asking me this or that it took me 2 hours to get the rocket ready. Then when I finally went to the pad, I forgot the igniter and had to run get it.
Fully prepped the rocket weighed in at 3.0 lbs. Simulations were very close to this and so I was quite confident that my simulation data was on target.
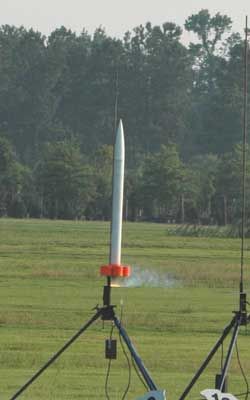
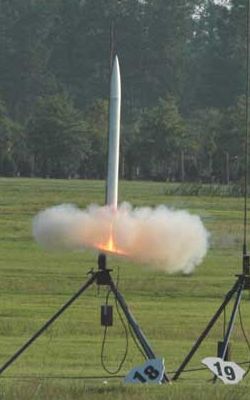
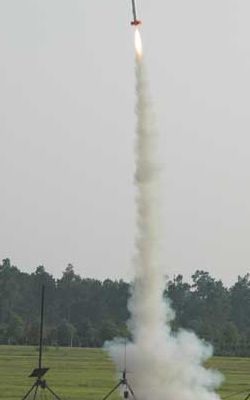
My rocket turned out to be the last HPR rocket of the day. The suspense was killing me. This would be my last chance to qualify for level one for at least two months so I was quite nervous. When the LCO called off the countdown and the igniter sputtered I thought I was cooked. But then the motor caught and the boost was perfect--nearly straight up with very minor wind induced weathercocking. The rocket appeared to go up to around 1000' and right around apogee the motor ejected.
Recovery:
The chute was predicted to be a little undersized but the hang time was very
long. I expect that I could get away with a smaller chute but I'm not sure. The
rocket settled back to the ground gently and my certification team all
congratulated me expecting that there would be no damage. As it turned out
there was a tiny amount of damage (1/16" deep) at the top of the tube
where the shock cord took up the slack against the parachute, but it was
nothing that would prevent launching the rocket again. If I had it to do again
I might change the mounting method and add a rubber ball to the cord or
something else to reduce potential for zippering.
Summary:
PROs: Easy to build from simple cheap parts. Non-complex construction
techniques make it simple for the first time HPR flyer. Durable and forgiving
tube fins make it easy to launch in most conditions. Large range of motor
choices make for simple one design
CONs: Tube fins are considered ugly by some. Tube fins have higher drag so the altitude is lower, but this can be considered a plus if the field used is not large. Design could zipper if you miscalculate the delay timing for ejection.
Sponsored Ads


 |
 |