| Construction Rating: | starstarstarstar_borderstar_border |
| Flight Rating: | starstarstarstar_borderstar_border |
| Overall Rating: | starstarstarstar_borderstar_border |
| Diameter: | 2.25 inches |
| Length: | 18.50 inches |
| Manufacturer: | Estes  |
| Skill Level: | 1 |
| Style: | Futuristic/Exotic |
Brief: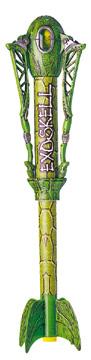
This weird sci-fi model rocket launches into the air and at ejection returns to earth in two parts. The sustainer returns using a 12" parachute while the pod carrying a little alien extends it legs and descends on an 18" parachute. The kids at the launch love to watch it.
Construction:
Within the colorful box the parts were undamaged.
Parts included:
- 1 large green body tube (BT-55)
- 1 smaller diameter notched body tube
- 1 engine mount assemble with two fins molded to it
- 2 plastic fins, one with a molded launch lug
- 2 adaptor rings
- 1 plastic engine retainer ring
- top and bottom halves of the alien pod capsule
- 3 pod windows
- 3 pod leg assemblies with screws
- 1 alien/rod assembly
- Leg capture ring
- 12" parachute and 18" parachute
- shock cord
- 1 braided cord
- 3 rubber bands
- 1 body tube wrap sheet
- 9 page instructions
The instructions were easy to follow but contained an addendum for assembly. If you are type of person that digs in before reviewing everything you may miss the addendum resulting in difficulty in construction.
Unlike most other kits, you need to finish (paint) the kit before you start. Before you paint you need to wash the plastic parts. The technique to paint the plastic parts with the raised areas takes a little practice so starting with one of the fins is a good idea. Use a medium sized paintbrush to apply black acrylic paint and while the paint is still wet gently wipe the raised areas with a dry paper towel. Then using a wet paper towel you can blend and remove any unwanted paint. When you are happy with the effect set the parts aside to dry. The legs, claws, and windows frames are then painted silver. Using plastic cement attach the 2 fins to the engine mount assembly at the slot provided. The fins have different configured slots so that is difficult to attach the wrong fin in the incorrect place.
The Exoskell body wraps are vinyl material so some patience and preparation is required to attach them to the body tubes. Next the adaptor rings and leg capture ring are attached. It important not to get the hook on the leg capture ring into the provided notch on the body tube until all the measurements and marking are made. Once the glue on the adaptor rings and leg capture ring is dry, the large body tube slides over the adaptor rings and against the leg capture ring. Lastly, the engine mount is attached. A notch is provided in the body tube to ensure that the motor is attached correctly and the launch lugs on the fin and on the leg capture ring are in line. The pod leg assemblies have coil springs already attached to help with construction. Once the pod leg is in position in the pod's base and the coil spring is under tension it can be held in place with supplied rubber bands. After all the leg assemblies are in place the alien and windows are slipped into place and the pod's top is attached with three Philip screws.
Construction Rating: 3
Recovery:
A C6-3 is recommended for flying the Exoskell. One the first attempt, the plastic fin with launch lug slid of the top of the blast shield adaptor and was caught. It burnt a nice round hole through the shield and the children present laughed like crazy when it ejected the pod and it flopped over and landed perfectly on the ground. Luckily, everyone was at a safe distance. On the second flight I used a clothes pin to keep the rocket from the blast shield. Lift off was slow and it flew nice and straight. Just after apogee the ejection charge pushed out the pod. Both the parts of the kit floated nicely to the ground.
Flight Rating: 3
Summary:
Overall, this is nice kit but somewhat ugly. In this case though ugly is not bad in a sci-fi sort of way. It was much easier to assembly than it appeared at first. If I were to paint another kit I would blend gray in with the black to get more of the H.R. Giger effect and I would not use body tube wraps but use an airbrush for some similar effect.
Overall Rating: 3
 |
 |
Flights
Sponsored Ads

 - 47776017535")

 | Intermediate Rocket Kit | Step-by-Step Instructions | Science Education Kits | Great for Teachers, Youth Group Leaders and Birthdays,Blue")

 Orange, 30 inches")
, Launch Pad/ Controller, Glue, Four AA Batteries, and Two Engines")


, 12.3 in. (31.1 cm)")


|
|