Scratch The Deplaquenator Original Design / Scratch Built
Scratch - The Deplaquenator {Scratch}
Contributed by Layne Pemberton
| Manufacturer: | Scratch |
Brief:
Sometime other than now in a galaxy somewhere else, all life forms with teeth
live under the constant threat of the Periodontalites, these free roaming bands
of malcontents bring the bane of Halitosis and Gingivitis to all they
encounter. Created during an accident involving a two dental technicians, a
cyclotron and a paperclip, the Deplaquenator is the galaxies only protection
against the ravages of the Periodontalites or more commonly called Flying
Plaque Monsters--not to be confused with the Flying Spaghetti Monster--that
roam the cosmos yellowing teeth where ever they go. Well, actually The
Deplaquenator is a backhanded downscale of FlisKits'
Decaffeinator**, but that doesn't quite carry the same drama as
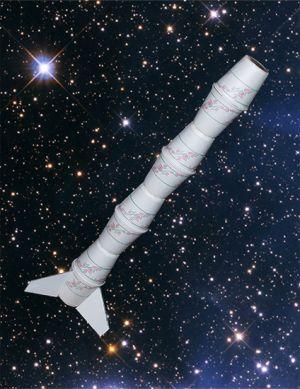
galactic conflict now does it? The Deplaquenator is a single stage odd-roc
rocket designed for 18mm BP motors, constructed from Dixie cups, and features
"Fall From the Sky" recovery.

** - All apologies to Jim Flis.
Construction:
The parts list:
- 1 BT-20 engine mount tube
- 8 Dixie© cups
- 3 cardboard fins
- 2 cardboard centering rings
- 1 sheet of card stock
- 1 engine block (Cut from expended engine.)
- 1 24" elastic shock cord
- 2 3/16" launch lugs
- 1 12" Estes chute
In my never ending quest to score highly in the 2005 EMMR Challenge, one of the categories that needed filling was an upscale/downscale of a commercial kit. As I am not one to take the easy route or do something ordinary, the wheels were set spinning for a suitable idea. One bleary morning at roughly 4:15am while brushing my teeth in preparation for work, I spied the Dixie© cup dispenser that hung beneath the bathroom mirror. Bing, bang, boom! Neurons fired and a plan formed in my twisted mind. Tiny cups could be used in place of big cups in FlisKits' Decaffeinator and voila! My downscale project had materialized.
With a 14.5" section of BT-20 tubing from the scrap pile, a couple of sheets of cardboard from the mailroom, and a hand full of Dixie© cups from the dispenser I set to work. In less than two hours my "De-plaque-nator" was complete.
After an all too brief glance at the Decaffeinator, the Dixie cups were stacked together to approximately match the length of BT-20 resulting in eight cups, end to end, with 0.5" of motor tube extending from the aft end of the cups. A hole for the BT-20 as well as a slot for the launch lugs were cut in the bottom of seven of the cups. Then 1/2" of an expended motor casing was cut off to form the engine block. Next, the three fins and two 1.375"-18mm centering rings were cut from scrap cardboard. Lastly, the shock cord was snagged from my parts box and a three fold shock cord mount was cut from scrap cardstock.
One centering ring goes in the bottom of what will be the aft cup and the BT-20 pushed through the ring and cup to protrude 1/2" from the base. I glued it in place with CA then I glued the launch lugs along the engine tube at 2.5" and 6.5" from the aft of the motor tube. I stacked the remainder of the cups with cut bottoms on the motor tube front-to-front and bottom-to-bottom making sure to align the slots for the launch lugs then slid the second centering ring over the fore end of the motor tube and seated it securely against the bottom of the uppermost cup. I CAed the centering ring in place, the cups together and the cups to the motor tube. The motor tube acted as an alignment guide. I finally set aside the assembly to dry.
For the nose cone, I used the remaining cup--the one with no hole in it--and rolled a 3" length of cardstock so that it fits loosely over the BT-20. It was glued to the inside base of the nose cone with urethane glue and then set upright to let cure. I formed the three fold shock cord mount, inserted the shock cord, and glued it inside the fore end of the motor tube.
With the nose cone completed, I tied the other end of the shock cord around the rolled cardstock inside it and tacked it in place. Then I drilled a hole in the top of the nose cone to allow passage of the launch rod. If all is done properly, the nose cone should slip over the forward end of the BT-20 and stay in place. The uppermost cup below the nose cone is used as parachute storage space. The last steps were gluing the thrust ring into place using an expended motor casing, and finally gluing the three fins equidistant around the aft most cup.
Finishing:
No finishing was needed nor desired as the Deplaquenator proudly carries the
"Roses and Vines" markings of the Dixie Corporation and honestly, the
fins just weren't worth the trouble to paint.
Flight:
We are currently (as the time of this writing) under a burn ban as a result of
a drought so I have so far been unable to fly the Deplaquenator. The local hay
farmers have in the past called down the wrath of the Lonoke County Volunteer
Fire Department upon my person to cease and desist all BP and AP related
activities for fear of a grass fire. It doesn't take but a couple of fire hoses
upside the head to convince one not to go against the LCVFD. I did toss her
into the sky once or twice but Nick informed me that doesn't count as flight so
she is still untried.
With a measured CG of 8.4" and a mass of 1.672oz, RockSim simulations indicate stable flights on B4 through C6 motors with an altitude up to 749 feet.
Recovery:
Summary:
PROs: The Deplaquenator can be constructed from common household items
(Dixie© cups), it is fun to make, and it should draw a number of stares at
the next launch. In short, it is cheap, easy, fun and draws attention. What
else could one ask for?
CONs: To quote a friend of mine, "She ain't too purdy" and I hope Jim Flis doesn't send me a mail bomb for maligning one of his kits.
Sponsored Ads

 - Ancient Prophecy - 1st Edition - Rare")


 | Intermediate Rocket Kit | Step-by-Step Instructions | Science Education Kits | Great for Teachers, Youth Group Leaders and Birthdays,Blue")

, Launch Pad/ Controller, Glue, Four AA Batteries, and Two Engines")


 |
 |