| Construction Rating: | starstarstarstarstar |
| Flight Rating: | starstarstarstarstar |
| Overall Rating: | starstarstarstarstar |
| Manufacturer: | Retro Rocketry  |
| Style: | Futuristic/Exotic |
Brief:
Like most BAR's I've done my share of cloning the classics, including upscales, but for some reason I've done very little in the area of downscaling. That said, the Mini Red Max from Retro Rocketry may be the kit that markedly changes my personal cloning habits. The Mini Red Max is a faithfully downscaled reproduction of one of the most recognizable rockets ever to fill the skies, Estes Der Red Max. Small size and big performance aside, this is a kit that you would do well to pick up if you're a fan of the original, because no matter how many requests Estes gets for it, I guarantee that they won't be making the Max a candidate for reissue. (Due to the same outbreak of political correctness that claimed any future the Frito Bandito and Thomas More Rebel may have had. R.I.P. boys.)
Construction:
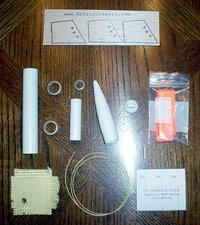 The kit comprises:-
- BT-5 engine mount tube
- Two BT-20 centering rings
- 13mm engine block
- BT-20 body tube
- PNC-20 two piece nose cone
- Launch lug
- 3/32" balsa fin stock
- Kevlar shock cord
- Kevlar heat shield
- Nylon streamer
- Adhesive tab
- Tango Papa decals
The Mini Red Max comes packaged in the hanging bag we've all come to love over the years. The color illustrated instructions are well written and easily followed.
There are no "gotchas" that I noticed. I was initially concerned by the lack of an elastic shock cord, but as it turns out, the Kevlar cord is easily up to the challenge. It's attachment point in the engine tube requires drilling a small hole in the forward end of the tube, but this is easily accomplished with a pin drill. (I have since found out that the hole was supposed to be pre-drilled and will be on the production run of kits.)
Like it's full sized brother, this is a quick 3FNC build, but in the end you're rewarded with a classic small field flier that will bring a smile to the face of old timers and small fries alike.
Finishing:
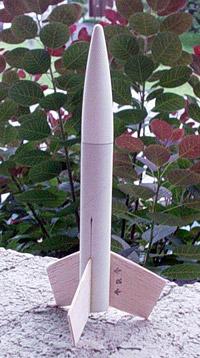
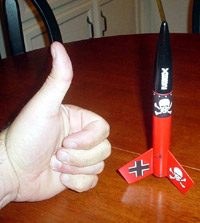 When finishing the Mini Max, I first sprayed the body tube with a coat of primer to toughen the tube somewhat for the sanding to follow. I followed this with the obligatory two coats of thinned Elmer's Fill N Finish, sanding in between coats. When I was satisfied that the tube spirals had been deleted I attached the fins. This was followed by two coats of Fill N Finish on the fins, two coats of primer and more sanding. (At least the Max's small size cuts down on some of the necessary sanding.) After priming I sprayed the body with ValSpar Apple Red and the nose cone with ValSpar Gloss Black. One coat was sufficient and the rocket was set aside for a couple of days to cure before the decals were applied.
I ran into some trouble with the decals because I insisted on spraying them with a coat of ValSpar Acrylic Clear. Big mistake. The decals crinkled right in front of my eyes. I've since found that the decals come with a clearcoat, making my ruinous step unnecessary. Crinkled or not, I decided to press on with the project anyway. The crinkling turned out to be noticeable only on very close inspection, and the finished Max is truly a great looking bird. Compact, but with the identical profile that it's big brother has.
Construction Rating: 5 out of 5
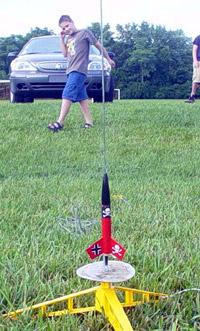
Flight:
For the first flight I chose the smallest recommended motor, a 1/2A3-4T, hoping not to lose it on the small field we were flying on for the first time. I needn't have worried. The flight was low enough that the ejection charge sounded like a firecracker, and I crossed my fingers hoping that no one at the adjoining baseball field would think we were up to no good and call the police. Again, no worries. The only spectators were a biker and two walkers, all of whom stopped to watch a flight, then moved on. The second flight was on an A10-3T and it was immediately obvious which engine would be the engine of choice in the future. There were four of us launching that day, but I was the only one who managed to keep the Max in sight on the second flight, and then only because I saw the tracking smoke. The flight was as high as I would have wanted a rocket to go on that field, and it was nice to know that I could stretch it's legs without worrying about losing it.
Recovery:
As I mentioned earlier, I was initially concerned by the Kevlar only shock cord, but even with the heavy duty Estes ejection charges the recovery system held up perfectly. Another area of concern was with the Kevlar heat shield. When I first tried putting it into the rocket, it began losing strands at an alarming rate. To combat this I coated the edges of the shield with a thin coating of wood glue. Bad move. The glue dried and made the whole shield difficult to place into the body tube, then the streamer only partially deployed on the first flight when the shield jammed in the tube. As it turns out, had I done more than skim the instructions, I'd have found this issue addressed. With the heat shield now as easy to fold as balsa, I removed it from the rocket for the second flight, replacing it with good ol' dog barf. The second flight was much higher and the rocket drifted completely across the parking lot into an adjoining soccer field, all systems having performed flawlessly.
Flight Rating: 5 out of 5
Summary:
This is a tough kit to beat, great classic looks and small field capability combined in a perfect package for beginners and reborn beginners alike.
Pro's:
- Hey, it's a Red Max.
- A great small field flier. Backyard capable with a 1/2A3-4T.
- Where else can you buy a Red Max of any size?
Con's:
- A know-it-all BAR who thinks READING the instructions is beneath him. (I'm not naming names.)
Overall Rating: 5 out of 5
Other Reviews
- Retro Rocketry Mini Red Max By John Rowan-Stern
Retro Rocketry's "Mini Der Red Max" is a downscaled version (1:2.33 scale) of the original popular Estes kit which use streamer recovery and a 13mm motor mount. My numbered kit (#27) was very well packaged and comes with a double sided color card sheet. On the reverse side of the card is a convenient NSL safety code chart and motor selection field chart. The model comes with one sheet ...
 |
 |
Flights
Sponsored Ads


|
|