Descon Zvezdotchka-ACM - Target
Scratch - Zvezdotchka-ACM - Target {Scratch}
Contributed by John McCoy
| Manufacturer: | Scratch |
Zvezdotchka-ACM - Target
(Micro-Maxx Carrot Missile)
by John McCoy
Construction:
Our club decided on a Group build of the same Odd-Roc for our March 12, sport launch. Being spring we sprang for Peter Always Zvezdotchka-ACM (Anti Carrot Missile) The Flying Rabbit. Being just a little off, I decided that if we were going to be flying ACM rabbits we should have a least one Carrot Target for them.
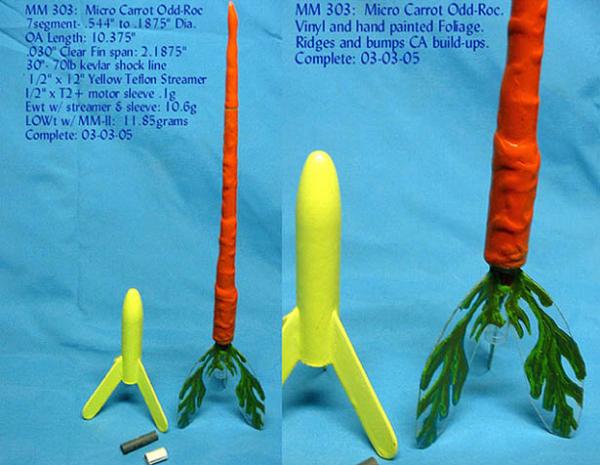
Choosing to stay with my Micro-Maxx power supply this model would start with a maximum base diameter of BT-5 .544" ending with a custom heat pulled and shaped 3/16" styrene tube tip. The model ended up with five segments of scrap tubes .544", .448", .375", and .316" asymmetrically spaced around a core .281" diameter motor tube 6 inches long. A nose section was fabricated of a section of .246" and a piece of heat pulled and shaped .1875" styrene tube complete the airframe. .281"dia. x .125" stop ring was added to the .246" nose section to form a .5" separation nosecone shoulder. See the accompanying drawing for exact part and overlap lengths. Wanting the motor mount tube to remain clear so that foliage detailing could be painted on and would appear to reach the blunt end of the carrot. A .321" OD, .281" ID clear polyethylene mailing tube section was CA’ed onto ¼" of the 6" .281" diameter main tube with a .5" x .246"dia. motor stop, shock cord mounted flush with the end of the .281 body tube. 30" of 70lb braided Kevlar line is CA attached to the nose section. Recovery is by ½" x 12" yellow Teflon permanent wadding streamer. Fins are .030" thick clear Lexan. Fins are joined to the clear motor tube and fillets of Weld-on #16 clear adhesive applied after the model body was painted.
 Finishing:
Body irregularities are formed with CA drip and run to simulate growth ridges and fill the gaps between segments with tissue/CA packing. Once the model body had been assembled the clear motor tube was mask off for priming and painting brown/Green than Orange. Little sanding was done on the body prior to painting. Fin attachment occurred last after all body paint had a chance to dry.
Foliage cutouts of green adhesive backed vinyl are attached to one side only on each fin, then light and dark shadow highlights were hand painted on both sides of each fin. After all paint had dried the model was swing tested and ready for launch.
Flight:
 Flight prep is very simple, stuff the talc
powdered Teflon streamer into the body, followed by the remaining Kevlar shock
line and install the nose cone.
Flight prep is very simple, stuff the talc
powdered Teflon streamer into the body, followed by the remaining Kevlar shock
line and install the nose cone.
MM-II .35 n/sec motor is the only motor recommended for this model. Carrot tips the scales at 10.6grams with a split .281" x .5" motor clamp tube and permanent recovery system. MM-II motor is also externally taped to the clear motor mount. A 1" long stir stick LL was added to the .544" base body diameter tube but the model is just as easily flown from a micro tower. LOWt: 11.85 grams.
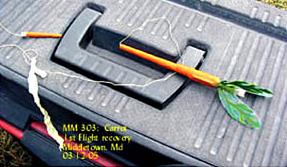
First flight 03-12-05: In my haste to fly this model, I forgot to tighten the .049" micro launch rod to the launcher base. At ignition the model rose with the 12" long rod to about 15 feet, arched over and ejected the streamer. Both rod and model were recovered undamaged.
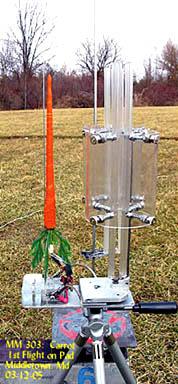
Second Flight 03-13-05: Much better! Gee, things fly a lot better when not dragging a launch rod with it. This MM-II flight sent the model straight up to +/- 65feet, ejected still on the way up and landed in very high brush on the edge of the field. The model was finally found about an hour later undamaged.
All in all a fun project which has already had quite a few folks asking for the plan below.


Sponsored Ads


![Vintage Estes Viper #0820 Model Rocket [4*G-17.25]](https://i.ebayimg.com/thumbs/images/g/Q7EAAOSwN1Nl1kDF/s-l225.jpg "Vintage Estes Viper #0820 Model Rocket [4*G-17.25]")


 |
 |