Neubauer Rockets Mercury Redstone (1/17.5th)
Neubauer Rockets - Mercury Redstone (1/17.5th) {Kit}
Contributed by Kurt Walchyshyn
| Construction Rating: | starstarstarstarstar_border |
| Flight Rating: | starstarstarstarstar_border |
| Overall Rating: | starstarstarstarstar_border |
| Diameter: | 3.90 inches |
| Length: | 58.50 inches |
| Manufacturer: | Neubauer Rockets  |
| Style: | Scale |
Brief:
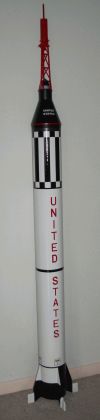
This 1/17.5 scale kit celebrates NASA's 1961 Mercury Redstone 3 manned mission
that placed Alan Shepard and his Freedom 7 capsule into space aboard a modified
Redstone booster (MR7).
While the kit is a single stage, single motor and single parachute model (just under 3.3 lbs or 52.8 oz) design using a molded polyurethane resin capsule with cardboard and plywood booster construction materials, it is recommended for the experienced modeler. It comes with enough basic detail to really "tune" the kit into an historical, flying scale replica if you are inclined to do the research and if you want to apply the skill and patience required to craft the kit (see John Purley's web page for reference). If you prefer to just get on with it, the instructions more than suffice to describe how to finish the kit in a "good enough to scale" fashion that really catches the eye as well as the imagination.
Construction:
The kit comes with a high quality cardboard main tube, laser-cut basswood
plywood fins, which come in eight halves that you epoxy and sandwich together
to make your 4 scale through the wall fins, dowels for the escape tower,
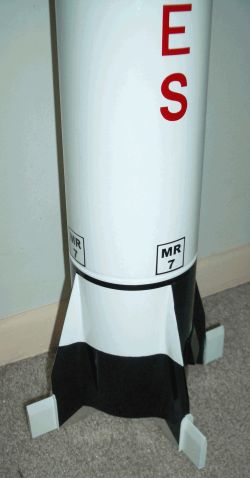
18" x 29mm MMT, 3 x 1/8" plywood centering rings, big vinyl decals
(roll patterns the 'MR7's on the booster and red lettering for 'United States',
launch lugs, a 50" nylon parachute, 6 page instruction manual, a flat and
beefy elastic shock cord, and steel aircraft cable to attach the shock cord to
the rocket.
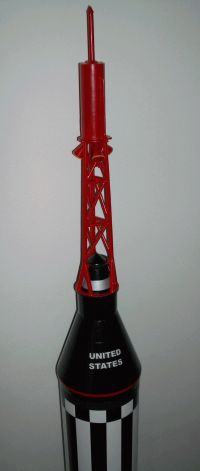 The
resin cast capsule measures approximately 7 inches in height (17" with
escape tower) and features surface details that include a round periscope
window, trapezoid window, hatch, vertical panels, and umbilical panel. A piece
of aramid string is used to attach the capsule to the shock cord. The aramid
string is passed through a hole in the side of the capsule. The end that is
passed through is then attached to an screw eye imbedded into the inside nose
of the capsule. This setup lets the capsule come down on its side, protecting
the escape tower somewhat if you choose to fly it with the escape tower on. The
escape tower may be removed for flight.
The
resin cast capsule measures approximately 7 inches in height (17" with
escape tower) and features surface details that include a round periscope
window, trapezoid window, hatch, vertical panels, and umbilical panel. A piece
of aramid string is used to attach the capsule to the shock cord. The aramid
string is passed through a hole in the side of the capsule. The end that is
passed through is then attached to an screw eye imbedded into the inside nose
of the capsule. This setup lets the capsule come down on its side, protecting
the escape tower somewhat if you choose to fly it with the escape tower on. The
escape tower may be removed for flight.
The instructions have plenty of diagrams and are easy to follow and clear. There is only one small mistake in the build logic, which you will pick up on if you read the instructions first before building. The instructions come with good templates to build the escape tower and to line up the fins with.
While the number of parts is small and the rocket big, don't let this fool you into thinking you'll be able to snap it together quickly with some 5-minute epoxy! Forget it as I found it pays to be a bit patient with this build as there are some components that require a bit of craft to get right.
First, getting the right angle on the leading edge of these compound designed fins is a bit challenging. I don't recommend using a rasp as it will damage the wood, rather 150 grit sandpaper wrapped around a long, square dowel works great. But be careful not to grind the square rudders while you are trying to angle the fin edge. If you don't plan on building the rocket in the near term, I also suggest you at least epoxy and sandwich the fins together so they don't warp in the box.
Second, since you want the paint to stick to the capsule, wipe it with odorless varsol, wash it with soapy water, and then scrub it with an abrasive cloth. Then wash it again. When done cleaning this piece, I recommend spraying it first with a paint designed to bond to plastic such as Krylon Fusion. Once this is dry, you can prime and final coat it. Since the kit has no decals for the capsule (United States and Freedom 7), you might want to make some. I used my PC and printer to fashion some up. After putting the final coat of gloss black to the capsule, I applied them with white glue. Once applied to the capsule, I then painted the scheme according to the instructions and finally satin clear-coated the whole thing.
Third, I used an Aerotech 29mm steel motor clip (looks like a giant Estes-style motor clip) for motor retention. They are cheap and practical and build just like the little ones from Estes. If you want, you can use a Aerocon 29mm motor retainer too. Neubauer recommends using a gear-clamp and masking tape retention system, which I am sure works, but if you are going to spend US$150.00 plus shipping on the kit anyway, what's another US$10.00 for a couple of Aerotech motor retention clips? Better yet, why not include them with the kit? Ditto for rail guides.
Fourth, you need to make up your mind early if you want to fly the rocket with the escape tower on or off. If on, you can certainly swap out the wooden dowels for graphite rods and piano wire cross tubes or something similar. Otherwise, make sure you attach the escape tower securely yet loosely enough to allow it to pop off if it needs to. Use a piece of good string to anchor it to the capsule in case it does pop off. If you decide to build the escape tower using CA instead of epoxy, you will make it brittle and it will come apart if enough energy is pushed into it. Brass pieces fitted and soldered could be a good way to go too but watch the weight if you are sticking to a 29mm motor.
Fifth, inside the rocket right where the steel cable recovery harness piece goes around the cardboard MMT is where you need to place a cardboard (or even light fiberglass) sleeve. Even thought the recovery harness uses elastic cord, having a little bit of extra wall thickness and durability here will help make the rocket recovery system more robust. This is important especially if you spend additional time scaling and detailing the model because its nearly impossible to do it after the model is built.
The rocket you will have at the end of your build will be heavy and overstable. Rest assured, the flight will be loud and relatively slow! I came really close to modifying this kit by putting a 38mm MMT in it. That would be a good alternative if you want to not have to worry too much about thrust-to-weight ratios and velocity off the pad. As it stands, the thrust to weight with the AT G80-4T SU motor is 5:1 and plenty good enough for a stable flight.
I liked building this kit! The parts fit together well and are excellent quality materials. There is enough detail to provide a solid foundation on which to scale the kit even more if you choose. If you like historic scale replicas, this is a great kit to buy, build, and fly. It will obviously accept being modified as well for things like a 38mm motor, dual deployment, and dual parachutes--one each for the capsule and booster.
Finishing:
I found the decals to be very easy to apply. While the complex roll pattern
near the capsule is a big decal it will come out nicely if you take a moment to
line it up at first and apply it carefully. I didn't use the decals for the
fins and lower booster, preferring instead to mask and spray paint them. I used
aluminum (metal) foil duct joint tape (not the standard duct tape!) to cover
the bottom of the fins and motor area. Looks good, wipes clean, and won't
blister, burn, or melt from heat like paint or mylar.
Construction Rating: 4 out of 5
Flight:
This rocket is fun to fly! It does not come of the pad in the blink of
an eye leaving you searching the sky for chute deployment. Rather, it comes off
rather majestically but at a fair clip for all to admire. I figure a flight
apogee at 180m/375' on the G80-4T. Half of the flight up seems like a coast. I
used a Nomex®
blanket to protect the parachute. You'll want to make sure the capsule fits
very well into the booster with no gaps. If not, you'll get gases escaping
before the capsule can come off fully and then, well, you've got a 52oz lawn
dart to cry over. I use a rail to launch my rocket. This rocket flew straight,
went over a little bit (maybe up to 5 degrees) and then ejected the capsule
just after apogee when it came over half way onto its nose. My escape tower
came a bit loose but stayed with the capsule, anchored as it was with a piece
of black heavy-gauge polyester thread. Everything remained intact. While it
doesn't fly very high, it is big and the fact that it travels so (relatively)
slowly and that the G80 is pretty loud and crackly makes it an exciting model
to fly.
Recovery:
The elastic shock cord can be extended a bit with nylon strapping, but I would
suggest tethering the capsule if you are doing single chute deployment to the
parachute and not the elastic--there's too many pieces bouncing around and too
much chance they'll come together.
Flight Rating: 5 out of 5
Summary:
PROs for this rocket are:
- Excellent materials, excellent fit, excellent decals, excellent fin scale and geometry, good instructions.
CONs for this rocket kit are:
- MMT is a bit light given that the steel cable passes around it. Instructions call for reinforcement of the appropriate area, but I suggest another sleeve of cardboard at this area as well as the recommended epoxy coating.
- No motor retention clip.
- No rail guides.
- No capsule decals!
- No stainless steel barrel swivel.
Overall Rating: 4 out of 5
 |
 |
Flights
|
|