 Brief:
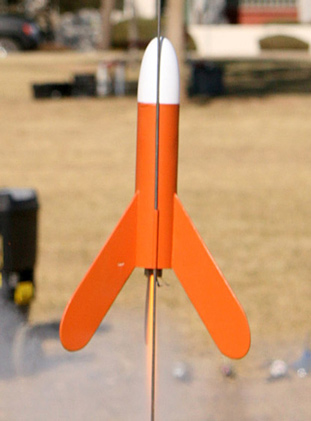
I built this great little performer during 2007 and I’ve flown it a number of times since then. I like the Mosquito design and I have an original I built in 1992. As “cheap” as they are to clone, I don’t want to lose my original so I built a bigger version that is much easier to track in flight and find once back on the ground. Since the original is BT-5, my BT-60 version is about 302 percent larger than the Estes Mosquito.
Construction:
Upscale projects don’t get much easier than this one:
- Baby Bertha Nose Cone Estes PNC-60L
- BT-60 6 inches long
- (2) AR2060 motor mount centering rings
- BT20J (2.75” long) motor mount tube
- CR520 motor block
- 2.75 inch long metal motor hook
- 2 inch long 1/8 inch diameter launch lug
- Recovery gear of your choice
The Estes Mosquito instructions are available online at JimZ’s among other sites. Print out the fin pattern and upscale it 302% with a copier machine and make three fins. I used 3/32” basswood for durability and ease of finishing. Mark the body tube for three fins and glue them on. I suggest using a piece of Kevlar as a shock cord anchor. A common method is to loop it around the motor tube and route it through a small hole in the forward centering ring. Use the glue of your choice to get a strong bond. Assemble the motor mount and glue in place with the rear of the motor tube even with the rear of the body tube. I glued my launch lug against one of the fins rather than centered between two fins.
Some nose weight should be added for stability. I don’t know how much I added but I can figure it out by weighing the cone and then weighing a stock cone. Attach the shock cord to the nose cone and the other end to the Kevlar. I use 12-inch plastic chute for recovery. It always brings the Mosquito back for another flight.
PROs: Easy to assemble from readily available components.
CONs: None that I can think of!
Finishing:
Prepare and paint the Mosquito as you choose. I left the plastic nose cone white and painted my Mosquito orange. I think it turned out fairly dark because I used grey primer and didn’t sand much of it away.
I don’t have any decals on my Mosquito. I suppose you could upscale the old Estes Mini-Brute Mosquito decal to liven the bird up a bit.
PROs: Simple paint scheme but easily customized to your liking.
CONs: None that I can think of!
 Flight:
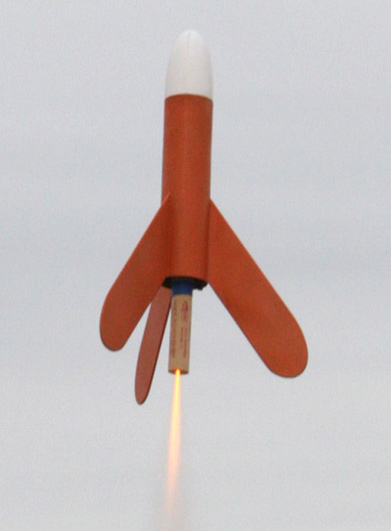
Just about any 18mm black powder motor will work in the Mosquito and I've had success on the typical basic motors: A8-3, B6-4, C6-5. I’ve even CHAD staged mine four times with excellent results. I guess the large fin area rear of the body tube helps maintain stability along with the nose weight I added. My fins are on rather straight but my Mosquito always seems to do several barrel rolls on the way up. It’s pretty cool to watch.
Since there’s not much room in the body tube ahead of the motor mount, carefully pack your chute and shock cord. I use an inch or so of dog barf recovery wadding to protect the recovery gear. Load up a motor, place it on the pad and watch the Mosquito rip. It’s a great performer and I highly recommend you build one if you haven’t already.
Summary:
PROs: Ease of construction; classic design, albeit bigger, cool sport flyer.
CONs: None that I can think of!
Other:
Since the ejection charge is confined to a relatively small volume, ensure your setup can withstand the intense heat. I've flown mine at least a dozen times and it's about time to replace the orignal recovery attachment point with some sturdier Kevlar.
Sponsored Ads


 |
 |