| Construction Rating: | starstarstarstarstar_border |
| Flight Rating: | starstarstar_borderstar_borderstar_border |
| Overall Rating: | starstarstarstar_borderstar_border |
| Manufacturer: | Caveman Rocketry  |
Brief:
I was bitten by the microhybrid bug about a year ago. At first, it looked as
though I would have to buy a small metal lathe and machine my own motor from Rene Caldera's plans (link-out dead). Fortunately I
found Caveman Rocketry's web site. They
are a mail order rocket supplier in the Netherlands that sell an improved
version of Rene Caldera's basic design. Caveman Rocketry also sells individual
spare parts, fuel grains, and nitrous chargers/cylinders.
Construction:
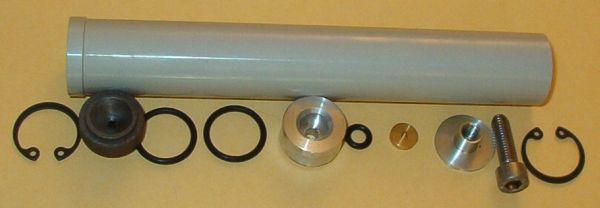
The motor includes:
- Aluminum motor tube
- Graphite nozzle
- Aluminum injector body
- Brass piercer/injector
- 2 Large O-rings
- Small O-ring
- 2 Snap rings
- Tee nut
- Initiating screw
- Allen wrench
- Fuel grain
- Burst disk
I ordered the microhybrid from the Caveman Rocketry web site and paid using PayPal. The motor arrived about 8 weeks later by international parcel post. All the parts of the motor were present. All the parts were precision machined and fit together very smoothly. In addition to the motor hardware there were 5 paper fuel grains, 10 burst disks and plans for the Rene Caldera version of the microhybrid motor.
Caveman Rocketry has improved on the Rene Caldera's basic design in several ways. The most obvious improvement is the 24mm motor tube. Rene's original design used a 7/8" aluminum tube which requires an adapter to properly fit a BT-50 body tube. Caveman's aluminum motor tube has a machined thrust ring at the nozzle end instead of a groove and snap ring. Finally, the Caveman microhybrid does not use an APCP preheater grain (unlike the Caldera motor), although perhaps it should. (More on this later.)
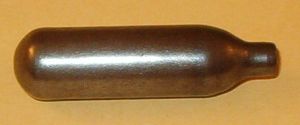 The microhybrid motor operates much like its bigger brothers
except that the source of the nitrous oxide gas is an internal steel cylinder
instead of a large external tank. This eliminates the need for heavy and
expensive Ground Support Equipment (GSE). The nitrous cylinders used in the
microhybrid are similar in appearance to the CO2 cartridges used in pellet
guns, and like these CO2 cartridges, they are non-refillable and thrown away
(recycled) after each use. Nitrous cylinders are normally used in whipped cream
dispensers and are sometimes called whippits. They cost $11.99 for a box of 24
from on-line sources such as EasyWhip.
They contain 8 grams of nitrous oxide (N2O) under 900 psi of pressure.
The microhybrid motor operates much like its bigger brothers
except that the source of the nitrous oxide gas is an internal steel cylinder
instead of a large external tank. This eliminates the need for heavy and
expensive Ground Support Equipment (GSE). The nitrous cylinders used in the
microhybrid are similar in appearance to the CO2 cartridges used in pellet
guns, and like these CO2 cartridges, they are non-refillable and thrown away
(recycled) after each use. Nitrous cylinders are normally used in whipped cream
dispensers and are sometimes called whippits. They cost $11.99 for a box of 24
from on-line sources such as EasyWhip.
They contain 8 grams of nitrous oxide (N2O) under 900 psi of pressure.
The fuel grains can be made from a variety of common materials such as rolled paper, nylon, or PVC. The burst disks are round disks punched from a 2-liter plastic soda bottle.
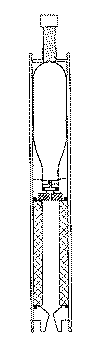 Preparing a microhybrid motor for flight is more like putting
together a reloadable APCP motor than prepping a normal-sized hybrid. You start
by inserting the fuel grain into the thrust ring end of the motor tube. A large
O-ring goes at the end of the fuel grain and then the graphite nozzle. An
internal snap ring keeps everything from sliding out the bottom. The motor is
turned nozzle end down and another large O-ring is put on top of the fuel
grain.
Preparing a microhybrid motor for flight is more like putting
together a reloadable APCP motor than prepping a normal-sized hybrid. You start
by inserting the fuel grain into the thrust ring end of the motor tube. A large
O-ring goes at the end of the fuel grain and then the graphite nozzle. An
internal snap ring keeps everything from sliding out the bottom. The motor is
turned nozzle end down and another large O-ring is put on top of the fuel
grain.
An long burning igniter, such as a Quickburst Twiggy, is pushed into the hole in the bottom of the injector body. It is important to use an igniter with thin wire leads (24 gauge or less) because the nozzle throat is only 0.1". Thick igniter wires will clog the nozzle at ignition and cause a CATO. The igniter wires are threaded down through the center of the fuel grain, the throat of the nozzle and out the bottom of the motor.
The burst disk, a small O-ring, and the piercer are inserted into a hole in the top of the injector body and the entire assembly is carefully slid into place in the motor tube resting against the large O-ring on top of the fuel grain.
Nitrous cylinders are slightly smaller that the inside diameter of the motor tube so it is necessary to wrap them with a couple of turns of masking tape. Just enough tape should be use to allow the cylinder to slide easily into the motor tube without rattling. A 2" section of BT-20 slit lengthwise or a single layer of cardstock can also be used in place of the masking tape. The seal of the cylinder should rest against the tip of the piercer.
The tee-nut goes on top of the nitrous cylinder and everything is held in place with the second snap ring. The final part to be installed is the initiating screw which is threaded into the tee-nut until the tip just contacts the nitrous cylinder.
Once the rocket and motor are ready to launch the nitrous cylinder is pierced by turning the initiating screw with an Allen wrench in quick bursts until the seal pops or until it won't turn anymore. A small, quick burst of gas escaping may be heard or felt. The hissing should stop immediately when the screw is tightened a little further. At this point the cylinder's seal has been pierced and the nitrous, at 900 psi, is pressing against the soda-bottle plastic burst disk. It is best to install the motor in the rocket and launch it as quickly as possible in case there is a slow nitrous leak.
Construction Rating: 4 out of 5
Flight:
At ignition there will be an initial puff of smoke coming out of the nozzle.
This is from the igniter. It make take a few seconds for the burst disk to burn
through and when it does, the motor will come to life with plenty of smoke,
flame, and noise.
After firing, the motor tube and nozzle is very hot. Care must be taken when handling it. After it has cooled, the motor should be taken apart in the exact opposite order it was put together. The piercer is small and easily lost. The nitrous cylinder, igniter, and burst disk are the only parts that are used up each time. The fuel grain can normally be used at least twice. The O-rings can be used several times and if properly handled, the graphite nozzle can be used many times. There will also be a light residue of combustion products on the inside of the motor tube, nozzle, and the injector body. This residue is easily removed using the same stuff used to clean other reloadable motors. Personally I prefer Goo-Gone, a citrus based cleaner. It smells nice and doesn't irritate my skin.
If you do everything exactly right the motor will fire perfectly. The most common failure occurs when the igniter doesn't burn through the burst disk to release the nitrous and light the grain. When that happen you have to disassemble the motor with gas pressure present. The best way to prevent a misfire is to make sure the igniter is making direct contact with the burst disk.
To safely relieve the gas pressure after a misfire, slowly back the initiating screw out of the motor until you hear a loud hiss. The escaping gas will be very cold so wear gloves and use eye protection. Once the gas is released, it is safe to disassemble the motor. Reload with another, igniter, burst disk and nitrous cylinder and try again.
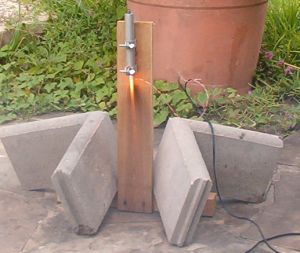 I test fired this motor many times using a homemade test stand
made out of wood and conduit clamps. I had about a 50% success rate igniting
the motor. I did fly it twice in one of my 6" Delta flying saucers with
24mm motor mount. In all my tests it behaved like a D or E impulse motor. None
of my static burns were instrumented so I can't be sure about the total impulse
but it seemed like a D or E and in the test flights flew like a D12.
I test fired this motor many times using a homemade test stand
made out of wood and conduit clamps. I had about a 50% success rate igniting
the motor. I did fly it twice in one of my 6" Delta flying saucers with
24mm motor mount. In all my tests it behaved like a D or E impulse motor. None
of my static burns were instrumented so I can't be sure about the total impulse
but it seemed like a D or E and in the test flights flew like a D12.
This is a nice motor for the person who has a lot of patience and would like to experiment with alternative rocket propulsion without using dangerous and potentially explosive chemicals. It is easy to test many different fuel grain materials cheaply.
This motor is currently not certified by the National Association of Rocketry or Tripoli Rocketry Association. It may however be flown at TRA EX launches if the flyer meets all the Tripoli EX requirements and makes his own fuel grains. There are no Government restrictions if you want to use this motor on your own.
Due to the very high pressure of the nitrous, working with these motors can be dangerous. Fortunately there is only a small amount of gas in each cylinder and the cylinders are very strong. Reasonable care should be taken and eye protection should always be used when handling loaded motors.
This motor is perfect for a glider or flying saucer-type rocket. If it is used in a rocket with a parachute or streamer recovery, then an altimeter, timer, or magnetic apogee detector must be used to deploy the recovery system.
There is an excellent microhybrid Yahoo discussion group open to anyone with an interest in this type of propulsion.
Flight Rating: 2 out of 5
Summary:
PROs:
- Low per flight cost (under $2 each)
- No Government license required
CONs:
- High initial cost
- Complicated assembly
- High ignition failure rate
- Relatively heavy compared to other motors with the same impulse
- Requires separate means of recovery system deployment
Overall Rating: 3 out of 5
 |
 |