Reviews copied, with permission from Sky High Hobbies - Your Vintage Rocket Source.
 Brief:
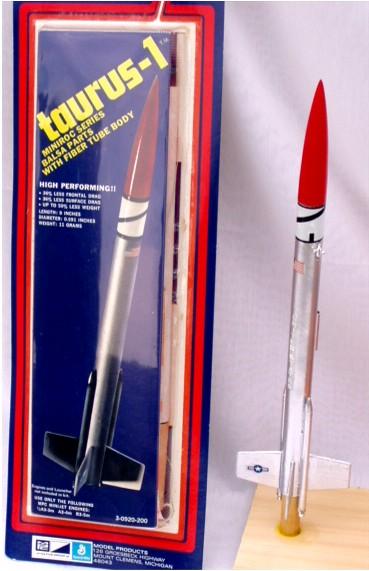
The Taurus-1 model rocket kit is one of the MPC Miniroc series of rockets. It uses the smaller 13mm Minijet type rocket engines. It was designed as both a sport rocket and a high performance competition rocket. Which type it classifies as is dependant on whether you build it with or without the side booster rockets that are included with the kit. Its appearance resembles the much larger NASA Mercury Redstone rockets but it is not a true scale replica.
When this kit was in production John M. Kennedy used a booster- less version of this rocket to set an all time altitude record for model rockets while flying on an A3-4m Minijet type engine. He flew his Taurus-1 to over 660feet.
The kit contains:
One of the nicest features of this kit are 2 plastic sprues of customizing detail parts. The booster rocket nose cones and the engine's nozzles are on these sprues as well as several other cool little parts that can be used to really customize your Taurus. Parts such as side thruster nozzles, engine shrouds, antennas, tracking flares and others, allow you to make your Taurus as wild or mild as you want. For even more detailing options the Taurus comes in a cardboard backed plastic blister pack. Incorporated in the plastic blister itself are many vacuum formed customizing detail parts. These can be carefully cut from the blister, trimmed and then glued to the rocket to simulate things such as cable shrouds, vents, scoops, pilot canopies and the like. Be sure that if you use these parts you only use Enamel paints for finishing your rocket.
The decals for this rocket are the water slide variety. Included are black and white .roll pattern" decals. Like the real rockets flown by NASA, these permit photographic analysis of the rolling or spinning of the rocket.
Construction:
The Taurus is a simple kit to build with balsa fins and nose cone, and a fiber body tube. There are 4 small balsa fins and 2 small booster rockets. The booster rockets must be assembled from the 2 included T-5 fiber tubes and from plastic nose cones and engine nozzles that are included. The instructions are easy to follow and well detailed.
I started by building the engine mount which is a simple 2 piece affair consisting of an engine tube and an engine block. Once the engine blocks glue has set, the engine tube with the block is inserted flush with the end of the booster tube. While the glue for the engine block is setting the lines for the 4 fins are measured and drawn. I used marking guides but a paper guide can be cut out from the instruction sheet and wrapped around the rocket's booster tube. It's important to always get the fins identically sized. Do this by carefully cutting them from the balsa stock and then pinning them together. This way they can be sanded without worrying about them slipping out of place as you're sanding. Once they are all sanded to equal size, unpin them, sand the flat sides smooth, and then sand sharp compound angles into the leading and trailing edges. The mounting edge of the fins are one by one given a light coat of glue and then mounted to the booster tube. Once they are all aligned correctly and the glue is set, start a series of 3 coats of glue fillets. These are applied by running your finger down each fin/tube joint while it's filled with glue.
To mount the small side booster rockets, for each T-5 tube I used plastic cement to glue the nose cones and engine nozzles on the thin tubes. Mark each one so that exactly 1 inch of the rear of each side booster rocket protrudes from the Main Tube, then add thruster nozzles to the main tube. These are included along with other plastic detail parts that can be added optionally. The shock cord of this kit is just plain string. It is mounted to the inside of the main tube with a piece of cardboard stock that has 3 holes in it. The string is threaded into this card stock and then glued into the tube far enough in that it will not interfere with the nose cone. It's actually a stronger connection type than the typical Estes and Custom method of folding the shock cord into a tri folded piece of regular paper.
The nose cone is as mentioned, balsa. A small eye screw is included like any other balsa nose cone kit. This is screwed into the center of the bottom of the nose cone and then removed. A drop of glue is put into the hole and then the screw is screwed back into the nose cone tight. The Taurus-1 uses a 10inch 6 sided parachute for its recovery. This is a bonus in my view, as most rockets of this size only use a streamer for recovery. I recommend using a small dab of glue in the chute gripper tabs to make sure that this 30+ year old parachute doesn't separate from its shroud lines during descent. Each shroud line is inserted into a hole in a small rectangle of single sided tape. The shroud line is then folded over on the sticky side and then the not so sticky side of the tape is folded over the edge of the parachute corners. Instead of tying the parachute directly to the nose cone screw I tied it to a latching swivel hook so that it can be mounted and removed after flights. Since it is such a high flyer a metallic silver or other very bright color is recommended for the finished rocket so that it can be more easily seen.
Summary:
Like all MPC rockets this one is a blast to build and fly. Its ease of assembly makes this a great first build, starter rocket, which can also be used for competition.
Other Reviews
- MPC Taurus 1 By John Lee (September 20, 2008)
Brief: This is a 4FNC OOP rocket that flies on 13mm motors and uses parachute recovery. While waiting for various things to happen on other current projects, I decided to start one that would be quick. I have several old MPC kits that would seem to be fast, straightforward builds and the Taurus-1 was sitting on top. It seemed to be just the ticket. Construction: The first ...
 |
 |
Flights
Sponsored Ads


|
|