Banshee and StingRay to Sting-Shee Modification
Modification - Sting-Shee
Contributed by Mark Fisher
| Manufacturer: | Modification |
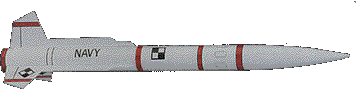
The Sting-Shee is a combination of two of Estes more popular E2X kits into a high flying, payload-carrying two stage rocket. It's appearance is reminiscent of many ship-to-air missiles like the Talon. It's not the cheapest two stager you can buy, but it sure does look cool. (I've left the decals off mine, but it would probably look neat with them applied, too.) It's a simple bash, requiring no special skills or additional parts, so it's perfect for young flyers.
To make the Sting-Shee, follow the Estes instructions for both rockets, EXCEPT WHERE MODIFIED HERE.
NOTE: Drawings are not to scale. Follow the dimensions given in the instructions. Do not scale drawings.
Mk-109 StingRay -EST2105 (82108, 3-97)
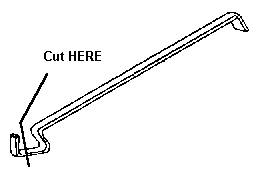
1B. ADD: Using a pair of metal shears, trim the last bend off the engine retaining clip. (see diagram at right)
 6B. Push the loop though eye of the TUBE COUPLER.
6E. Tie shock cord from the Banshee to the installed shock cord with a double knot. Tie the other end to the TUBE COUPLER with a double knot.
7. IGNORE.
8. IF DESIRED.
9. IGNORE.

Banshee - EST2132 (82110, 5-96)
0. Cut the Banshee body tube in half, 3" from the fin end. The fin end will become the booster stage, and the remaining body tube will become the payload section.
 1A. IGNORE.
1C. IGNORE.
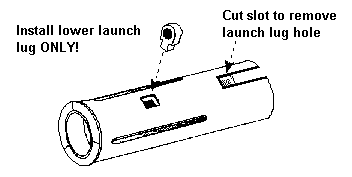
2B. Attach the LOWER LAUNCH LUG ONLY.
3. REPLACE WITH: Cut a slot 3/8" long and 3/16" wide from the top edge of the booster stage to remove the upper launch lug attachment hole. (see diagram at right) This slot will accommodate the upper stage engine retaining clip. Sand the inside upper portion of the engine mount to size. Use a spent engine (NOT a yellow spacer tube) to test for fit. The engine should slide completely though the booster stage with slight pressure.
4C. IGNORE.
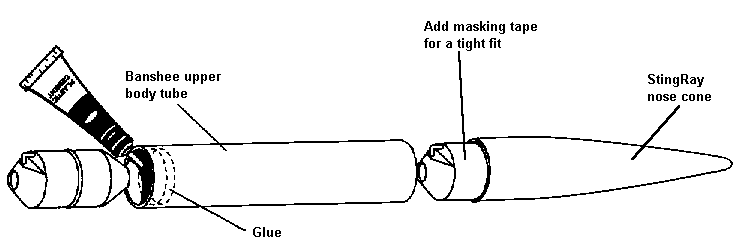
5. REPLACE WITH: Glue the payload section to the StingRay's tube coupler. Make sure the unused shock cord mount is at the far (i.e., nose cone) end. Place the StingRay's nose cone on the other end of the payload section. If fit is loose, add a layer of masking tape to the nose cone shoulder to get a good, tight fit. (see diagram below)
6. IGNORE.
 8. IF DESIRED.
9. REPLACE WITH: Tape the booster and upper stage engines together with CELLOPHANE TAPE. Do NOT use masking tape. Be sure the NOZZLE end of the upper stage engine is joined with the OPEN end of the booster engine. Slide the engine assembly into the StingRay's engine mount. The engine clip will NOT engage; this is normal. Slide the booster stage over the booster engine, mating the StingRay's engine retaining clip with the slot in the booster. Check alignment and fit. If fit is loose, remove the booster stage and add some masking tape to the booster engine until a good, tight fit is achieved. If alignment is incorrect, add the masking tape to only one side of the booster engine to correct. Once the booster is properly installed, insert the appropriate igniter in the booster engine.
Recommended engines:
Booster: B6-0 (first flight), C6-0
Upper stage: A8-5 (first flight), B4-6, B6-6, C6-7
OPTIONAL: Build the second 'chute and attach it to the Banshee's nose cone. You can replace the payload section and it's 'chute with this assembly, and still fly the StingRay as a single stage rocket. Paint the nose cone white to match. (The Banshee's nose cone is heavier than the Stinray's, adding some much-needed stability.)
What to Expect
During staging, the StingRay's motor clip will engage, kicking the booster out of the upper stage engine's plume, and putting one heck of a spin on it. This slows it dramatically, and it will come back quickly. Your booster stage tracker will have plenty of time to recover it and still enjoy the upper stage flight. On a C6-0/C6-7 combination with no payload, I estimate the Sting-Shee will reach an altitude of about 1,250 feet, hence the single, twelve inch 'chute. The added shock cord should prevent any "Estes dents."
Related Products
Sponsored Ads

 - Ancient Prophecy - 1st Edition - Rare")


 | Intermediate Rocket Kit | Step-by-Step Instructions | Science Education Kits | Great for Teachers, Youth Group Leaders and Birthdays,Blue")

, Launch Pad/ Controller, Glue, Four AA Batteries, and Two Engines")


 |
 |