| Construction Rating: | starstarstarstar_borderstar_border |
| Flight Rating: | starstarstarstar_borderstar_border |
| Overall Rating: | starstarstarstar_borderstar_border |
| Manufacturer: | Clone |
| Style: | Multi-Stage |
 Brief:
I've long admired the looks of the "Astron Avenger," (KA-38) a long out-of-production two-staged kit introduced by Estes in the late 60s. When the plans for the kit were posted on "JimZ's" wonderful site, I decided to have a go at re-creating it.
I actually began this project in 1998! It languished, unfinished, until the summer of 2000, when I completed the arduous task of sanding, filling, painting and detailing.
Construction:
Most of the Avenger's parts (body tubes, engine mounts, recovery system) are standard Estes material. Because Estes itself makes it rather difficult to obtain individual parts, I chose to order the parts for the kit from Rogue Aerospace. I highly recommend this outfit, whose on-line catalog and order system are great.
The Avenger's balsa nose cone (the BNC-50Y) was available from Rogue, but the other balsa part I needed -- the TA-5055 balsa adapter -- wasn't. I decided to get both parts (and a bunch of other cones for a Trident and Orbital Transport I'm still working on) from BMS. The adapter was a "semi-custom" part; I obtained the measurements from the 1970 Estes catalog. I decided almost from the beginning to use basswood for my Avenger's fins. Although a bit heavier than balsa, basswood is very tough and extremely easy to finish. I bought my basswood from a "Michael's" craft store.
The Avenger's plans are easy to follow and logically laid out. The Avenger is fairly easy to build for someone who has had experience putting together custom kits. It does require some "lost skills," such as cutting fins from un-die-cut wood sheets, so I don't recommend this project for beginners.
I ordered full length body tubes and cut them to the required lengths (see here for a great chart of standard Estes tube lengths). I use the method shown in the yellow technical section of the 1970 Estes catalog. This requires a balsa block or coupler for each tube length.
Two phases of construction require extra care: assembly (and insertion) of the engine mounts and alignment of the fins. The Avenger uses the "cellophane tape" staging method. The placement of centering rings and engine blocks, and insertion of the mounts into the body tube, must be made exactly as shown in the plans. You should certainly test fit the (thoroughly dry!) engine mounts into the tube before gluing. Try inserting a pair of taped-together motors in the inserted-but-unglued mounts to make sure everything "clicks."
The Avenger's upper and lower fin sets are designed to mesh with each other, creating the appearance of one large fin. It is very difficult to get an exact match unless you are very careful about gluing on the fins. (My model's fins line up . . . but only in one orientation!)
I'll give the Avenger a 3 out of 5 for ease of construction.
Finishing:
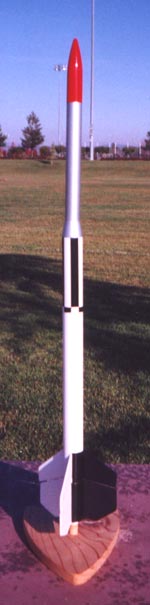
I decided to give my Avenger a "catalog perfect" finish, with a paint scheme based on the photos shown in the 1971 Estes catalog. The model is white overall, with one black fin and panel on each stage, a silver payload section and red nose cone. The main body of the upper stage features a custom roll bar.
I filled and sanded both the fins and wood parts many times, and filled in the body tube spiral seams with thickened Balsa Fillercoat. This was followed up with several coats of white primer, and the white base coat.
Painting the black fins and panels required a lot of painstaking masking work. I didn't examine the catalog picture carefully enough before masking and ended up with a upper-stage black panel that was shorter than it should have been. An embarrassing but far from fatal mistake!
After the black, silver, and red coats were applied, I coated the entire model with two coats of "Future" floor wax, giving each coat lots of time (and summer heat) to dry.
The trickiest part of the finish was creating the roll bar. It consists of three long and three very short black bands. I used a ruler and calculator to determine, from the various catalog pictures available, the length of the roll bar. I drew the pattern on the back of a piece of gloss black trim Monokote and carefully cut out the pieces. Using a mechanical pencil, I carefully drew alignment marks on the body tube, taking care to draw the lightest line possible. After "wetting" the tube with slightly soapy water, I carefully placed the bars in place . . . one at a time, making sure each was aligned before going on to the next. The slick surface of the "Future" wax, and the lubricating water, made it easy to correct errors before rubbing a bar.
I finished everything off with a few more coats of "Future!" After everything was dried, the model looked wonderful. Except for the shortened panel, the model could have fallen out of a catalog page.
In my case, I'll rate the experience of finishing a 3 out of 5. It was a lot of work, but the result was worth it.
Construction Rating: 3 out of 5
Flight:
I flew my Avenger at the August LUNAR launch in Livermore, CA. For my first flight I used one of my precious Estes B6-0 motors and Quest A6-4. The delay of the latter tends to run "long," making it a good replacement for the old A8-5.
The Avenger's motor mount design makes it easy to mount and tape the motors. Although I've built and flown lots of staged models, I brought the instructions with me and followed the checklist. I didn't want to take any chances!
Because I WANTED the model back, I "reefed" the 18" parachute to reduce drift.
The flight up was perfect! The model was very stable and staged perfectly. I hooted in relief when the recovery system deployed at what looked like apogee.
Recovery:
The reefed parachute worked as intended in reducing drift, but the model did come down faster than it should. It landed on concrete and caused a hairline crack in the paint along the root edge of the "black" fin. The fin joint itself was undamaged, and a tiny pit of paint (and more "Future") served to cover the damage.
A second flight, in November, using a B6-0 / B6-6 combination, was similarly successful and very dramatic.
Flight Rating: 3 out of 5
Overall Rating: 4 out of 5
UPDATE 4/01:
I'd like to follow up on my article.
I flew the Avenger again on Saturday 3/17, using the B6-0 / A6-4 combo. Another good flight, but one of the fins snapped off the booster. It should be easy to fix, but I really wish that I'd made the booster fins "through the wall" to prevent accidents like this. TTW construction adds a minimal amount of weight, takes only a little amount of extra effort, and makes the fins almost impossible to break off under normal use. (Unfortunately, the Avenger's design makes it almost impossible to make the sustainer fins "TTW.")
I also think it would be a good idea to lengthen the shoulder of the balsa transition section. The shoulder of the 5055 adapter isn't long enough to comfortably support the payload section. This could be done by asking BMS to turn the adaptor with a longer shoulder, or by adding 1" or so of BT-55 coupler to the adaptor.
On a brighter note, at least two veteran rocketeers came up and told me that they owned Avengers way back when and got a kick out of the recreation.
UPDATE 8/01:
After repairing the broken fin, I fly my Astron Avenger with motors from back when it was a production kit: A B14-0 / B4-6 combination. The B14 is a "kickass" B motor with a thrust spike higher than that of a D12. The B4 is a relatively long-burning motor.
The B14 got the model going really quickly. Staging occured less than 50 feet up. The B4 kept the upper stage moving for quite awhile. I got it back with no damage this time.
#Related Reviews
Related Products
Sponsored Ads


 |
 |