| Construction Rating: | starstarstarstarstar_border |
| Flight Rating: | starstarstarstarstar_border |
| Overall Rating: | starstarstarstarstar_border |
| Manufacturer: | First Flight Hobbies  |
 Brief:
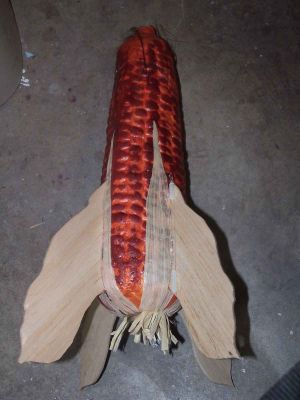
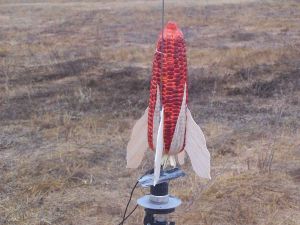
The Corn-Roc is a fall themed oddroc I was asked to beta test. It is basically a conversion of a Styrofoam ear of Indian Corn from a craft store into a rocket.
Construction:
Construction began with the building of the motor mount. A slit was made for the engine hook and the hook was secured in place with several wraps of masking tape. The mount was then marked at each end and the centering rings were slipped into place and glued. One ring needed just a touch of sanding to fit properly. When they were in place, they were glued with yellow glue. The thrust ring was the slipped into the forward end and glued into place.
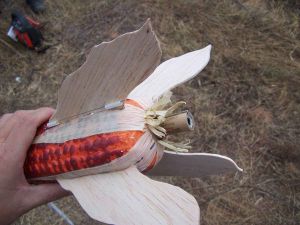
While the glue on the motor mount was drying, I turned my attention to the fins. The instructions come with a template to be cut out to mark the fins on the sheet balsa stock. I cut out the template and taped it into place on the balsa. I then roughly traced the outline with a pencil. I did not bother being too careful because I figured the individuality of the fins would add to the overall project. The fins were then cut out with an X-Acto knife.
Turning my attention back to the motor mount, I tied a loop of Kevlar around the forward end of the motor mount and filleted it in place next to the centering ring. A notch was then cut in the ring to pass the Kevlar.
I needed to give the glue fillets a chance to dry so I took the cut out fins to the spray booth. The instructions recommend to just seal the fins instead of painting them. This is to help prevent warping and leaves the fins a nice straw color to go with the harvest theme. I sprayed with Rustoleum clear. About an hour later, I gave them another coat. The next day, I sprayed the other side. The instruction make clear that any such spray should be allowed to dry fully before trying to install in the Styrofoam ear of corn. I let it dry a full day.
After the motor mount was fully dry, I passed the Kevlar through the notch I had cut and weighed the end of it with a pencil. I used the weight of the pencil to pass the Kevlar through the body tube to the forward end. A ring of yellow glue was then swabbed in the aft end of the body tube and the motor mount was pushed into place with but a bit of the motor tube protruding.
Next up, the body tube was test fit into the Styrofoam ear of corn. There were a few gaps here and there but the tube went in easily and was straight. I then removed the tube and mixed a batch of 5 minute epoxy. The instruction indicate that either yellow glue or epoxy should be used in this step and I figured epoxy would do a better job. I used a disposable brush to thickly paint the epoxy onto the body tube and the pushed it into place, leaving just a bit of the motor tube protruding.
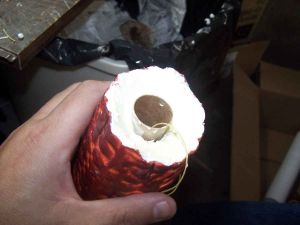
The instructions advise to coat the white Styrofoam at the forward end of the corn cob with either epoxy or glue. This is done in order to protect the foam from the ejection charge. Strangely enough, the instructions claim that the problem is only with the main body of the rocket and not with the nosecone. I figure the burning gases get forced back against the main body for a longer period of time and that the NC is protected by brief contact. In any event, I painted over the white foam with yellow glue to give it the protection it needed.
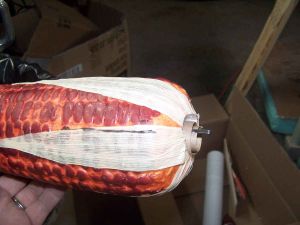
The fin template has a pair of marks indicating the placement of the launch lugs on one of the fins to keep it clear from the corn cob. I duly marked a fin, cut the lug in half and mounted the pieces at either end of the line.
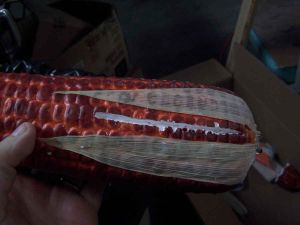
The ear of corn comes with 4 pre-marked lines for fin placement. I set a fin along each line and marked a forward and aft end. I then used a razor knife to cut along either side of the line. The pointy end of the knife was used to dig out the foam and I kept whittling away until the fins fit in their slots.
To attach the fins to the foam, I mixed up some 5 minute epoxy and drizzled it into the slots. I then pressed the fins in and used a gloved finger to smooth a fillet on each side. When done, the rocket was able to stand on its base.
The bottom of the corn ear had a bit of a gap between the Styrofoam and the body tube due to the coring of the foam. This was anticipated in the instructions and the kit came with a few bits of corn straw with which to fill in the gap. I just bent the pieces over double, dipped the middle in some glue and tucked it into the gap. It actually gives a nice appearance, but I wondered how exposed that dry material will be to the rocket exhaust. I tied to make sure that the straw is facing away from being directly in the blast zone. Overall, I like the effect.
The chute for the Corn Roc is hexagonal plastic. I think it is a Hartle Engineering Skinz based chute. Reinforcement rings were put at the corners and the shroud lines were cut into 3 equal lengths. A hole punch was used to perforate the chute material, and the shrouds were tied into place. The kit came with a snap swivel and the ends of the shrouds were passed through it and looped back.
The nose cone of the Corn Roc is simply the end of the ear of corn which has been strategically broken off and modified a bit. A balsa coupler was epoxied into the hole pre-drilled for the purpose. It fits into the body tube the way any nosecone would.
The instruction give precise instructions for balancing the rocket and provide for a margin of safety. The kit comes with a bag of BBs to glue into the Styrofoam of the NC to give the perfect trim after balancing. I know my building habits so I decided to use them all. I also like keeping rockets down where I can see them better. I wedged some of the BBs into the space between the balsa and foam and epoxied the remainder on top of them.
With that, the Corn Roc is ready for her maiden flight. I've enjoyed putting this together even if I did have to listen to some corny comments...
PROs: Easy. Distinctive.
CONs: Sarcastic comments from witnesses.

Finishing:
For the most part, the rocket is pre-finished. Its a Styrofoam ear of Indian corn with a hole in it for a motor. The only real finishing came in two places: the fins and the gap-filling straw.
As recommended by the instructions, I left the fins as a natural balsa color and only applied a clear coating to protect them. That was easy and quick.
I also that the corn straw filler to spruce up the area where too much Styrofoam had been poked out to be a nice touch and showed some foresight. I thought the result looked nice but had some concerns about the stuff being in the exhaust path and igniting. Talking with the manufacturer resulted in the realization that I had misunderstood the manner of application and I trimmed some of the fuzz back to prevent problem in flight. I liked "my look" better but it was obvious, even to me, that it might result in higher NAR insurance premiums.
PROs: Not much too it. Looks good and odd.
CONs: Mistakes are not easily fixed by replacing parts. There is a limited, seasonal run of the corn cobs.
Construction Rating: 4 out of 5
Flight and Recovery:
The Corn Roc finally flew for the first time on 22 Nov 2008, but I forgot to bring the popcorn to use for wadding!
I stuffed it with dog barf and an Estes B6-2. It turned a few heads and the turned in a creditable performance. Its not going to win any altitude or duration competitions, but it's stable and fun to fly. Click here to see a video of the first flight.
The second motor I wanted to try was the recommended C6-3. The only Cs I could find were C6-7s and C11-3s. Tim Reidy was kind enough to provide me with a C6-5, which is not a recommended motor, but I was willing to try. It actually performed well. The delay was too long but it was still safe. Click here to see a video of the second flight.
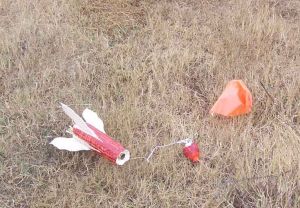
They say the third time's the charm. Well, at least the Corn Roc seems to have a charmed life. It survived being built by me and now came its ultimate test. The instructions say you can try an A8-3 if you're feeling really lucky. I was. The Corn-Roc was not. It boosted to a stunningly low altitude, nosed over and headed down aerodynamically. I later found out that the ejection charge went off right as the nosecone impacted the ground. The bouncing lawn dart flight can be seen here.
Examining the rocket after its sudden deceleration trauma revealed surprisingly little damage. The ejection charge had gone off just as it struck the ground and this resulted in a lot of internal pressure that had to go somewhere. It did manage to eject the chute, a moot point by then, but the rest of the force was directed towards inducing a zip from the engine hook. This one is a friction fit from now on. Examination of the nosecone revealed just a slight bit of cracking. The rocket conceivably could have flown again.
Two weeks later, I got another chance to fly the Corn-Roc. The only 2 changes made were to take the A8-3 off the schedule permanently and to replace the engine hook with friction fit tape. It performed flawlessly.
PROs: Interesting oddroc. Bounces well.
CONs: None.
Flight Rating: 4 out of 5
Summary:
Nota bene: This was a prototype. The manufacturer did successfully fly the rocket on an A8-3. We attribute that success to a probable early ejection. He has since taken it off the recommended list. No significant changes were needed for the production model, just a few spelling corrections for the instructions.
All in all, this was a fun rocket and will continue to be flown. It is fairly easy to build and, because of the odd design, it is easy to hide construction blemishes. It is definitely...odd.
Overall Rating: 4 out of 5
Other Reviews
- First Flight Hobbies Corn Roc By Charlaine Cadence Nordin (December 25, 2008)
Brief: The main stay of the Corn on the cob shaped oddroc collections by First Flight Hobby. This 18mm rocket once complete is interesting and fun. It promises to be a head turner and also a great flier. Construction: The parts include: One styrene foam corncob One body tube MMT 18mm tube One engine block 2 centering rings Small bag of bb's ...
- First Flight Hobbies Corn Roc By Dick Stafford (November 21, 2008)
Brief: This is a seasonal oddroc based on a Styrofoam ear of corn. It is a cool-looking, sturdy rocket and looks better in person than in photos. My beta test version flies on 18mm motors but 13mm and 24mm versions were also offered. Unfortunately, all had limited runs and more will not be available until next year. I normally don't submit reviews until I've flown a rocket but, ...
 |
 |
Flights
|
|
Sponsored Ads


")


")


|
|
J.A.L. (February 14, 2009)