| Construction Rating: | starstar_borderstar_borderstar_borderstar_border |
| Flight Rating: | starstarstar_borderstar_borderstar_border |
| Overall Rating: | starstarstar_borderstar_borderstar_border |
| Manufacturer: | PD Rocketry |
| Style: | Futuristic/Exotic |
Brief:
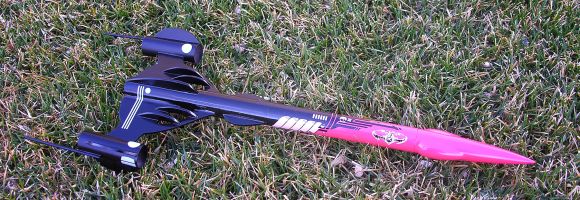
The PDR Alien Invader is a reproduction of an old Estes kit that went out of production in 1981. It has an 18mm motor
mount in a 24mm body with exotic futuristic wings.
Construction:
The first construction step is to cut out the wings and all the accompanying fins. The parts are traced onto stock
balsa using fin templates provided in the kit. Unfortunately, the templates were printed on thin copy paper, making
accurate tracing very difficult for such intricate shapes having so many curves. The balsa was also very rough, and
required several coats of diluted wood filler to reach acceptable smoothness.
The large curved fins are fit together from several smaller pieces. This is difficult because one of the pieces is a long curved arm with a small foot that must be glued to a flat edge. If you don't get the two pieces angled perfectly, then the other end of the foot will not be perfectly aligned with the other flat pieces, causing a poor or impossible fit against the body tube. Perfection is difficult here because you could easily trace, cut, or sand slightly the wrong angle. Needless to say, I did this, despite aligning all the root edges against a ruler. The problem is that the thin arm portion can be angled against the rest of the large fin piece with many subtle errors. The result was ill-fitting wings that weren't symmetric. I fixed them as best I could with lots of trial-and-error sanding. It would be far better if the larger fin piece had a notch to fit the curved arm at the right angle.
The rest of the wing assembly is easier although instructions for placing the ribs lack sufficient detail. At the end, the main wings are supposed to be installed so that the tips are slightly lower than the root, but no measurements are given, leaving it to your interpretation of the figure to decide on what "slightly" means.
The rest of the assembly involves standard Estes-style construction. The dowels look fragile, but were strong enough to survive the first flight.
The nose cone is a special bug-eyed shape that feels too thin and light. I was concerned that there would not be sufficient nose weight for stable flight, but it turned out to be okay.
The parachute is 12" of red mylar; perhaps a bit meager for this rocket.
PROS: Retro style
CONS: poor, complex templates; difficult fin assembly; some instruction ambiguities
Finishing:
I got a pretty good result for finishing. The body is simply masked a bit above the most forward fins to get a split
bi-color result with the aft portion black and the forward portion any light color. I chose watermelon pink.
It takes a lot of angling the spray paint can to cover all the nooks and crannies. Avoid the temptation to spray too much in any single layer or drips are likely.
The waterslide decals are numerous and detailed. They are extremely thin, however, so care is warranted. There is a very large black decal that should be positioned at the body color transition. This decal is slightly tricky to cut out. My copy was too long, meaning that when wrapped all the way around the body tube, there was some overlap. (Unfortunately, this occurs on the top surface of the rocket, if I interpreted the picture correctly.) As I tried to align the overlap perfectly, the thin decal tore. I fixed it as best I could and touched it up with a black marking pen later. The rest of the decals are straightforward.
PROS: Opportunity for a very good finish with intricate decals.
CONS: Thin decals.
Construction Rating: 1 out of 5
Flight and Recovery:
I loaded up a C6-5 for the maiden flight. A nasty spiral was evident during the boost. This was probably due to all
the complications with fin construction and alignment. Ejection was fine, and it seemed to me that the descent was
normal. Despite a reasonably gentle landing, however, the top 3/8 inch of the nose was broken off. This confirmed
either my worry about the thin nose cone or the small chute.
No more flights are possible until the nose is repaired.
PROS: I guess it is nice if you like spirals.
CONS: Lots of potential breaking points
Flight Rating: 2 out of 5
Overall Rating: 2 out of 5
Sponsored Ads


")


 99.5% complete")
 |
 |