| Construction Rating: | starstarstarstar_borderstar_border |
| Flight Rating: | starstarstarstar_borderstar_border |
| Overall Rating: | starstarstarstarstar_border |
| Manufacturer: | Estes  |
 Brief:
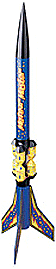
New 2003 release kit from Estes that releases three streamer recovery cluster
bombs at apogee. It flies on 18mm B and C motors to 475 feet. It is classified
as a skill level 2 kit and rightfully so. This is somewhat of a complex kit.
Construction:
I picked this kit up at my local hobby shop for $7.99, a great deal for what
you get.
The kit came packaged in an Estes trademark plastic bag with a header card showing the finished rocket. The kit included the BT-55 sized upper and lower body tubes, internal body tube, piston body tube, 3 small centering rings, 2 large centering rings, nose cone, mylar retaining ring, split centering ring, launch lug, wooden dowel, motor retention hook, shock cord, 2 bomb retention caps, 3 molded plastic bombs, die cut balsa fins, centering rings, 3 streamers, pre-assembled 18 inch plastic parachute and decals.
The instructions were the typical Estes material with great illustrations and lots of easy to understand text. Also included was the shock cord mount, piston vent hole cut out guide and the two tube marking guides. The instructions really took all the guesswork of assembling this somewhat complex kit.
For all construction, I used Pica Gluit. This stuff works fabulous on these kits. The construction begins with gluing the two piece fins together on waxed paper. This works great, the glue won't stick to the wax paper and you won't have glue all over your work area.
Next, you cut out the piston vent hole marking guide from the instructions, cut out the locations shown and tape it around the piston body tube, then, you mark the lines onto the piston tube. You now carefully cut out the vent holes, do not rush this, then you remove the guide. You then install the split centering ring into the piston tube with the notch in the middle of the line that you marked earlier. I then attached one of the large centering rings at the mark on the tube, you then attach the last large ring on the end of the piston tube opposite of the vent holes.
To finish the piston, you punch out the bulkhead from the card containing the centering rings and glue it to one of the small centering rings but the bulkhead is not installed at this time.
I now cut out the internal tube marking guide and marked all the lines required. You then attach one small centering ring at 1 1/4 inch from one end of the core tube, I then attached one more ring flush with the end of the tube. After the glue dried, I attached the wooden dowel on the launch lug line marked on the tube. You now slide the piston assembly over the centering rings, make sure it slides back and forth freely, you now permanently attach the bulkhead assembly into the top of the piston.
I attached the un-notched centering ring at this time and then mounted the motor retention hook and then the mylar retention ring to secure it. I then attached the last centering ring. You now glue the launch lug on the balsa standoff, wait for the glue to dry, then attach it on the launch lug line on the core tube.
The instructions then call for the assembly between the rear centering ring and the bottom of the piston in the retracted position to be painted gloss black at this time. I sprayed on a coat of primer and then about three light coats of gloss black.
You assemble the lower body by cutting out the lower tube marking guide and marking all the required lines. You now cut out the bottom disks of the bomb retaining caps. This took quite an effort and about two exacto knife blades. You apply a thin ring of plastic cement to the top of the lower body tube, slide the retention cap from the rear of the tube and mount it with its inside edges flush with the front of the tube.
I now attached the fins, one at a time to the lower body assembly to complete it.
The upper body is assembled in the same manner.
I now applied fillets to the fins, the instructions also had you apply fillets to the launch lug/standoff assembly, I applied them before I painted the tube assembly. After all, who wants to apply glue fillets onto paint?
I assembled the shock cord mount, waited for it to dry, then mounted it into the upper body assembly.
The instructions now tell you to attach the body sections at this time but I found it a lot easier to paint them individually and then attach them.
PROS: Nice instructions, nice parts fit.
CONS: Somewhat challenging construction, nothing major though.
Finishing:
To finish the rocket, I sprayed on a coat of Ace brand white primer, sanded,
then applied another coat. I then sprayed both sections with Ace brand Navy
spray enamel. One thing I've noticed about this paint is that it goes on as a
light blue/green and then darkens to navy as it dries.
I also painted the bombs yellow, I then brushed on the details with Testor's bottle paints. I then attached the streamers, one to each bomb.
After the navy dried, I masked it off and painted the bomb retaining caps gloss black, I then painted the nose cone black at this time.
I then mounted the core assembly into the lower body assembly. When the glue dried, I then attached the upper assembly.
I then attached the peel 'n' stick decals. I then sprayed on Ace brand Clear enamel to protect the decals. I then attached the parachute to complete the assembly.
PROS: Easy to paint, if it is done the way I did it.
CONS: Somewhat challenging to paint if the instructions are followed.
Construction Rating: 3 out of 5
Flight:
The recommended motors for this kit is the B4-2, B4-4, B6-2, B6-4, C6-3, C6-5.
This kit is somewhat heavy for it's size.
The rocket is prepped by sliding the piston assembly forward, rolling up the streamers and inserting the bombs into the lower retaining cap. You then slide the assembly down over the bombs.
You now insert some wadding into the upper body tube, I used about 5 sheets. You then load and insert the motor into the mount and it is retained by the motor hook.
My first and second flights were on the B6-4. This gave a nice slow lift-off and boost to about 110 feet but the 4 second delay is too long and I thought for sure that I had a lawn dart on the second flight. If you insist on using the B motors, use the B4-2 or B6-2.
My third and fourth flights were on the C6-3. Great flights. Nice boost to about 300 feet opposed to the 475 feet on the package. Also, the 3 second delay is perfect. I'm sure that the C6-5 would work also. I'll bet that this thing would rock on an Aerotech D.
PROS: Nice and fun flyer.
CONS: Don't use the 4 second delay motors.
Recovery:
At apogee or whenever the ejection charge fires, it pushes the upper assembly
forward releasing the bombs and deploying the parachute from the upper body
tube. This appeared to work ok but make sure your assembly slides freely every
time or you'll have a lawn dart at some point.
The 18 inch parachute is the right size for this rocket and brought the rocket down landing unharmed every time. However, the shock cord is too short. I noticed some rebound damage. Also, I noticed some paint blistering from the vent holes but it has not progressed so I'm not sure what happened there.
Just remember that the ejection charge has to perform two jobs and it has to do them both at the same time to insure a safe recovery.
PROS: Correct parachute size, bombs are fun to watch.
CONS: Shock cord length.
Flight Rating: 3 out of 5
Summary:
I really liked this rocket. It was really enjoyable to build but I only
recommend this kit if you've built a few kits already. A newcomer could run
into trouble easily with this one.
For about $7.99, this rocket was a great deal and I'll build another if anything happens to this one but I'll definitely lengthen the shock cord and possibly add some epoxy where the piston vent holes surround the body tube to hopefully prevent blistering and possibly eventual blow through.
Also, the bombs are great to watch but bring spotters. If you enjoyed this review and have built a few kits, go to your hobby shop or craft store and pick it up. Who knows how long this kit will be available before Estes decides to "pull the plug" on it.
Overall Rating: 4 out of 5
 |
 |
Flights
Sponsored Ads

")


 - 47776017535")

, 12.3 in. (31.1 cm)")

|
|