Scratch Competition Payloader Original Design / Scratch Built
Scratch - Competition Payloader {Scratch}
Contributed by Chan Stevens
| Manufacturer: | Scratch |
Brief:
For an R&D project I was doing for NARAM-47, I needed to fly at least 12
flights and record altitude for each flight using a Perfectflite Alt15kWD
altimeter. The rocket needed to be rugged, handle the altimeter payload, and
support being quickly prepped and flown so that I could get all the flights in
as quickly as possible. It also needed to be as high performance as possible,
since the experiment was to analyze competition-style rockets.
Construction:
From my spare parts stash:
- Polystyrene nose cone from ASP, size BT-20
- BT-20, two 6-inch sections
- 1/16" G10 fiberglass fins
- 2x20" mylar streamer (party store surplus)
- Kevlar® shock cord
- Nomex® heat shield
I used several official EMRR tips on this build including:
- If a fin breaks off at the fin/ body tube joint, simply carefully sand off the old glue from both the tube and the fin, then reattach.
- Party streamers. 60 ft for $2.50. Enough for nearly 30 streamers. beats paying $5.00 to Estes to make four?
- Shock Cord: Use a Kevlar® shock cord root. Also make the bungee at least 2.5 times the length of the BT.
- Always bring a bottle of medium CA to launches.
The construction is fairly straightforward since it is a basic 3FNC style rocket, so I'll elaborate on the payload construction.
The payload bay is fairly long (6") to accommodate the altimeter and nose cone shoulder plus my homemade bulkhead. Since I was working from spare parts, I made the bulkhead from a tube coupler with a disk cut from basswood. To anchor the shock cord, I tied a knot on one end of the Kevlar® line, slipped it into the payload tube, and then inserted and glued it in the bulkhead. The Kevlar® was then secured between the bulkhead and the body tube. I finished the payload bay by drilling a couple small vent holes, critical for accurate altimeter readings.
The streamer is nested in the lower portion, protected by a Nomex® heat shield. Not only does this take up less room than wadding, but it can be reloaded and prepped for flight in under two minutes (including resetting the altimeter).
Notice that the RockSim file does not include a launch lug. That's because the purpose of the R&D report was to measure the impact of launch lugs on the drag coefficient. The rocket was flown about 12 times without a lug, then a lug was attached to the fin/tube joint and flown again about 12 times on the same types of motors to compare altitudes. To eliminate weather variability, I tried for all flights in the same day. That's 24 flights on one rocket on a single day, many of which were approaching 1700 feet in altitude. Try that feat with a basic E2X kit...
Finishing:
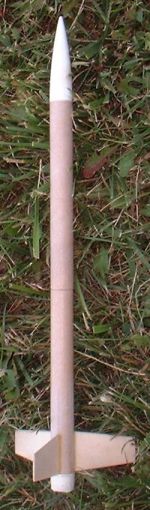
Normally competition-style rockets are not painted, but since I had already
lost a previous model (including an expensive altimeter) to 1500-2000ft
altitudes on an overcast day, I elected to paint this one florescent orange.
That made it much easier to pick up in the sky and on the field. I also sanded
it smooth with 600 grit paper and coated with automotive wax to reduce the
surface drag.
Flight:
With the fairly small fins, this rocket is only marginally stable with a C6-7,
so the altimeter actually provided enough CG shift for very stable flights.
All flights were straight as an arrow, and on a C6-7, my actual readings clustered fairly closely around 1500 feet.
Recovery:
Throughout the day, I suffered a few minor nicks/dings, including breaking a
fin loose, and a Kevlar®
line break. Remarkably, when the Kevlar®
broke, I was able to recover both sections in fairly high grass.
Summary:
PROs: Simplicity of construction, low cost materials, very good performance for
a payload carrier, and very durable.
CONs: Not suitable for official NAR payload events (payload must contain a BT-20 tube, so it needs to be slightly larger diameter).
Sponsored Ads


 |
 |