Scratch Flying Frog 3 Original Design / Scratch Built
Scratch - Flying Frog 3 {Scratch}
Contributed by Gene Wolski
| Construction Rating: | starstarstarstarstar |
| Flight Rating: | starstarstarstarstar_border |
| Overall Rating: | starstarstarstarstar |
| Published: | 2011-08-22 |
| Manufacturer: | Scratch |
 Brief
Brief
The Flying Frog 3 is a scratch built 3" diameter dual deploy rocket. I used double tube construction for extra strength - the airframe is reinforced internally with tube couplers.
Components
Parts:
- LOC 3.0" tube couplers (for reinforcement of payload and booster sections)
- Payload section: LOC 3.0" airframe, 21" long
- LOC 3.0" electronics bay
- Booster section: LOC 3.0" airframe, 24" long
- Motor tube: LOC 38mm motor tube, 17" long
- Centering rings: 3 x LOC 38mm to 3.0"
- Fins: 3 x PML FIN-B-09 (0.062" G-10)
- Motor retainer: Giant Leap Rocketry 38mm Qwik-Loc
- Rail buttons: 2 x LOC small rail buttons
Hardware:
- Nose cone: Commonwealth Displays 3/16" eyebolt
- Quick links: 2 x 3/16" quick links (hardware store)
- Electronics bay: 2 x Commonwealth Displays 3/16" eyebolt
- Forward centering ring: u-bolt (hardware store)
Electronics:
- Missile Works RRC2 mini altimeter
- Commonwealth Displays BH9VW 9v battery holder
- Terminal blocks: for ejection charge connections
- Altimeter wiring kit: bought from a Rocketry Planet auction. Nice set with quick disconnect wires.
- Keyswitch: from Aerocon Systems
Recovery:
- Main chute: PML PAR-54
- Deployment bag: Fruity Chutes 3" deployment bag
- Main Shock cord: Giant Leap 1/4" kevlar, 15' with loops
- Drogue chute: none
- Booster shock cord: Giant Leap 1/4" kevlar, 15' with loops
Construction
As noted in the description above, I opted to use double tube construction for this rocket. I installed tube couplers in the payload section airframe. Other than that, construction was little different from other HPR rockets I've built.
I added small sections of a 3" LOC centering ring to the forward and aft centering rings for rail button attachment. The forward centering ring was drilled to accept a u-bolt, the the forward and mid centering rings were epoxied to the motor tube. I slotted the booster section using a sharp hobby knife and a metal ruler. Fin spacing was done using a template from VCP. Once the fin slots were cut, I epoxied the G-10 fins in place then applied internal and external fillets. THe aft centering ring was installed, then I used JB Weld to attach the Slimline motor retainer. I then drilled the rail button holes (and actually hit the wooden centering rings!) and installed the rail buttons. Lastly, I epoxied a section of tube coupler into the top of the booster section - making sure to leave enough clearance for the avionics bay.
I assembled the avionics bay per the instructions. I drilled a hole for the Aerocon key switch as well as the altimeter vent holes. I installed terminal blocks on either end for connecting the ejection charges. I drilled small holes for the altimeter wiring and used epoxy to seal the holes once the wires were connected to the terminal blocks. I did replace the stock eyebolts with stainless eyebolts from Commonwealth Displays. I mounted the altimeter and battery holder to the altimeter sled (a piece of G-10). I drilled holes for zip ties to retain the battery as well as keep the wiring neat. I also attached the payload section and drilled two small holes for t-nuts to be used to fasten the payload section to the upper part of the avionics bay.
I attached an eyebolt to the nose cone and cut a small hole in the nose cone shoulder to drop in a nut. With some fiddling, I was able to get the nut on the eyebolt and tightened. I then inserted the nose cone into the payload section and drilled holes for the 2-56 nylon shear pins. I did this one at a time - drill one hole, insert 2-56 screw, then repeated for the other two). I then measured and epoxied tube couplers inside the payload section - again, leaving clearance for the nose cone and avionics bay.
Finishing
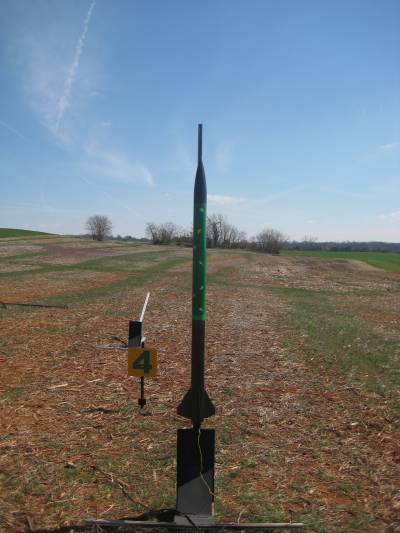
The original Flying Frog was an Estes Hi-Flier painted black and day-glo orange. With my rocket consultant (my now 5 year old son), I decided to change to metallic green and metallic black. I sanded and primed the rocket in dark gray Krylon primer. I then applied an overall coat of metallic silver followed by the metallic black and green as shown in the photos. A quick trip to the local craft store yielded some really cool frog stickers which were applied to the metallic green payload section. I clear coated the entire rocket with Krylon clear.
Flight
First flight of the Flying Frog 3 was on a CTI I345WW. RockSim and RASAero were showing a max altitude of just under 3000'. Before the launch, I assembled ejection charges using Newton's Third canisters. I ground tested successfully and recorded the main and drogue charge amounts.
On the day before the launch, I started building the ejection charges. I did reject one canister after testing with a multimeter. On launch day, I pulled a new 9v battery out of the package and checked voltage (more on that later) prior to installing it in the avionics bay. I switched on the altimeter and tested continuity with a couple of christmas tree lights. I powered the altimeter down, sealed up the avionics bay, then attached the ejection charges. I then double checked all the recovery harness connections, packed the main chute in the deployment bag, inserted the nose cone, and installed the shear pins.
I inserted the I345WW reload into the CTI case - I left the stock ejection charge in place as a backup (more on that later too). I installed the motor and screwed down the Slimline retaining ring. The igniter was taped to a fin.
After a trip to the RSO table, I loaded the rocket on a pad and installed the igniter. I switched on the altimeter and listened to the power up beeps. Once satisfied that everything was ready, I gave the LCO a thumbs up and headed behind the line to watch the launch.
Launch was awesome - arrow straight boost with a nice white smoke trail!
Recovery
Since it was "Battle of the Rockets" weekend, the flight was filmed. Pretty cool, and, as it turns out, very helpful.
I could eventually see the rocket had separated as planned (no drogue). However, no main chute deployed, and the rocket landed flat in the mud. The altimeter was beeping out 2764', and the rocket was in great shape except for one nickel sized ding in the payload section. If not for the double tube construction, the payload section would probably have been a total loss.
After turning off the electronics, I discovered that the main charge was still intact, and the drogue charge appeared to have been set off. I assumed the main charge was bad, but I was able to fire the main at home successfully. After suggestions from more experienced fliers, I checked the battery amperage and discovered that the amps were quite low despite showing 9v and being new. Now the culprit appears to have been the battery, but I was not sure why the drogue charge had fired and not the main. I puzzled over this until the BOTR DVD finally arrived with my launch footage on it.
Once I watched the video, I could see the rocket tilt over at apogee and continue to fall until finally separating well past apogee. It finally hit me - motor ejection! I think the motor ejection is what separated the rocket (and may have caused the drogue charge to fire as well). It appears that the motor ejection most likely saved this rocket.
Lessons learned:
- Always check ejection charges (did that)
- Always use a fresh battery (did that)
- Always check battery for voltage and amps (didn't check amps, will do this every time going forward)
- Don't underestimate the value of film (I'm filming all of my HPR launches from now on)
- Don't underestimate the value of motor ejection as a backup (saved this rocket)
Summary
Overall takeaways:
- strength of double tube construction
- check battery amps before flight
- consider motor ejection backup
 |
 |
Flights

Sponsored Ads


")

")


|
|