| Construction Rating: | starstarstarstarstar |
| Flight Rating: | starstarstarstarstar_border |
| Overall Rating: | starstarstarstarstar |
| Manufacturer: | Clone |
 Brief:
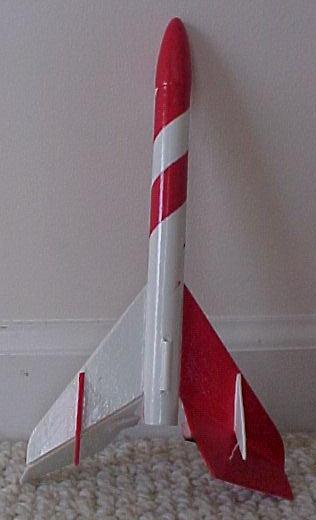
A helicopter recovery rocket. My wife's favorite, because the prep time after a recovery is about 2 minutes -- put the engine, igniter, and igniter plug in, and the rocket is ready for another go!
Components:
- Body tube: BT-20D (7")
- Nose cone: BNC-20B (balsa) (any blunt one will do)
- Fins: 2 large, 2 hinged, 4 rudders
- No motor mount, just an engine block
- No shock cord, parachute, or streamer
- Short length of elastic string
- Short length (2") of hardwood (popsicle stick works well)
- Launch lug 1"
- Hinge material (unscented bounce sheets work well)
- Other materials you will need (as usual): pencil or pen, hobby knife to cut the fins, a sewing needle, and some white glue (no plastic parts).
Construction:
Construction PROs: This rocket is pretty simple to build. There are relatively few steps, due to the simple design. Typical Estes picture-heavy instructions make everything go together well. Most of the "gotcha's" were spelled out in the instructions (gluing the fins together where the hinge goes). The only hard part of this whole "kit" is getting the elastic into the fins without destroying them. A sewing needle is almost too big, but the elastic is too thick for most everything else.
Another PRO is the sturdiness. You would think that the rocket repeatedly landing on the nose would dent it, or rip the fins off. However, while it looks like it is screaming down, it is really floating -- an optical illusion because it is spinning, I guess. Finally, there are only two fins to glue onto the body tube, so it is much easier to align than 3 or 4. You could probably use a ruler or other straight-edge to help also, if needed. Gluing the rudders is pretty easy, they need to be opposite of each other, which you can tell by sighting down the fin.
Construction CONs: Nothing really. A very simple rocket to build.
Finishing:
As this is a JimZ plans, there are not any decals supplied. So, you are free to make up your own scheme. I painted it in a spiral by painting the undercoat white, then masking off with a length of 3/4" tape. I also painted the fins and rudders alternating colors, so it really blurs when it comes down. This makes the finishing much harder than it has to be. Not too many nooks and crannies, so is easy to spray paint.
Construction Rating: 5 out of 5
 Flight:
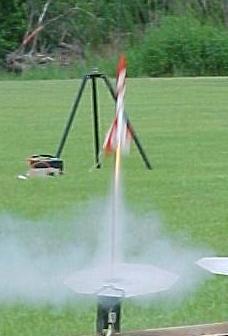
Flights are great. Put an A engine in (a B engine is almost too much, a C is out of sight for a LONG time), add an igniter and its plug, and you are good to go. The engine holds the fins straight until it ejects, which lets the elastic pull the bottom part of the fins into the helicopter configuration. No wadding to forget. No parachute to fold or get tangled. No shock cord to burn through, or cause a zipper. Man, what a waste! How are you supposed to CATO this? ;-) Mine flies pretty straight, but has a spin to it while boosting. I can't tell if I didn't position the hardwood against the engine right, or got the fins cocked while gluing them on, or the wind pushes it. However, it just adds to the "helicopter" feel!
Recovery:
The only CON here is that the elastic and hinge material wear out after a while. Mine has had about ten flights, and one fin only pulls a little. However, it doesn't seem to affect the spin much. I'll bet I have to replace both elastic strings, and maybe the hinge material too. I don't know what you could do to make it better, though! Ten flights and still going strong, better than most of my rockets ... but that's another story.
Flight Rating: 4 out of 5
Summary:
Simple to build, very simple to prep, very little to go wrong on this baby. A great rocket. An added bonus: All the old-timers get a real kick out of seeing this one, too.
Overall Rating: 5 out of 5
Related Products


 |
 |