| Construction Rating: | starstarstarstarstar_border |
| Flight Rating: | starstarstarstarstar |
| Overall Rating: | starstarstarstarstar_border |
| Manufacturer: | Eric Truax |
| Style: | Odd-Roc |
 Brief:
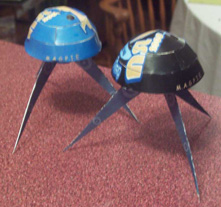
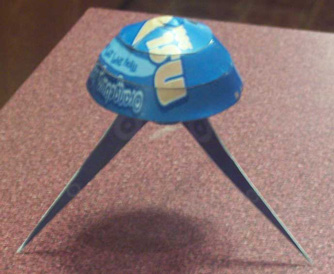
This is a paper 13mm, NSL 2008 Commemorative rocket. Some months ago, I found the link to the plans of Eric Truax's M.A.G.P.I.E.s in PDF form and downloaded them. A lull in my ability to get to my Main Rocket Lab has prompted me to try and build a couple of these interesting looking rockets. There are 2 color schemes of the same plan. Both feature artwork in commemoration of the 2008 National Sport Launch.
Construction:
The component consists of a piece of cardstock. It is used to print the plans obtained here. After that, it is just a matter of cutting out the pieces and gluing them together.
There are no instructions, per se. Only an exploded diagram. Anyone who has built a couple of rockets should be able to manage.
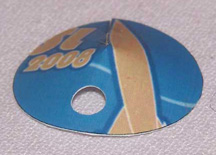 Since there were no instructions, I decided to deviate from standard practice and NOT work on the motor mount first. I cut out the top of the rocket with a pair of scissors, applied a bit of "bend" to the cardstock and glued the tab.
Inexplicably, I next headed for the motor mount. It is nothing more that a rectangle of cardstock with a glue tab that is rolled into a tube and glued. A spent motor helps in making sure the final product will be usable.
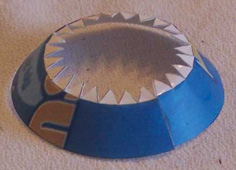 The middle section of the body is the most tedious part of the build. The long rounded strip is cut out. One edge is curved, one is straight and one is practically straight but the top edge is a pain because of all the little glue tabbies. The radius of the inner curve is such that getting the scissors lined up right is difficult without hitting the opposite edge. Patience pays off however, and the actual assembly consists of nothing more than gluing on the edge tab to form a ring. This is made slightly easier by precurving the cardstock.
The bottom ring is essentially the same as the middle except that it is a bit larger. This made it easier to cut out because the radius is not as tight. The end tab was glued to form a ring.
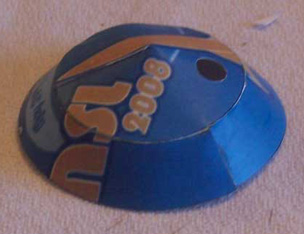 I started putting the body together by gluing the top to the middle. At first, it was madening trying to get everything lined up but I hit upon a solution that worked out well and was repeated when I build the other variant. I first glued just the section where the "S" of the "NSL" logo was matched on the top and middle sections. I held the pieces together until they were sufficiently dry and then glued the opposite side which conveniently had a rocket body to act as a match line. Once these two pieces were glued, it was fairly simple to get the rest lined up right and glued.
The same procedure was used for gluing the previous assembly to the bottom ring. I looked for match lines in the artwork and then glued opposite sides first, later getting the rest of it glued.
 The after bulkead is a simple affair that I managed to get wrong the first time. I cut it out and glued it together with the printed side being convex. It should have been concave. I figued this out after slipping the motor mount in and looking at the spacing. Fortunately, the curve was gentle enough that I was able to reverse it.
I did have some issues getting the after bulkhead to fit within the body. I had to do some sanding around the edge to get it to fit. Then when I glued it, I pushed too hard in some places and got it too far in. I finally decided that it would not be visible and let it be. The motor mount was slipped in and glued into place.
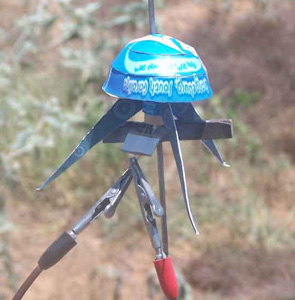
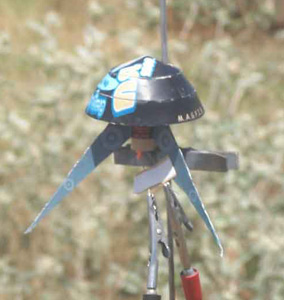
 The legs for the MAGPIE are very simple. You cut them out, fold them in half and glue. I set mine under a book to dry flat. Once assembled, They are glued to the motor mount along the preprinted lines. I dabbed the end in glue, pressed it on the motor mount and then immediately removed it. It gave it a chance to set up a bit and then pressed it on again. The seams were then filleted.
PROS: Looks good, unusual, free
CONS: Not as easy as it looks and requires some patience.
Finishing:
There is no real finishing for this rocket. You print it with one of the available designs and that's what you have. I built both the blue and the black variants.
Construction Rating: 4 out of 5
 Flight:
I apparently did not fillet the legs/fins well enough when building. When it was time to launch both variants that built had a leg coming loose. That means they both got scrubbed for the museum launch and the club launch happening the next day.
It took a month to get another launch window but when it came, I was ready. I had heard that this is a good little performer but really did not know what to expect. I chose to fly the Blue Magpie first because it was the fist one to come out of the box. I loaded it with an A10-PT, set it off and was amazed. It really screamed off the pad. It flew straight and true and tumbled gently down.
The Blue Maggie performed so well I wanted to see how well the Black Maggie would do with minimal thrust. Accordingly, I loaded a 1/4A3-3. It too flew straight but seemed to start to curve over a bit as soon as the thrust ended. It spit the motor about 50 feet off the ground but had a reasonable, if not spectacular flight.
PROS: good performer on entire range of 13mm options
CONS: Moves really fast.
 Recovery:
It goes up and it tumbles down. If the motor has an ejection charge, it flutters down. It can drift a bit on the wind and is easily hidden by shrubs but there is nothing unexpected or bad.
Flight Rating: 5 out of 5
Summary:
This is a cool looking little rocket. It takes a bit of effort but that effort is well repaid. It is probably best done by somebody with a bit of experiene and a little patience.
Overall Rating: 4 out of 5
Other Reviews
- Plan M.A.G.P.I.E. By Dick Stafford (May 24, 2008)
The M.A.G.P.I.E. (Mining Android Geological Prospecting Ion Engine) is a simple cardstock UFO-style rocket that was designed to commemorate NSL 2008. It flies on A10-PT motors and is available for download until June 15th on The Rocketry Blog . While there, make sure you check out the back story so you know exactly what you are flying. All that is needed is one sheet of 110lb cardstock. (I ...

![Curse of the Undead [VHS]](https://m.media-amazon.com/images/I/41bZa8BemnL._SL500_.jpg "Curse of the Undead [VHS]")
")


")


 |
 |