| Published: | 2010-11-13 |
| Manufacturer: | Public Missiles  |
(06/30/08) I have to admit that I have some sort of "connection" with PML kits. It was 10 years ago when I opened my first PML kit, the Callisto, and I still remember the "Wow" affect that I received back then as this was my first mid/high power rocket.
The Callisto is a simple 3-fin and a nose cone design, but it just had a classic look for me. At NARAM-40, I was successful in getting my NAR Level 1 certification on that Callisto.
 So fast forward 10 years. I had a desire to build a new high power
rocket for the up-n-coming NERRF4. Wanted something straight-forward, easy to finish, and that could fly on 38mm motors
without going out of sight. Enter the PML Ariel.
So fast forward 10 years. I had a desire to build a new high power
rocket for the up-n-coming NERRF4. Wanted something straight-forward, easy to finish, and that could fly on 38mm motors
without going out of sight. Enter the PML Ariel.
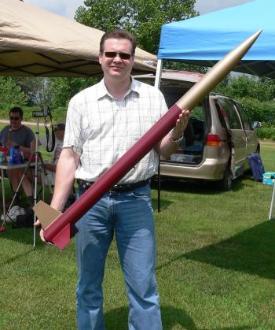
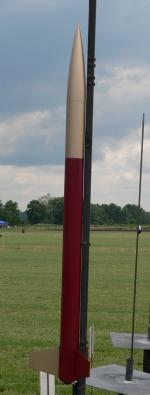
The Ariel sports the same 3-fin and a nose cone classic design of the Callisto but on a 3.1" airframe. It stands over 58" tall.
The kit comes with two pieces of Quantum Tubing, a PML plastic nose cone, G10 Fins, a piston recovery system with a 36" parachute, a Kwik-Switch motor mount system, a single decal, and launch lugs.
CONSTRUCTION:
The instructions are printed in multiple formats. There is a base assembly instruction booklet with detailed illustrated steps. Then there are several leaflets on Tying Tubular Nylon, Choosing a Motor Retainer, Quantum Tube, Piston Ejection System Assembly, and Kwik-Switch Motor Mount.
The Kwik-Switch Motor system is built first. It consists of the main 54mm motor tube that has a threaded (inside) retainer/end-piece glued in place first. The remaining 38mm and 29mm motor tubes have a threaded (outside) retainer/end-pice glued in place that, when used, would screw into the 54mm motor tube. Then a 38mm to 54mm and a 29mm to 54mm centering ring is glued on the 38mm and 29mm motor tubes, respectively opposite the threaded piece. This completes this simple but effective system.
The upper (slotted for the strap) centering ring is glued in place next. Then the nylon piston strap is glued in place on the outside of the 54mm motor tube with epoxy.
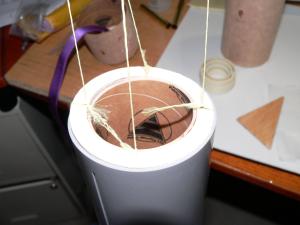 The lower centering ring is not glued in place yet.
PML recommends placing tape around the lower centering ring and placing it on the motor tube. This is to allow the ring
to be in place while gluing the motor mount and through-the-wall fins in place, but then allowing it to be removed to
apply internal fillets (or foam). It would then be glued in place after the interior work is complete. I like this
method and have used it on other builds. This time, I used Kevlar®
thread instead of scotch tape (see picture).
The lower centering ring is not glued in place yet.
PML recommends placing tape around the lower centering ring and placing it on the motor tube. This is to allow the ring
to be in place while gluing the motor mount and through-the-wall fins in place, but then allowing it to be removed to
apply internal fillets (or foam). It would then be glued in place after the interior work is complete. I like this
method and have used it on other builds. This time, I used Kevlar®
thread instead of scotch tape (see picture).
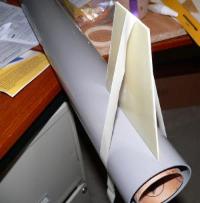 The G10 fins are glued in place next. The Quantum is pre-slotted so
naturally this is an easy step as well. Once the fins are glued in place I made my external fin fillets using
epoxy.
The G10 fins are glued in place next. The Quantum is pre-slotted so
naturally this is an easy step as well. Once the fins are glued in place I made my external fin fillets using
epoxy.
 After removing the aft centering ring I used Gorilla Glue to
form my internal fillets. I did this by squeezing an ample amount of glue down the two joints (fin to motor tube and
fin to interior body tube) and allowed it to run down the length of the fin. Then I set the rocket so the fin joints
were horizontal and allowed the glue to dry.
After removing the aft centering ring I used Gorilla Glue to
form my internal fillets. I did this by squeezing an ample amount of glue down the two joints (fin to motor tube and
fin to interior body tube) and allowed it to run down the length of the fin. Then I set the rocket so the fin joints
were horizontal and allowed the glue to dry.
Since Gorilla Glue expands, I found this "growth" to be interesting. Obviously the glue found a small hole in my external fin fillets right at the top of one of the fins! (I trimmed it off).
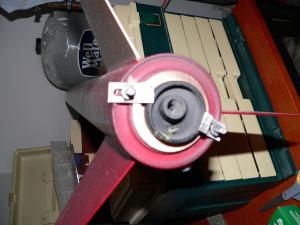
I drilled two holes and epoxied two screws (facing out) to be used for motor retention. (Shown here with the spent I211 in place)
 For finishing I used 400 grit sand paper to sand the entire
outside fo the rocket. I then used Plasti-Kote Primer. This was followed by Dupli-Color automotive paint and then
finished with Dupli-Color's Clear Effex™ which adds "... tiny metallic particles that change color at
various angles of light."
For finishing I used 400 grit sand paper to sand the entire
outside fo the rocket. I then used Plasti-Kote Primer. This was followed by Dupli-Color automotive paint and then
finished with Dupli-Color's Clear Effex™ which adds "... tiny metallic particles that change color at
various angles of light."
Once the rocket was finished I add two rail buttons. Be careful doing this, because the upper button has to be lower than the piston inside the body tube.
Overall, for CONSTRUCTION I would rate this kit 4 ½ points. In many ways building this kit is easier than many Estes kits. Instructions are good and the materials are top notch. To stay consistent with my previous ratings of kits, I would say a bit more pizzazz could be put into the decals (but I'm not so sure many high power fliers would use them). Quantum tube and G10 fins finish like a dream!
 FLIGHT/RECOVERY:
My finished rocket weighed in at 3.1 lbs (49.75 ounces) and my CG was at 36".
As I stated, I wanted to get this built and ready to fly at NERRF4. I had an Aerotech I211 and I161, both with Medium delays looking for a rocket to fly in... no really, they were calling out to me, "fly me, burn me, launch me". (Okay, a little scary, right?)
RockSIM indicates that I should get about 4000 feet on the I211 and that I needed about 11 seconds for delay and so I loaded it up.
I then re-checked my piston for easy movement inside the body tube. Sometimes in the heat of the day, things can tighten up with this type of recovery system, so always check it. (Likewise, after flights, clean your piston and the inside of the Quantum tube.)
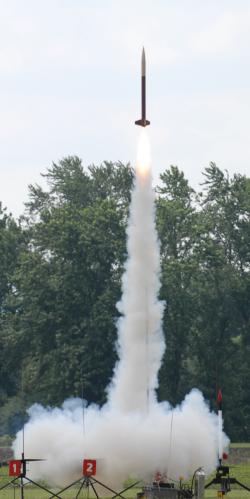
After RSO check-in and loading up on the pads, I waited for the final count down and lift-off. The I211 came up to speed and the rocket ripped off the pad. The flame looked to be 3 feet long coming out of the back of this rocket, even though I only had a second to see it. The launch earned a "down town" exclamation from the LSO (listen to the video). It generated a "Wow" feeling in me again.
The rocket came under 'chute and landed several fields over. Overall, outstanding and thrilling flight for me.
The 10 second delay must have not been enough, because upon inspection I had a small crack at the top of the body tube and clearly the nose cone (gold) whapped the body tube hard (red) based on the red scuff on one side of the cone. I choose not to fly it again until I can do some repair work.
 For FLIGHT/RECOVERY, I would rate this rocket
5
points. I realize I have only flown this rocket once, but it is perfectly stable and has a great variety of
flying options from 29mm to 54mm motors.
For FLIGHT/RECOVERY, I would rate this rocket
5
points. I realize I have only flown this rocket once, but it is perfectly stable and has a great variety of
flying options from 29mm to 54mm motors.
NOTE: I paid for the picture on the right that someone (Brian?) took of my rocket taking off. A bit washed-out (because of the angle of the sun), but look at the length of that flame!
I look forward to flying it again at a large launch and I hope to try it on a G, H, and another I. Not ready to go to Level 2 though, but if/when I am, it will probably be on this PML Ariel.
I give the rocket an OVERALL rating of 5 points. As I stated in the intro, my "connection" to PML kits is because of the ease of getting into mid/high power rocketry with them. The Ariel is no exception and it would be a great Level 1 and Level 2 rocket. The simple classic lines and ease of build and finishing are all very satisfying.
Other Reviews
- Public Missiles Ariel By Michael Mangieri
Brief: Single stage HPR sport rocket with parachute recovery. Construction: The components are all top-notch. The kit contains two Quantum Polymer (QT) body tubes: a main airframe and a 9" long payload section. The main airframe is slotted, always a nice touch, and the payload section is large enough for most electronics. If you've never used QT before, you must give it ...
 |
 |
Flights
Sponsored Ads


|
|