Descon The Lusty Cornmaiden
Scratch - The Lusty Cornmaiden {Scratch}
Contributed by Kevin Trojanowski
| Manufacturer: | Scratch |
The Lusty CornmaidenIn honor of Bob's twisted humor |
|
What would inspire someone to build a rocket named The Lusty Cornmaiden, you ask? An innocent Rocket Talk, including Bob Fortune would be the answer. This week (late February), a group of us were chatting about our launch sites and surrounding rocket-eating crops when Bob said something about lusty cornmaidens hiding in the corn waiting to attack dweeby rocketeers. The conversation then turned to exceedingly corny puns, and an idea struck. Why not build a rocket with a corn theme? Of course, now the difficult question is what to use? Corncobs seem perfect... Cheap... Lightweight... Totally atypical rocket material... |
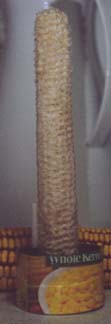 |
Collecting the partsFortunately, this is a pretty easy build. I realized that a 13mm motor will fit into a corncob, so there's no need for ANY form of conventional body tube, unlike my first idea. Get your hands on some field corn, often sold for feeding squirrels and similar critters. A couple of cans of corn for decorating material (labels), a 3/4" launch lug, and a box of some sort made of light cardboard, and you're set. |
 |
AssemblyFind a decent sized ear of corn and strip all of the kernels off. Next, cut a strip of cardboard approximately 7.5" long and 3/4" wide. Finally, remove the labels from the cans of corn. Form the strip of cardboard into a ring and use a small strip of paper to join the ends. Glue the labels from the can onto the outside of the ring, strictly for aesthetic purposes. Set aside the just completed ring fin. Use a 1/2" drill bit to bore a hole into the base of the corn cob which is deep enough to hold a 13mm motor with approximately 1/8" sticking out the bottom. Some sanding of the hole will likely be required to allow a 13mm motor to fit without needing a winch to remove it. Five minutes with a Dremel and a small sanding drum works wonders... Cut two short strips of cardboard approximately 1" long and 1/2" tall. Use an X-Acto knife to two shallow slits in the corn cob approximately 1/2" from the end with the hole, on opposite sides from each other. Use CA to glue one end of a strip into each slot, to form two tabs on which the ring fin can be mounted. Hold the corn cob upside down (drilled end up) and center the ring fin over the end. Make a pencil mark on each tab to indicate where the ring touches each tab. Set the ring aside and cut each tab 1/8" beyond the pencil mark. Fold each tab at the pencil mark then slide the ring over the tabs. The tabs should now hold the ring in place. Adjust the folds as necessary, then glue the ring on with CA. Use liberal amounts of CA to glue the launch lug onto the corn cob just above the ring fin.
|
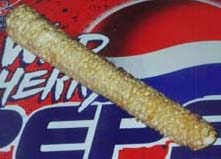 |
Launch Report03/04/2001 Okay, time to try again. This time, it's serious, so out comes an A10-0T. No recovery system, so the lack of delay shouldn't be an issue. 5... 4... 3... 2... 1... Whoosh! And away she goes! Nice, straight boost followed by a nice POP! as the motor ejects. Hmmm... That recovery doesn't quite look like a tumble... No, matter of fact, that looks rather ballistic... WHUMP! Nose first into the ground less than 10 feet from the bad, and the ring fin pops off. That wasn't in the original plan... I have a redesign planned to resolve this without dramatically complicating the design or construction, and without adding a parachute or streamer to contend with. Once I've done a test flight, I will post an update. |
|
Sponsored Ads


 |
 |